My blog has moved!

You should be automatically redirected in 6 seconds. If not, visit
http://www.spachethespatula.com/
and update your bookmarks.

Monday, November 30, 2009

Thow-It-Together Pumpkin Soup

IMG_0709

I have been unnaturally obsessed with pumpkin this fall and was really craving a meal featuring the fine squash. I looked in the pantry and saw 2 cans of pumpkin puree. I walked to the fridge, another half can, "Pumpkin soup!" I said aloud. For the first time in like EVER, I didn't feel like looking up a recipe and just decided to completely wing it. 
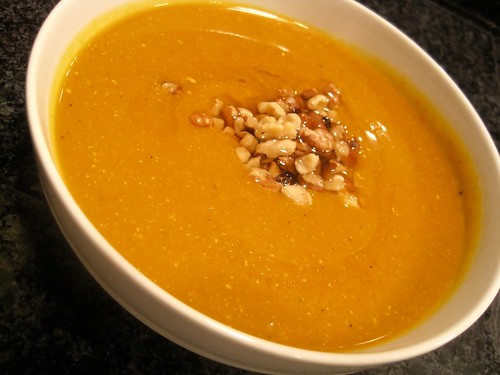
The soup turned out surprisingly yummy, especially when served with a nice buttered hunk of crusty bread! It seems to me, however, that it would make a much better appetizer rather than a meal. A nice small bowl would be perfect before lunch or dinner. A huge bowl of it kind of gets hard to eat towards the end- not because it doesn't taste great- my taste buds just tend to get sick of the pumpkin-y flavor after so many bites.

IMG_0707

Throw-It-Together Pumpkin Soup

All amounts are approximations as I literally just tossed whatever I had into the pot.

ingredients:
  • 2 1/2 cans (15 ounce) of pure pumpkin puree
  • 1 tbsp butter
  • 1/2 medium onion, chopped
  • 1/2 large carrot, chopped
  • 2 garlic cloves, minced
  • 2 sprigs of fresh thyme
  • 1/2 tsp fresh oregano leaves
  • 2 tsp salt
  • 1 tsp freshly ground pepper
  • 1/2 cup chicken broth
  • 2 1/2 cups vegetable stock
  • 1/2 cup water
  • 2 tbsp half-and-half (all I had, haha)
  • 1/4 cup 2% milk
  • 2 tbsp sherry vinegar
  • walnut oil, to garnish
  • toasted walnuts, chopped to garnish
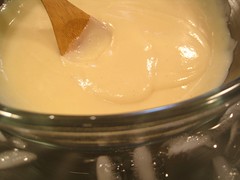
  1. In a dutch oven, melt the butter over medium-high heat. Add in the onions, carrot, garlic, salt, pepper, thyme, and oregano, Cook for about 4 minutes, stirring often, until the onions are translucent and the carrots begin to soften.
  2. Add the chicken broth and vegetable stock to the pot and raise the heat to high. Bring to a boil and continue to cook for about 15 minutes. Remove from heat. Using a large ladle, add the soup to a blender (or simply use an immersion blender if you have one!) and puree. Return the soup back to the pot.
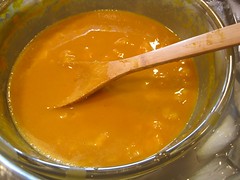
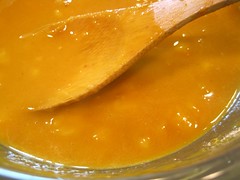
  3. Add the pumpkin to the soup and stir to combine. Turn the heat to medium-high and bring the soup to a simmer. When thoroughly heated through, stir in the sherry vinegar, milk, and half-and-half.
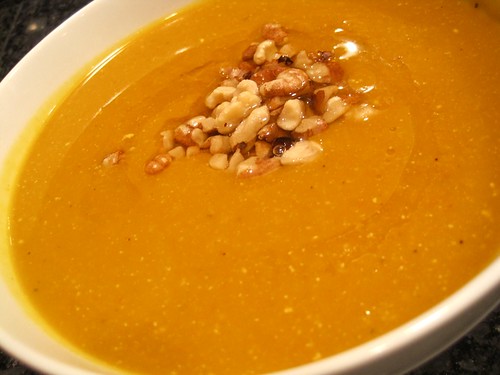
  4. Ladle into bowls and drizzle with walnut oil; sprinkle with toasted walnut pieces and serve!
IMG_0703

Sunday, November 29, 2009

Chocolate-Covered Salted Peanut Cajeta Cups

IMG_0691


I first saw this basic recipe on David Lebovitz's blog a few months back and my initial thoughts were that I needed to make these little chocolate cups. Yet, somehow, months passed and I still hadn't made them. Well, when I saw the altered recipe over at Salty Seattle just a few days ago, the replacement of the caramel with the cajeta (basically a dulce de leche made with goat's milk instead of cow's) just sang to me and I immediately bought all of the ingredients.
These bitty cups are ah-mazing! The cajeta imparts a unique flavor that you can't quite obtain with simple caramel. It's so delicious that I'm sure you wont be disappointed by the fact that the cajeta recipe I'm giving you makes more cajeta than you'll need for the chocolate cups.


IMG_0686
Aren't they pretty?

IMG_0692


Chocolate-Covered Salted Peanut Cajeta Cups
recipe from here

ingredients:

filling:
  • 1/2 cup cajeta (recipe below)
  • 1/2 cup raw Spanish peanuts
  • 1 tbsp butter
  • 1 tsp fleur de sel
chocolate cups:
  • 20+ small baking cups
  • 6 ounces semisweet chocolate (I used Scharffen Berger)
  • 6 ounces bittersweet chocolate (I used Lindt)
  • Finishing salt (I used Cyprus flake salt and Hiwa Kai- black, charcoal-dusted, Hawaiin sea salt)
  1. Preheat oven to 350 degrees.
  2. Roast the peanuts, butter, and salt in the oven for about 15 minutes, stirring a couple times to ensure even coating (I roasted mine in a mini cast iron skillet because it happened to be the absolute perfect size!). Remove from the oven and stir the mixture into the cajeta. IMG_0599
  3. Melt the chocolate in a double boiler or in the microwave (checking every 30 seconds).
  4. Using a small spoon, dab a bit of the chocolate into the bottom of each baking cup. Spread it around so that it evenly coats the bottom and up the sides. IMG_0667 
  5. Now fill each cup with about 1 teaspoon of the cajeta/peanut mixture. IMG_0674 
  6. Finally, top each cup off with more of the chocolate and spread it around so the top is smooth and the chocolate drips down the sides of the baking cup just a bit. Sprinkle with some finishing salt before the chocolate dries.
  7. Place in the fridge to harden for at least 10 minutes and, voila!- Heaven in a cup!
IMG_0694

Cajeta
recipe from Rick Bayless (who I am absolutely obsessed with as of late)

ingredients:
  • 1 quart goat's milk
  • 1 cup granulated sugar
  • 1/2 cinnamon stick
  • 1/4 tsp of baking soda dissolved in 1 1/2 tsp water
  1. In a dutch oven, combine the milk, sugar and cinnamon stick over medium heat. Stir until the milk comes to a simmer and the sugar is dissolved. 
  2. Remove from the heat and stir in the baking soda/water. It should foam up, and after the bubbles subside, return to the heat.
  3. Maintain the mixture at a "brisk simmer" and stir regularly until the mixture becomes a pale golden color. This will probably take about an hour, and though it may seem like a while, the end product tastes more amazing than you will ever know.
  4. Begin stirring quite frequently, scraping down the sides, as the mixture turns a more caramel-y brownish color and thickens to a more syrup-like consistency. IMG_0645IMG_0648IMG_0647IMG_0646 Don't be alarmed when the mixture starts bubbling up like this. It wil do this many times during the cooking process and always goes back down (at least mine did).
  5. To test the cajeta, Rick suggests dropping a couple of drops on a cold plate. The caramel should be the consistency of a medium-thick caramel sauce when cool. He says that if your mixture is too thick, you should stir in a tablespoon of water and remove from the heat.
  6. When done, pour the cajeta through a fine-mesh strainer and, when cool, refrigerate until you are ready to use.

Friday, November 27, 2009

Thanksgiving!

IMG_0536


What a wonderful holiday! Everyone just sits around and stuffs their faces until it's near impossible to move. I love it!
My Thanksgiving this year was small, but big in flavor. It was spectacular! I spent it with my boyfriend, Mikey, and his parents and even though I did really miss my family, it was really delightful .
We had so much food! I brought over the desserts and cranberry sauce and then whipped up some mashed potatoes and roasted asparagus when I got there. John cooked an excellent turkey and made the most delicious turkey stock that created a gravy that was simply sublime. Amy made some amazing stuffing and a lovely homemade applesauce.
Everything was so phenomenally good that it's hard to put into words! To better explain everything, here are some photos:


Cooking dinner:


tday3


The gorgeous table:


tday4
IMG_0531
Isn't the china just beautiful?


Mmmm, feast!:


IMG_0532
Yes, I'm a dark meat fan for the initial meal, but I prefer the white meat for the classic leftover turkey sandwiches.


IMG_0534
Yep, I did eat everything on that plate if you were wondering.


Finally dessert (x2!):


IMG_0550
IMG_0545


IMG_0554
IMG_0556
Pumpkin Banana Cream Pie- which we we all far too full to eat by the time it was served but still ate anyway!

Thursday, November 26, 2009

Egg Nog Ice Cream

IMG_0544


It was my first year making many of the Thanksgiving Day treats all by myself. One of the first things to cross off my list was the ice cream! This I knew I could make ahead and it wouldn't suffer a loss in flavor. Ice cream is one of my very favorite things to make, and once you get the custard base down, it's incredibly easy.
I made the custard base for my ice cream Tuesday night before bed so it could chill in the fridge over night. All I had to do today was pop it into the ice cream machine this morning and let it churn baby churn! ...Or so I thought. Then, I realized that I forgot to freeze the stupid bowl for the ice cream machine! This ice cream gave me so much trouble! So of course, the freezer was apparently set to burning hot because 5 hours in the freezer still didn't freeze the bugger. I tried churning it like 4 different times and each time it wasn't cold enough so I would put the bowl back in the freezer and wait some more. Finally, I just decided to put the custard in the freezer to help the cooling down. This was a mistake because it made it sort of icy. When we wen't over to Mikey's parents' house for dinner I decided to bring the ice cream machine with and see if it would freeze at their house. It did! But... I soon realized that I forgot the whip portion of the ice cream machine and had to stand there holding two spoons in the custard to act as a replacement. Hahaha, but after all the hassle the ice cream caused me, it paid off.
This ice cream is absolutely delish, even if it was a weence icy, and I'm not even really a fan of egg nog! I served it with some Pumpkin Shortbread and the two were practically made for one another!


Egg Nog Ice Cream
recipe from here


ingredients:
  • 2 cups heavy cream
  • 1 cup whole milk
  • 6 large egg yolks
  • 2/3 cup granulated sugar
  • 4 whole cloves
  • 1/4 tsp cinnamon
  • 1 tsp freshly grated nutmeg
  • pinch of salt
  • 1 tsp vanilla extract
  • 2 tbsp brandy
  1. Heat the milk, 1 cup if the cream, the cloves, cinnamon, nutmeg, and salt in a saucepan over medium heat until steamy. Remove from heat, cover, and let the spices steep for at least 30 minutes.
  2. Remove the cloves, and heat the mixture over medium heat. Add in the sugar and stir until dissolved.
  3. Make an ice bath in a large bowl and set a smaller bowl inside. Pour the remaining 1 cup of cream into the bowl and set a fine mesh strainer over top.
  4. Whisk the egg yolks in a bowl. Slowly add some of the warm mixture to the yolks while continuously whisking. Next, add the egg yolk mixture into the warm milk/cream, still whisking all the while. You want to temper the yolks, not make scrambled eggs.
  5. Continuously stir the custard over medium heat until it coats the back of a wooden spoon. You should be able to run your finger across the spoon and have the custard not run (the temperature of the custard should be around 170-175 degrees).
  6. Once the custard has reached the desired consistency, immediately pour it through the strainer into the bowl of cream. Stir until the mixture is chilled. Put the custard in the fridge to cool completely (at least a few hours- overnight is best).
  7. Once the mixture is thoroughly chilled, stir in the vanilla and brandy and process in an ice cream maker according to the manufacturer's directions.
  8. Serve immediately as soft serve, or freeze in the freezer until ready to use.
IMG_0549

Roasted Garlic Mashed Potatoes

IMG_0530


What is Thanksgiving without mashed potatoes? Not Thanksgiving, that's what. Mashed potatoes are one of the most delectable sides and are super versatile. You can add nearly anything to them- herbs, cheeses, vegetables, etc. I decided on a very yummy roasted garlic mashed potato. Roasted garlic has a wonderful flavor to it- savory with the smallest hint of sweetness from the caramelization that happens in the oven.
These potatoes were out of this world good! They were an excellent addition to our Thanksgiving feast, and even better drowned in gravy!


IMG_0529


Roasted Garlic Mashed Potatoes
recipe slightly adapted from here

ingredients:
  • 1 1/2 lbs red potatoes
  • 1 head of garlic
  • 1/2 cup half-and-half
  • 2 ounces cream cheese
  • 1/4 cup butter
  • salt and pepper, to taste (you're going to need a ton of salt)
  • chives, chopped, to garnish
Roasting the garlic:
  1. Preheat oven to 400 degrees.
  2. Peel the outer covering off of the head of garlic, but leave the the casings around the individual cloves. Cut the very top of the head off so that the tops of the cloves are exposed. 
  3. Place the head of garlic in the cup of a muffin tray and drizzle with olive oil. Cover the top with tin foil. 
  4. Bake for 30-35 minutes, or until the cloves are golden in color and feel soft.
Making the mashed potatoes:
  1. Boil the potatoes until fork tender (20-30 minutes). Drain the potatoes.
  2. Mash the potatoes with the roasted garlic, half-and-half, cream cheese, and butter. Season to taste with salt and pepper.
  3. Garnish with chives, or any herb of your choice (or leave it out like me!).
IMG_0528

Pumpkin Banana Cream Pie

IMG_0523


As much of a travesty it is against Thanksgiving, I have never really been a fan of pumpkin pie. I know, I know, first egg nog and now this?! See I know it's an issue, that's why this year I made a compromise with myself and decided on a pie containing pumpkin, but not an actual pumpkin pie. As soon as I saw this glorious creation over at CakeSpy, I knew it was perfect for me.
I present to you, Pumpkin Banana Cream Pie! This pie is surprisingly amazing (yes I snuck a taste before Thanksgiving, shhh!). Who would have thought that pumpkin and banana could go together so well? Though it is a bit labor-intensive, I highly recommend it as a delightful alternative to the traditional pumpkin pie (also, the brandy-whipped cream is insanely delicious). It should be noted, too, that the orange in the pumpkin custard really freshens up the pie.


IMG_0525
Isn't my throw-away pie-tin just gorgeous? Hah. Ew.


Pumpkin Banana Cream Pie
recipe slightly adapted from here

ingredients:

for the pie crust:
  • 1 cup unsalted butter, diced and cold
  • 2 tbsp granulated sugar
  • 2 cups self-rising flour
  • 2 large egg yolks
  • 3/4 banana chips, crushed in food processor
for the pastry cream layer:
  • 1 cup whole milk
  • 1 cup 2% milk
  • 1 tsp vanilla extract
  • 1 tsp vanilla paste
  •  2 large eggs
  • 1/2 cup + 2 tbsp granulated sugar
  • 3 tbsp all-purpose flour
  • 2 bananas thinly sliced (these will sit right on top if the pie dough)
for the pumpkin custard layer:
  • 1/2 cup half-and-half
  • 15 ounces (1 can) pumpkin puree
  • 1 cup dark brown sugar, lightly packed
  • 3/4 tsp salt
  • 1/4 tsp ground ginger
  • 1/4 tsp freshly grated nutmeg
  • 3 large egg yolks
  • 1 banana, mashed
  • 2 tsp (1 package) unflavored gelatin
  • 1/2 tsp orange zest
  • 1/4 cup freshly squeezed orange juice
for the whipped cream:
  • 1 1/2 cups heavy cream, chilled
  • 1/4 cup granulated sugar
  • 1 1/2 tbsp brandy
Make the dough:
  1. Pulse the butter, sugar, and flour in a food processor until large crumbs form. Add the yolks and pulse until the crumbs are moist.
  2. Press into an 11-inch pie or tart pan and then press the banana chip crumbs into the dough.
  3. Refrigerate covered for around 30 minutes.
  4. Bake in a 375 degree oven for 20-25 minutes.
IMG_0473

Make the pastry cream:
  1. Warm the milk in a medium-sized saucepan until it just about comes to a boil. Add the vanilla extract and vanilla paste.
  2. Fill a large bowl with water and ice to create an ice bath for the pastry cream.
  3. In a bowl, whisk together the eggs, sugar, and flour until well-combined. Temper the eggs (like when making ice cream) by adding about 1/3 cup of the scalded milk mixture into the egg mixture, while whisking. Add the egg mixture to the remainder of the milk mixture of the saucepan, still continuously whisking. Whisk over medium-high heat until the pastry cream thickens and begins to bubble. Continue to whisk for 4-5 minute longer, until the pastry cream is very thick.
  4. Remove from heat. Transfer the pastry cream to a bowl and set the bowl into the ice bath. Stir occasionally until cool.
  5. Place a piece of plastic wrap directly onto the surface of the pastry cream to prevent a skin from forming over the top. Refrigerate until completely cold- the pastry cream will thicken as it cools.
IMG_0462IMG_0465

Make the pumpkin custard:
  1. Heat the half-and-half, pumpkin, brown sugar, salt, ginger, and nutmeg over a double boiler until hot- around 5 minutes.
  2. Whisk the egg yolks in a bowl and temper them with some of the hot pumpkin mixture (just like when making the pastry cream). Then pour the egg/pumpkin mixture into the double boiler, continuously stirring. Heat the mixture for another 4-5 minutes, stirring constantly, until it begins to thicken and reaches 160 degrees. Remove from heat.
  3. Dissolve the gelatin in the orange juice. Add the dissolved gelatin, banana, and orange zest to the pumpkin mixture and mix well. Cool in the ice bath you used for the pastry cream and then chill in the fridge until cool.
IMG_0468IMG_0469
You can see the mashed banana, mmm!

Make the whipped cream:
  1. In an electric mixer fitted with a whisk, or with a hand-held beater, whip the heavy cream with the sugar and brandy until stiff peaks form. Set aside
IMG_0512

To assemble:

When the pastry cream, pumpkin custard, and dough are all cooled, assemble the pie by layering fresh banana slices onto the dough. Smooth the vanilla pastry cream on top of the banana slices, smoothing the surface. Next add the pumpkin custard layer and smooth it out. Finish with the whipped cream. Decorate with fresh banana slices or banana chips. Be sure to let the finished pie chill in the fridge for at least two hours prior to serving!

IMG_0508
IMG_0521

*I made the dough, pastry cream, and custard all yesterday and let them chill in the fridge over night. Then this morning I just whipped the cream and put together the pie and had it chilling until we were ready for dessert!

Pumpkin Shortbread

IMG_0496


By now you should realize that I loooove me some shortbread... probably a little too much. But, when I saw the recipe for this pumpkin shortbread, I knew that it would go way too well with the egg nog ice cream that I had planned, and thus, I just had to make it! C'mon, who can honestly resist the buttery goodness that is shortbread (don't tell me if you can, because if that's the case, I'm not sure I want to know you)?
This shortbread is super tasty and, though I did make a pie as well, you could completely forgo a pie and simply serve this at Thanksgiving! I'm sure you would hear no complaints (just don't forget to serve it up with some of the ice cream).
This shortbread is softer than most because of the moist pumpkin, and packs a ton of flavor into each bite. You could fairly easily turn these into little cookies but I like the look of the little tart slices (especially if you do decide to make this instead of a pie!).


IMG_0495
IMG_0502


Pumpkin Shortbread
recipe slightly adapted from here


ingredients:
  • 1 1/4 cups all-purpose flour
  • 1/2 cup cornstarch
  • 1/2 tsp salt
  • 1 tsp pumpkin pie spice (I made my own with 1/2 tsp cinnamon, 1/4 tsp ground ginger, 1/8 tsp freshly grated nutmeg, 1/8 tsp allspice)
  • 3/4 cup unsalted butter, at room temperature
  • 2/3 cup confectioner's sugar
  • 1/2 cup pumpkin puree
  • Turbinado sugar, for sprinkling
  1. Preheat the oven to 300 degrees. Grease a 9.5 inch fluted tart pan with removable bottom. Set aside.
  2. Combine flour, cornstarch, pumpkin pie spice, and salt in a medium-sized bowl.
  3. In the bowl of an electric mixer fitted with a paddle attachment, cream together the butter and sugar until light and fluffy. Add pumpkin and mix until combined. Add flour mixture and mix until just combined.
  4. Spread the dough into the greased pan and smooth the top.
  5. Bake for about 80 minutes, until firm and golden brown. Remove from oven and sprinkle with turbinado sugar. Cool for at least ten minutes. Remove side from pan and cut with serrated knife.
IMG_0499

Wednesday, November 25, 2009

Maple Brown Sugar Cranberry Sauce

IMG_0479


When I think of Thanksgiving, I immediately think of cranberry sauce. Maybe it's just my family, but for us, cranberry sauce has always been a quintessential part of the Thanksgiving feast. This is the first year that I'm making my own (as it is for all of my Thanksgiving goodies this year).
This cranberry sauce is so delicious and I imagine it will be even more fabulous when paired with a tasty turkey! It's perfectly sweet and tart with a nice maple flavor. Additionally, the orange zest gives it a nice little kick of freshness.


IMG_0526


Maple Brown Sugar Cranberry Sauce
recipe adapted from here

ingredients:
  • 24 oz fresh (or frozen and thawed) cranberries
  • 1 cup pure maple syrup
  • 1 cup brown sugar
  • 1/2 water
  • 3/4 tsp maple extract
  • 1/2 tsp orange zest
  1. If you are using fresh cranberries be sure to wash them first and pick out any weird looking berries. IMG_0442
  2. In a dutch oven or large sauce pan, combine all of the ingredients. Stir well and set the mixture over medium-high heat until it comes to a boil. Stir mixture.
  3. Reduce the heat to medium and simmer for around 15 minutes, or until the cranberries burst (it's cool because you can here the little berries popping!), stirring frequently. IMG_0451
  4. Transfer the mixture to a bowl or tupperware and chill in the fridge until ready to use. IMG_0456
Yum, yum, yum!
IMG_0481

Saturday, November 21, 2009

Apple and Carrot Shortbread

IMG_0415


After the tasty mess I made with the Lemon Cornmeal Shortbread Cookies, I decided I should try to make a shortbread that was more... aesthetically pleasing. I saw these Apple and Carrot Shortbread Cookies over at 101 Cookbooks a while ago and had added the recipe to my "to bake" list.
The little cookies were definitely not your typical shortbread, but my are they a delicious (and healthy-ish!) alternative. The apple and carrot make a delightful combination, and you still get that yummy buttery flavor present in all shortbreads, but they are softer than your standard shortbread. They would also be great with a bit of turbinado sugar sprinkled over each cookie prior to baking!


Apple and Carrot Shortbread
recipe from here

ingredients:
  • 2 ounces semolina flour
  • 6 ounces whole wheat pastry flour
  • 1/4 tsp baking powder
  • 1/2 tsp salt
  • 5 ounces unsalted butter, at room temperature
  • 3 1/2 ounces brown sugar
  • 2 ounces carrot, grated
  • 1 ounce apple, grated
  • zest of one lemon
  • milk, for brushing cookies
  1. Preheat oven to 350 degrees. Line a baking sheet with a silicone baking mat or parchment paper. Set aside.
  2. In a medium-sized bowl, mix together the semolina flour, pastry flour, baking powder, and salt. Set aside.
  3. In the bowl of an electric mixer fitted with a paddle attachment, cream together the butter and sugar until light and fluffy.
  4. Stir the carrot, apple, and lemon zest into the flour mixture until evenly dispersed.
  5. Slowly add the flour mixture to the butter/sugar mixture with the speed set to the lowest setting. Mix until just combined.
  6. Scrape the dough out onto a clean surface and knead a couple of times so that everything comes together. Halve the dough and flatten each piece into a thick patty. Wrap each in plastic wrap and chill in the refrigerator for at least half an hour.
  7. Roll the dough out onto a lightly floured surface until it is about 1/2 inch thick. Use sharp cookie cutters to stamp out cookies and place them on the baking sheet.
  8. Brush each cooking with a bit of milk and bake for around 10 minutes (mine baked for 11 minutes) or until the edges of the cookies begin to turn golden. Cool cookies on baking sheet for at least 5 minutes and then transfer to a wire baking rack for further cooling.
IMG_0423
Related Posts with Thumbnails