My blog has moved!

You should be automatically redirected in 6 seconds. If not, visit
http://www.spachethespatula.com/
and update your bookmarks.

Monday, May 31, 2010

Hot Milk Sponge Cake with Balsamic Berries and Stabilized Whipped Cream

IMG_6483


For reasons I can't even explain, I had been non-stop craving a light cake with berries and cream for the past couple of weeks. Totally random thing to crave, I know, but nonetheless it wouldn't let up and I knew I had to act, hah.
I found this recipe for a basic sponge cake and it looked absolutely perfect. The suggestion was to serve it with balsamic berries and my-oh-my.... DELICIOUS!
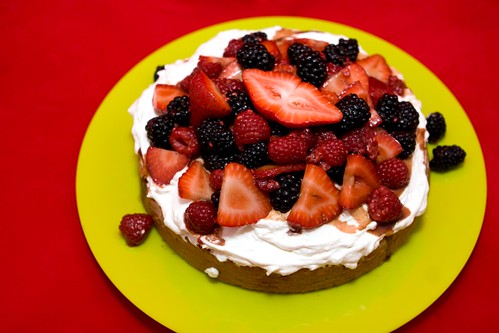
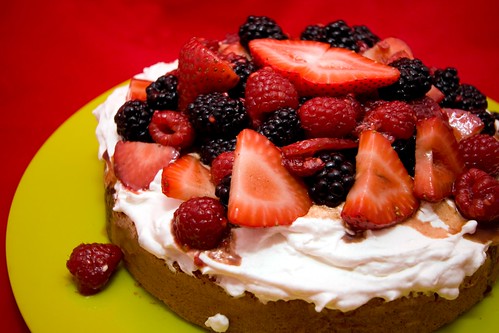
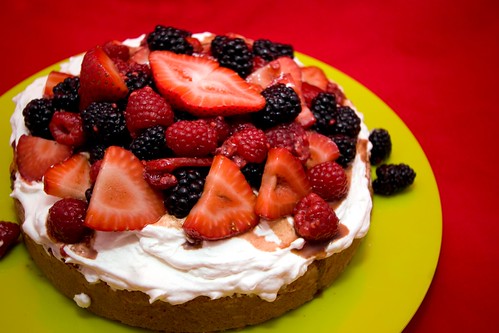
This cake far exceeded my expectations. It is so light, sweet, and amazingly moist, and paired with the slightly sweetened whipped cream and balsamic macerated berries it was absolutely out-of-this-world! I am SOOO glad that the recipe made two cakes because I could not wait to dig in to one straight out of the oven before I could manage to take even a single picture. A really great perk about this cake is that the whipped cream is stabilized so it will hold it's shape for hours (even days!).
This cake makes an outrageously beautiful and simple summer dessert.

IMG_6509
IMG_6486
IMG_6502

Guess what? This is my 100th post on my blog! I can't believe it! It seems like I just started it yesterday, hah, but it's been eight months already!
To show my appreciation for the support that you all have given me in my cooking/baking endeavors, I will be doing a giveaway on my 108th post. 8 is my lucky number so that's my logic behind the odd choice, so keep an eye out for a potential special gift from me to you :P!


Hot Milk Sponge Cake
recipe from here

ingredients:
  • 2 cups all-purpose flour
  • 2 tsp baking powder
  • 1 tsp sea salt
  • 4 large eggs
  • 2 cups granulated sugar
  • 1 cup whole milk
  • 2 tbsp butter
  • 2 tsp vanilla extract
  1. Preheat oven to 350 degrees. Butter and flour two 9-inch round cake pans (or one 13x9-inch pan).
  2. In a medium bowl, combine the flour, baking powder, and salt and set aside.
  3. In the bowl of an electric mixer fitted with the whisk attachment, beat the eggs for around 4 minutes. With the mixer on medium speed, slowly add in the sugar and beat for about 7-8 minutes until the mixture is thick and comes off of the whisk in a ribbon when the whisk is lifted.
  4. While the eggs and sugar are beating, bring the milk and butter to a low boil in a small saucepan. Remove from heat and stir in the vanilla.
  5. With the mixer running on medium speed, slowly add the hot milk mixture to the egg/sugar mixture and mix until combined. Reduce the speed to low and slowly add in t he flour mixture just until combined. Immediately pour the batter into the prepared pans and place in the oven.
  6. Bake for 20-25 minutes or until the edges are golden and slightly pulling away from the sides. A toothpick inserted into the center should come out clean. Leave the cake in the pan for around 5 minutes to cool before turing the cake out onto a rack to cool further.
  7. Top with whipped cream and balsamic berries (recipes below).
Stabilized Whipped Cream

ingredients:
  • 2 cups heavy whipping cream
  • 2 tsp vanilla
  • 2 tbsp confectioners' sugar
  • 2 tbsp cool water
  • 1 tsp plain gelatin
  1. About 15-20 minutes before you want to make your whipped cream, pop the bowl (metal please) and beaters you will be using into the freezer.
  2. Combine the cool water and gelatin in a small bowl and allow to sit for about 5 minutes so that the gelatin can absorb, then place it in the microwave for about 5-10 seconds until liquid and allow to cool to room temperature (make sure it is still a liquid!).
  3. Beat the cream, vanilla, and sugar together until slightly stiff. Add in the gelatin/water and beat until stiff peaks form.
Balsamic Berries

ingredients:
  • 2 cups mixed berries (I used sliced strawberries, raspberries, and blackberries), washed
  • 1 tbsp + 1 tsp aged balsamic vinegar
  • 2 tbsp fine grain sugar (caster sugar)
  • pinch of freshly ground pepper
  1. Combine all of the ingredients together in a bowl and toss to combine. Refrigerate for 15-30 minutes before serving.


IMG_6479
IMG_6478

Saturday, May 29, 2010

Brown Butter Chocolate Chip Toffee Walnut Cookies


IMG_2722

Yes, these cookies are just as good as they sound... maybe even more amazing.
These are basically a chocolate chip cookie-lover's ultimate indulgence. The nutty brown butter, the gooey chocolate chips, and the crunchy toffee walnuts (that you will have to physically restrain yourself from downing all of before they can make it into the cookie dough) all unite to form one of the most outrageous cookies I have ever encountered.
The texture is absolutely perfect; they are crisp, yet still chewy, and so addicting that you should probably bake them when you have guests over lest you eat the entire 3-4 dozen all by yourself!
Oh, and might I add, these cookies make GREAT ice cream cookie sandwiches with a bit of vanilla ice cream nestled in between!
p.s.- Please excuse these horrid photos. The cookies were a few days old when I took them (still absolutely incredible tasting though!), and I used my old, trusty point-and-shoot.

IMG_2706
IMG_2728
IMG_2707

Brown Butter Chocolate Chip Toffee Walnut Cookies
recipe slightly adapted from here
makes about 3-4 dozen

ingredients:

toffee walnuts:
  • 2 tbsp unsalted butter
  • 1/4 cup granulated sugar
  • 1/2 tsp sea salt
  • 1 1/2 cups chopped walnuts (toasted if you want)
cookie dough:
  • 1 cup unsalted butter (2 sticks)
  • 4 1/2 cups all-purpose flour
  • 2 1/2 tsp baking powder
  • 2 tsp sea salt plus more for sprinkling
  • 1/2 cup unsalted butter (1 stick), at room temperature
  • 2 cups firmly packed dark brown sugar
  • 1 cup granulated sugar
  • 4 large eggs
  • 1 tbsp + 1 tsp vanilla extract
  • 12 ounces semisweet chocolate chips
for the toffee walnuts:
  1. Melt the butter in a small saucepan over medium heat. Stir in the sugar and salt and bring to a boil. Boil for 1-2 minutes, stirring frequently, until golden brown. Add in the walnuts and stir until well-coated.
  2. Pour the mixture out onto a sheet pan and allow to dry.
for the dough:
  1. In a medium-sized bowl, mix together the flour, baking powder, and salt. Set aside.
  2. Melt 1 cup of butter in a small saucepan over medium heat. Continue to cook the butter for 5-7 minutes, until it begins to brown, foam, and smell nutty. Remove from heat and set aside.
  3. In the bowl of an electric mixer fitted with the paddle attachment, beat the 1/2 cup of softened butter with the sugars until well combined, about 2 minutes. Next, beat in the browned butter for an additional minute. Add in the eggs and vanilla and beat until well combined. Reduce the mixer speed to low and slowly add in the flour mixture and beat until just combined. Add in the chocolate and toffee walnuts and combine. Chill dough in the fridge for at least an hour.
  4. When ready to bake, preheat oven to 375 degrees. Line baking sheet with silicone baking mats or parchment paper.
  5. Roll the dough into 2-ounce balls and place on prepared baking sheets an inch or two apart; flatten slightly. Sprinkle a bit of sea salt on each dough ball.
  6. Bake for 12-14 minutes or until golden brown. Cool for about 2 minutes before transferring cookies to a wire rack to cool further.
IMG_2723

Thursday, May 20, 2010

Cinnamon-Sugar Popovers (in a muffin tin!)

IMG_2654


Popovers have always intrigued me; alas, a popover tin is one of the many awesome kitchen gadgets still on my wish-list. Thus, I figured without that integral piece of equipment, I wouldn't be able to successfully bake any- that is until I found this recipe on David Lebovitz's site!
These cinnamon-sugary treats are reminiscent of those massive fried "elephant ears" that you can buy at the fair. They are sooo good- super crispy, buttery, and all-around glorious. The best way (read: only way) to eat them is nice and warm out of the oven, freshly dredged- talk about a decadent breakfast! But, they will still be yummy the next day if kept in a air-tight container ;).
I presume they would be just as good rolled in powdered sugar as opposed to a cinnamon/granulated sugar mixture.


IMG_2677
IMG_2660
IMG_2685


Cinnamon-Sugar Popovers
recipe from here
makes 10

ingredients:

for batter:
  • 2 tbsp butter, melted
  • 3 large eggs
  • 1 cup whole milk
  • 1 tsp sea salt
  • 1 1/2 tsp granulated sugar
  • 1 cup all-purpose flour
for cinnamon-sugar coating:
  • 1/4 cup butter, melted
  • 2/3 cup granulated sugar
  • 1 tsp cinnamon
  1. Preheat oven to 400 degrees. Butter a standard-sized muffin tin and set aside.
  2. In a blender, combine the butter, eggs, milk, salt, and sugar. Whiz for a few seconds until combined. Add in the flour and whiz for about 10 seconds until fully combined.
  3. Pour into the greased muffins cups, filling each 1/2-2/3 of the way full.
  4. Bake for 35 minutes, or until deep brown in color. Let cool for a couple of minutes until they can safely be handled.
  5. Combine the cinnamon and sugar in a medium-sized bowl.
  6. Brush each popover with the melted butter, and then dredge each in the cinnamon-sugar. Gobble up!
Cinnamon-Sugar Popovers
IMG_2653

Wednesday, May 19, 2010

Slow-Cooker BBQ Beef with Sweet Cole Slaw

IMG_6410TEXT


Mikey and I have owned a slow-cooker for quite some time now but have actually never used it (shame on us!). It's not that I never wanted to, it's just that I'm so used to preparing such labor-intensive meals when I do cook, that the prospect of throwing something in the pot and then turning it on only to touch it again hours later was completely foreign to me. How terrible is it that I'm intimidated by something being too easy to cook?
Anyways, we both had been craving BBQ lately and I have always wanted to make some myself, so I thought it would be the perfect occasion to try out the slow-cooker. 
I found this great recipe for BBQ beef and it could not have been easier. Seriously, what was I thinking waiting this long to toss something in the crock pot?! I literally put it in in the morning, added the sauce when I got back from class, whipped up the coleslaw a couple hours later, and then viola! Dinner in a flash (well it technically took like 10 hours... but my personal input was minimal)!
This BBQ beef is absolutely sublime, you guys! It's sweet, tangy, and oh-so-comforting. And, paired with the cool slaw it is the perfect entree for a dinner outside on a summer evening. I served mine up on cute little Brioche buns, but they would also be great on Hawaiian rolls (any slightly sweet roll really).
Oh, and just so you know, this makes AWESOME leftovers :).


IMG_6417
IMG_6413
IMG_6408


Slow-Cooker BBQ Beef
recipe adapted from here

ingredients:
  • 3 1/2 lb beef chuck roast
  • 1 cup water
  • 1 tbsp + 1 1/2 tsp apple cider vinegar
  • 2 tbsp dark brown sugar
  • 2 tbsp honey
  • 1 tsp dry mustard
  • 2 tbsp Worcestershire sauce
  • 1 1/2 cups ketchup
  • 1 tsp sea salt
  • 1/4 tsp freshly ground pepper
  • 1/8 tsp cayenne pepper
  • 1/4 tsp red pepper flakes
  • 2 cloves garlic, minced
  1. Place the roast in the slow-cooker along with the water. Cover and cook on low for 4 hours.
  2. Remove 1/2 cup of the broth from the slow-cooker and discard.
  3. In a medium-sized bowl, mix together all of the remaining ingredients. Pour over the meat; cover and continue to cook for 3 more hours on low.
  4. Remove the meat from the slow cooker (try to shake off the excess juices/sauce) and shred on a cutting board using 2 forks. Try to remove the fat from the meat now as well. Place back in the slow-cooker, mix around with t he sauce/juices, and cook for 3 more hours on low.
  5. Serve on buns topped with Sweet Cole Slaw (recipe below).
Sweet Cole Slaw
recipe adapted from here

ingredients:
  • 1 10-ounce bag of shredded cabbage for cole slaw
  • 6 ounces broccoli slaw mix
  • 1 shallot bulb, diced (2-3 tbsp)
  • 2/3 cup Miracle Whip (it's sweeter than mayo)
  • 2 tbsp vegetable oil
  • 2 tbsp granulated sugar
  • 1 tbsp apple cider vinegar
  • 1/4 tsp sea salt
  • 1/2 tsp poppy seeds
  1. Combine the slaw mixes and shallot in a large bowl.
  2. In a medium-sized bowl, whisk together the remaining ingredients. Pour over slaw and toss to coat.
  3. Chill at least 2 hours prior to serving
IMG_6412

Friday, May 7, 2010

Momofuku Milk Bar's Crack Pie

IMG_6323


After seeing this pie just about everywhere across the blog-o-sphere for the past couple of months, I finally got around to making it myself. So, does it live up to all the hype? Oh you bet, and then some! In fact, Mikey proclaimed that this pie was the best thing I have ever baked- and I bake A TON!
Before the pie was even remotely finished I knew it was going to be a winner. I could not stop eating the batter for the pie crust cookie- my goodness it tasted AMAZING! And then, oh and then the filling, yes this was perfect as well- 8 raw egg yolks and all, hah.
I made the pie to bring to Mikey's parents' house for dinner the other night and they loved it. I am so glad  that this recipe makes 2 or else I never could have left the first with them!
Everything about this pie is sheer perfection- the sweet, crunchy crust, the ooey-gooey filling, the whole package! It basically tastes like pecan pie, minus the pecans.
But, it is rich (and so not healthy considering it includes 3 1/2 sticks of butter, heavy cream, and a kajillion tons of sugar) so I recommend starting with a very tiny piece and going from there. It also probably didn't help that I accidentally put a whole stick of butter in the crust as opposed to a half, ha ha.


IMG_6307
IMG_6326


Momofuku Milk Bar's Crack Pie
recipe from here
makes 2 10-inch (though I used 9 1/2-inch dishes and it turned out great) pies, 8 slices each

ingredients:

cookie for crust:
  • 3 ounces all-purpose flour
  • scant 1/8 tsp baking powder
  • scant 1/8 tsp baking sodA
  • 1/4 tsp sea salt
  • 1/2 cup (1 stick) unsalted butter, at room temperature
  • 2 1/2 ounces brown sugar
  • 1 1/4 ounces granulated sugar
  • 1 large egg
  • 3 1/2 ounces rolled oats
crust:
  • crumbled cookie for crust
  • 1/4 cup (1/2 stick) unsalted butter
  • 3/4 ounce brown sugar
  • 1/8 tsp sea salt
filling:
  • 10 1/2 ounces granulated sugar
  • 7 ounces brown sugar
  • 1/4 tsp sea salt
  • 3/4 ounce milk powder (dry milk)
  • 1 cup (2 sticks) butter, melted
  • 3/4 cup + scant 2 tbsp heavy cream
  • 1 tsp vanilla extract
  • 8 egg yolks
other:
  • prepared crusts
  • confectioner's sugar, for garnish
make the cookie for the crust:
  1. Preheat oven to 375 degrees.
  2. In a medium-sized bowl, combine the flour, baking powder, baking soda, and salt. Set aside.
  3. In the bowl of an electric mixer fitted with the paddle attachment, cream the butter and sugars together for a few minutes. Add in the egg and mix until fully incorporated. Slowly add in the flour mixture, on low speed, and mix until just combined. Stir in the oats.
  4. Spread the mixture onto a 9x13 baking sheet and bake 18-20 minutes, until golden brown and set.
  5. Let the cookie cool a bit and then crumble and reserve for pie crusts.
make the crust:
  1. Combine the crumbled cookie, butter, sugar, and salt in a food processor and pulse until combined. The mixture should hold together when pressed with your fingers.
  2. Divide the crust between to pie dishes and press down to form a thin even layer on the bottom and up the sides. Set aside.
make the filling & assemble:
  1. Preheat the oven to 350 degrees.
  2. In the bowl of an electric mixer fitted with the whisk attachment (or by hand), mix together the sugars, salt, and milk powder. Add in the melted butter and mix to incorporate. Then, add in the cream and vanilla and combine. Gently mix in the egg yolk, being careful not to add too much air.
  3. Divide the filling between the two pie crusts.
  4. Bake the pies, one at a time, for 15 minutes. Then reduce the oven temperature to 325 and bake for about 10 more minutes, until the filling is jiggly and golden brown.
  5. Cool pies on a rack before transferring them to the fridge to chill (pies should be served cold).
  6. Before serving, dust with the confectioner's sugar.

Thursday, May 6, 2010

Chocolate Cinnamon Hazelnut Cookies


Chocolate Cinnamon Hazelnut Cookies

These are like the cookie version of the Cinnamon Hazelnut Brownies I made a couple of weeks ago, and they are every bit as glorious!
Once again I have the wonderful Sugar Plum to thank for these. Her recipe doesn't call for any cinnamon, but after how tasty the cinnamon hazelnut combination was in the brownies, I knew it would be amazing in these cookies as well. Oh how right I was, how right indeed!
They are chewy yet fluffy (very soft straight out of the oven and a bit crisper after a couple of hours) with crunchy hazelnuts throughout, and completely over-the-top when dunked in milk. You will love these, and that is a promise. I mean really, who could ever dislike anything that contains Nutella???
I also feel like these cookies would be great for making whoopie pies (or something of the sort?) or ice cream sandwiches. I can just imagine a delectable cinnamon whipped cream or a beautifully simple homemade vanilla ice cream placed smack dab in between two of these babies. Mmmm, heaven! Someone try this and report back on my yummy suspicions, please!


Chocolate Cinnamon Hazelnut Cookies


Chocolate Cinnamon Hazelnut Cookies
recipe adapted from here
makes about 30 cookies

ingredients:
  • 1/2 cup unsalted butter
  • 2 ounces dark chocolate
  • 1/4 cup granulated sugar
  • 1 3/4 cups all-purpose flour
  • 1 tsp baking soda
  • 3/4 tsp sea salt
  • 1 1/4 tsp cinnamon
  • 3/4 cup Nutella (or other chocolate-hazelnut spread)
  • 2 large eggs
  • 2 tsp vanilla extract
  • 1 cup coarsely chopped hazelnuts, toasted
  1. Preheat oven to 350 degrees. Line baking sheets with silicone baking mats or parchment paper.
  2. In a small saucepan over medium heat, brown the butter. It should turn golden brown, foam, and smell nutty (it will take around 3-4 minutes). Remove from heat and stir in the chocolate until melted.
  3. In a small mixing bowl, combine the flour, baking soda, cinnamon, and salt. Set aside.
  4. In the bowl of an electric mixer fitted with a paddle attachment, beat together the sugar and butter/chocolate mixture for a few minutes. Add in the Nutella, eggs, and vanilla and beat until combined. Slowly add in the flour mixture and beat on low until just combined. Stir in the hazelnuts.
  5. Scoop onto the prepared baking sheets about an inch apart (I used a medium-small cookie scoop for this); flatten the balls slightly. Bake for 12-15 minutes until set (I baked mine for 12). Cool for a few minutes on the baking sheet before transferring to a wire rack to cool further.
Chocolate Cinnamon Hazelnut Cookies

Sunday, May 2, 2010

Dark Chocolate Peanut Butter Banana Bread

IMG_6203


If you haven't noticed yet, chocolate and peanut butter are two of my very favorite flavors; however, when combined, the flavor produced may just be the best flavor ever. Add some banana in there and you have a combination that can only be described as sensational!
Sugar Plum is quickly becoming my very favorite blogger. All of her recipes are right up my alley and have yet to disappoint! This Chocolate-Peanut Butter Banana Bread of hers is extraordinary!
There is a one-two punch of peanut butter in this bread- first you have the actual peanut butter itself mixed in the batter, and then you have delicious gems of peanut butter chips throughout!
I recommend eating this banana bread nice and warm out of the oven with a tall glass of ice cold milk. You could even spread a little butter on your piece so it gets all melty and seeps down into the bread- mmm, sinful yet oh-so-satisfying!


IMG_6210
IMG_6207


Dark Chocolate Peanut Butter Banana Bread
recipe from here

ingredients:
  • 2 1/3 cups all-purpose flour
  • 1 tsp baking powder
  • 1 tsp baking soda
  • 1/2 tsp sea salt
  • 1/3 cup dark chocolate chunks + more for sprinkling
  • 1/3 cup peanut butter chips + more for sprinkling
  • 2 rather ripe bananas
  • 3/4 peanut butter (I used a mixture of creamy and chunky)
  • 1/2 cup granulated sugar
  • 1/2 cup packed brown sugar
  • 2 large eggs
  • 1 1/2 tsp vanilla extract
  • 1/2 cup milk
  • 1/4 cup unsweetened cocoa powder
  1. Preheat oven to 350 degrees. Butter and flour a 9-inch loaf pan and set aside.
  2. In a medium bowl, combine the flour, baking powder, baking soda, and salt. Stir in the chocolate chunks and peanut butter chips so they are coated.
  3. In the bowl of an electric mixer fitted with a paddle attachment, beat together the bananas and peanut butter until creamy. Add in the sugars and beat for an additional minute or two. Add in the eggs and vanilla and beat until combined. Reduce the mixer speed to low and alternately add in the flour mixture and the milk- beginning and ending with the flour.
  4. Pour half of the batter into another bowl and beat in the cocoa powder.
  5. Alternately add spoonfuls of each batter to the prepared pan. Swirl a butter knife through the batter to create a marbled effect. Sprinkle the top with more chocolate chunks and peanut butter chips.
  6. Bake for 60-65 minutes or until a toothpick inserted into the center comes out with moist crumbs attached.
IMG_6209
Related Posts with Thumbnails