My blog has moved!

You should be automatically redirected in 6 seconds. If not, visit
http://www.spachethespatula.com/
and update your bookmarks.

Sunday, April 11, 2010

Spanish Varillas, or "Rods"- Tapas Night Part 2 of 3

IMG_5866


As soon as I saw this recipe over on Kayotic Kitchen, I knew that it would make an awesome addition to my Tapas Date Night menu!
These little Spanish "rods" (as they are so lovingly called- "varillas"), are not only incredibly tasty, but truly unique! Have you ever seen anything like them? I know I haven't!
I switched up the recipe a bit. I used prosciutto di parma in place of serrano ham (jamรณn serrano) because Whole Foods didn't carry the latter. I would have really preferred the serrano though to keep with my Spanish theme. In case you aren't familiar, the difference between the two is that serrano ham has much less fat, and it is a bit drier.
I also used a goat's milk cream cheese as opposed to cow's milk. I was originally going to just substitute the cream cheese for goat cheese (which I still think would be great), but as soon as I saw the goat's milk cream cheese I was sold.
Goat Cream Cheese
For my greens I chose baby arugula for the nice spicy bite it lends, but any green would do here- play around!
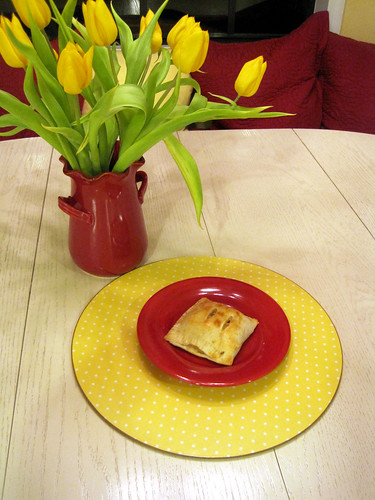
I thought these turned out incredible! They were super easy to make, but packed a ton of flavor. The tangy creaminess of the goat's milk cream cheese paired with the salty, chewy prosciutto and crisp bread stick is a combination so divine that I had to have 2! While that may not seem like a lot, these guys are over a foot long each!


IMG_5849
IMG_5864


Spanish Varillas, or "Rods"
recipe adapted from here

As you can see there are no exact amounts here. You can make as many or as few as you want. Everything is made to your own personal tastes!

ingredients:
  • prosciutto di parma (or serrano ham), sliced very thin
  • crispy bread sticks (you could get flavored ones if you want but I just stuck with the traditional)
  • goat's milk cream cheese (I found this at Whole Foods)
  • chives, diced
  • sun-dried tomatoes (I only used one), minced
  • pinch of fresh ground pepper
  • pinch of sea salt
  • baby arugula
  1. Mix together the chives, pepper, sea salt, sun-dried tomato, and cream cheese in a small bowl.
  2. Spread the cream cheese mixture over one side of a slice of prosciutto and add the arugula on top of that.
  3. Carefully roll the prosciutto around a bread stick. Repeat for as many as your heart desires.
  4. Serve with leftover cream cheese mixture to dip!
IMG_5850

Saturday, April 10, 2010

Manchego Crackers with Marcona Almonds- Tapas Night Part 1 of 3

IMG_5855
IMG_5872
Lately I have been craving all sorts of Spanish food, and to satiate these desires, I decided to have a Tapas Date Night for Mikey and myself!
This is just the first recipe of the three in total I will be posting in the coming days, but it just might be the best! I originally saw the recipe here, but it had no recipe attached so I had to search a bit.
These little crackers turned out awesome- super crunchy, tons of vibrant flavor, and a perfect vessel for dulce de membrillo, also known as quince paste! 
IMG_5861
Membrillo is commonly served with Manchego cheese in Spain, and thus I knew it would be a match made in heaven! Each of the components (Manchego cheese, Marcona almonds, and quince) all fit flawlessly together is this super easy appetizer. The bite of the Manchego paired with the sweetness of the quince, and then the crunch of the Marcona almonds is a true delight for the taste buds! I also served a Spanish olive medley, extra Marcona almonds, and a Goat Patacabra (cheese) on the side.
I think these crunchy, little crackers would also be wonderful topped with some very lightly dressed arugula or something. The great thing about the recipe is that it's really versatile- it's a base that you can add any number of flavorings to, maybe a bit of honey or a tiny pinch of saffron- the possibilities are endless.

IMG_5868
Spanish Olive Medley:
IMG_5857
The gloriousness that is Marcona almonds:
IMG_5863
IMG_5867


Manchego Crackers with Marcona Almonds
recipe very slightly adapted from The New Spanish Table, but it can also be found online here
makes 30-40 crackers

ingredients:
  • 4 tbsp unsalted butter, at room temperature
  • 1 cup (about 1/4 lb) grated Manchego cheese (I used one that was aged for 12 months)
  • 1 1/4 cups all-purpose flour
  • 1/2 tsp sea salt, plus more for the egg wash
  • 2-5 tbsp water, as needed
  • 1 large egg
  • about 40 Marcona almonds
  1. In the bowl of an electric mixer fitted with a paddle attachment, mix together the butter and cheese until well combined. Scrape down the sides of the bowl and then add in the flour and salt. Mix on low speed until the dough just comes together. If the dough isn't coming together, drizzle in the water until it's workable.
  2. Turn the dough out onto a piece of plastic wrap, knead a few time to bring it together,  and form it into a log about 1 1/2 inches in diameter (you can make them round or square- it's your call). Wrap the log in the plastic wrap and refrigerate for at least an hour or up to 4 days.
  3. Preheat oven to 350 degrees. Line two baking sheets with parchment paper or silicone baking mats and set aside.
  4. Slice the dough into 1/4 inch rounds and place them on the prepared baking sheets 1 inch apart.
  5. Mix the egg and a pinch of salt together and then brush the egg wash onto the tops of the crackers. Press an almond onto the top of each.
  6. Bake until golden, about 15 minutes. Transfer to a wire baking rack to cool.
IMG_5856
IMG_5869
And I'll leave you with a little preview of the next recipe to be posted- those crazy looking things on the left side:
IMG_5852

Friday, April 9, 2010

Chocolate Peanut Butter Marble Cake

Chocolate Peanut Butter Marble Cake

It's been awhile! I have been wanting to bake for weeks, but I couldn't find anytime with school.
Though I didn't have any special occasion, I decided I really wanted to bake a cake (must be all that pent up baking desire, hah). I found this awesome recipe for a chocolate peanut butter cake, and that being one of my all-time favorite flavor combinations, it was settled- plus it helped that I had every ingredient on hand.
Oh. My. Goodness. This cake is easily one of the best things that I have ever put in my mouth! The frosting is honestly out-of-this-world- so creamy and luxurious, yet somehow still light and fluffy! I ate a good 1/4 cup of it while frosting the cake- be careful with this stuff guys... It's dangerously addictive. The actual cake itself is definitely something to behold on its own. It's soft but not too crumbly, and the peanut butter cake and chocolate cake mix together to form a heavenly, familiar combo.
Basically what I'm saying is that you simply must make this cake to truly grasp the pure ecstasy that is this dessert- you don't even need a holiday or occasion to make it; I didn't! 
(By the way, you are DEFINITELY going to want a glass of milk handy while chowing down on this.)

Chocolate Peanut Butter Marble Cake

Chocolate Peanut Butter Marble Cake
recipe by Sugar Plum
makes 10 servings

ingredients:
cake:
  • 2 1/4 cups cake flour
  • 2 1/4 tsp baking powder
  • 1/2 tsp sea salt
  • 3/4 cup unsalted butter, at room temperature
  • 3/4 cup firmly packed brown sugar
  • 1/2 cup granulated sugar
  • 3 large eggs
  • 1 1/2 tsp vanilla extract
  • 3/4 cup milk (I used 2%)
  • 1/2 cup creamy peanut butter
  • 2/3 cup semi-sweet chocolate chips, melted
frosting:
  • 2/3 cup granulated sugar
  • 1/3 cup all-purpose flour
  • 3 tbsp unsweetened cocoa powder (I used Dutch-processed because that's what I had on time)
  • scant 1/4 tsp sea salt
  • 1 cup milk (I used 2%)
  • 1 cup unsalted butter, at room temperature
  • 1 cup semi-sweet chocolate chips, melted
  • bag of mini chocolate chips to garnish
For the cake:
  1. Preheat oven to 350 degrees. Grease and flour two 9-inch round cake pans; set aside.
  2. In a medium-sized bowl, combine the cake flour, baking powder, and salt. Set aside.
  3. In the bowl of an electric mixer fitted with a paddle attachment, cream together the butter, brown sugar, and granulated sugar for about 5 minutes. Add in the eggs and vanilla and beat until combined.
  4. Reduce the mixer speed to low and alternately add in the flour mixture and milk, beginning and ending with the flour.
  5. Remove half of the batter and place in another bowl. Beat the peanut butter into one half, and the melted chocolate into the other half.
  6. Pour the peanut butter mixture into half of each prepared pan, then divide the chocolate mixture between the other sides of the pans. Using a butter knife, swirl the batters together. There's no "right" way, so have fun!
  7. Bake the cakes for 35 minutes or until a toothpick inserted comes out clean (mine took 32 minutes). Cool for about 10 minutes before turning the cakes onto a wore rack to cool completely.
Chocolate Peanut Butter Marble Cakes sans Frosting

For the frosting:
  1. In a small saucepan, whisk together the sugar, flour, cocoa, salt and milk. Bring the mixture to a boil, whisking frequently. Boil for about 1 minute until thickened. Remove the pan from the heat and strain the mixture (with a sieve) into a small bowl and then cool completely. I just popped mine in the freezer for a bit.
  2. Beat the butter in a medium-sized bowl until creamy. Add in the cooked flour/cocoa mixture and beat until combined. Finally add in the melted chocolate and beat until combined.
  3. Spread the frosting onto the cake layers. I added some mini chocolate chips in between the two layers, and then pressed some onto the sides of the cake- it added a great crunch!
*This cake is much easier to slice after a trip to the fridge!

Chocolate Peanut Butter Marble Cake

Wednesday, March 31, 2010

Chicken Hand Pies

Chicken Hand Pies

I made these adorable hand pies while I was home last week. I wanted my mom to have something homemade to bring on the plane with her (she flew to Chicago to celebrate her birthday!). They turned out WONDERFUL if I do say so myself *smug face*. But I mean really, how can you go wrong with chicken pot pies that are portable?! I think my addition of fennel added a unique flavor to the mix, and I would actually just use a whole bulb next time. These were both comforting and hearty (plus super cute), and would make a great addition to any picnic basket. Also, these are a much better alternative to Hot Pockets for kids (for instance you actually know what ingredients these hold)!
I had a bit of trouble with the dough, but only because the food processor that I had to make it in only held 3 cups, ha ha. Also, I had a TON of leftover filling,which is excellent just served in a bowl topped with a biscuit, but I would recommend at least doubling the dough recipe for the amount of filling this makes.


Chicken Hand Pies
Chicken Hand Pies

Chicken Hand Pies
recipe slightly adapted from here
makes 6 hand pies with lots of leftover filling

ingredients:
  • 1 potato, peeled and diced
  • 1 tbsp olive oil
  • 2 large carrots, diced
  • 1 stalk of celery, diced
  • 1/2 small fennel bulb, sliced
  • 1 small onion, diced
  • 1 tbsp butter
  • 1 tbsp all-purpose flour
  • 14 ounces chicken stock
  • 1 tsp bouillon powder (or 1 bouillon cube)
  • 2 boneless skinless chicken breasts, cut into small bite-sized pieces
  • salt and pepper, to taste
  • pastry dough (recipe below)
  • 1 egg + 1 tsp water, beaten
  1. Place the potato chunks in a small saucepan and cover with water. Bring to a boil and cook until fork-tender. Drain and set aside.
  2. In a large skillet, heat the olive oil over medium heat. Add in the onions, carrots, celery, and fennel and cook until the onions are very tender, about 15 minutes.
  3. Melt the butter into the veggie mixture and stir in the flour to create a roux. Let cook for around 2 minutes to cook out the flour taste. Add in about half of the chicken stock and the bouillon and let simmer for a few minutes. Then, taste and adjust seasonings.
  4. Add the chicken pieces to the pan and add the chicken stock in until you have reached your desired consistency (more than likely you will use all of it). Cook until the chicken is cooked through. Store mixture in the fridge until ready to use (the pies are easier to assemble when the filling is cold).
  5. Line a baking sheet with parchment paper. Set aside.
  6. Roll out the pastry dough on a lightly floured surface into about an 18 X 22 inch rectangle. Cut in half, and then cut each half into thirds to make 6 small rectangles.
  7. Scoop 1/4 cup of the filling onto each pastry rectangle, a bit off center. Wet the edges of the dough with a pastry brush and water. Fold the longer end of the pastry up and over the filling. Press down the sides to seal it, and then crimp the edges with the tines of a fork. Place the prepared pastries on the lined baking sheet. With a sharp knife, create two incisions on the top of each pastry. Brush the tops of each with the egg/water. Refrigerate the pastries for at least 30 minutes.
  8. When ready to bake, preheat the oven to 425 degrees. Bake the pastries for 15-20 minutes, until golden-brown and puffed.
*These can be refrigerated after being baked and then reheated in a preheated 350 degree oven for 10 minutes.

Pastry Dough

ingredients:
  • 2 1/4 cups all-purpose flour
  • 1 1/2 tsp sea salt
  • 1 tsp sugar
  • 8 tbsp (1 stick) cold unsalted butter, cut into 1/2 inch cubes
  • 1 egg slightly beaten
  • 1/3 cup ice cold water
  • 2 tsp apple cider vinegar
  1. In a food processor fitted with a blade attachment, pulse together the flour, salt, and sugar. Add in the butter and pulse a couple of times until the mixture is crumbly.
  2. Combine the egg, water, and vinegar in a small container. While the food processor is running, pour in the egg mixture and pulse until just combined.
  3. Pour mixture onto a floured surface and knead a few times to bring all of the ingredients together. The dough can be rolled out immediately, or wrapped in plastic wrap and refrigerated for up to 2 days.
Chicken Hand Pies
Chicken Hand Pies

Tuesday, March 30, 2010

Italian Salad

Italian Salad


This is the salad that I served up the other evening with the Mussels and Fennel with Saffron Cream Sauce. I know I promised to have it up just a day after the mussels, but it's been a seriously hectic week starting my new quarter of school, plus trying to show my little sister all around Seattle!
The salad turned out AMAZING! I loved how herb-y the dressing was, and paired with the salty olives and cheese it was simply sublime. It was my personal favorite portion of the meal. Even Mikey, who only ever eats Caesar salads liked it!
This could also easily be made into an entree by adding a grilled chicken breast on top.


Salad Veggies

Italian Salad
Italian Salad sans Dressing


Italian Salad
recipe from here
serves 6 as a side salad

ingredients:
for the salad:
  • 3 hearts of Romaine, washed, dried and cut into bite-sized strips
  • 1 large carrot, peeled into strips
  • 1 cucumber, diced
  • 1 red bell pepper, diced
  • handful of pitted olives (I used Nicoise olives)
  • handful of grape tomatoes, halved
  • Ricotta salata cheese, to taste
for the dressing:
  • 1 cup loosely packed fresh Italian flat leaf parsley
  • 10 big fresh basil leaves
  • 1/4 tsp dried oregano
  • 3/4 tsp sea salt
  • 1/4 tsp black pepper
  • 2 cloves garlic
  • 1 1/2 tsp honey
  • 1/4 cup red wine vinegar
  • 3/4 cup extra virgin olive oil
  1. Make the dressing: add all of the dressing ingredients into the bowl of a food processor and blitz to combine. The dressing should be fairly thick. Pour into a container, cover and refrigerate until ready to serve salad.
  2. Make the salad: combine all of the salad ingredients in a large bowl. Toss with the dressing, being sure to fully cover all the veggies. Serve immediately.
Italian Salad
Related Posts with Thumbnails