My blog has moved!

You should be automatically redirected in 6 seconds. If not, visit
http://www.spachethespatula.com/
and update your bookmarks.

Monday, June 14, 2010

Best Ever Sugar Cookies

IMG_6584


When Mikey's mom, Amy, asked me if I wanted to make some sort of baked goods for a baby shower for one of her friends, I jumped at the opportunity. I LOVE baking (which is clearly apparent), but I love it even more when people can actually enjoy what I've made instead of it just rotting away on our kitchen countertops.
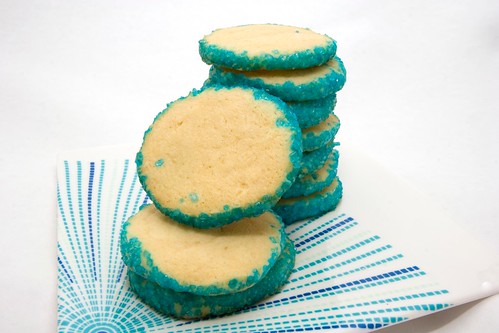
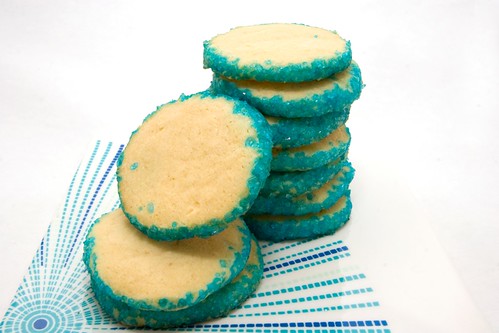
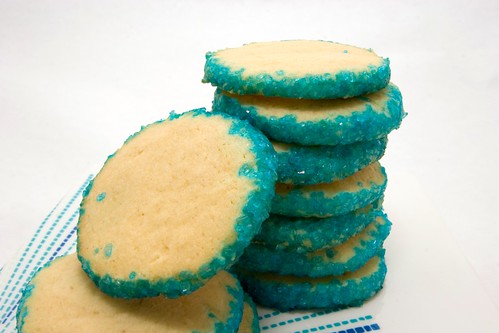
I wanted to make something that would make it obvious that they were made for a (little boy's) baby shower, but I didn't want to do the typical cupcakes, cake, or sugar cookies covered in icing. I decided on some wonderful sugar cookies rolled in blue sparkling sugar.
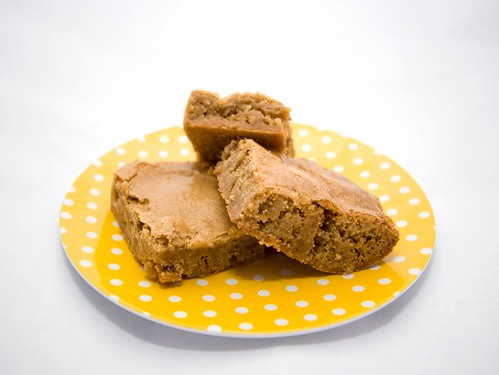
Besides looking cute, they tasted pretty darn good as well. In fact, to me they taste identical to those buttery cookies that you get in the black and red checkered tins; you know which I am referring to- the cookies come in all different shapes (rectangular, pretezel-shaped, etc.), but they all taste the same and are covered in coarse sugar. Yeah, THOSE!
Amy described them as "creamy" which I think is a testament to the caster sugar used in the cookies. They really are quite decadent and I highly recommend them. I myself will be making them again as soon as I get to Florida (I'm flying out today to go visit my family!). The best part is, they couldn't be simpler to make- they're slice-and-bake!
It should probably be noted that the cookies in these photos are the rejects. I (naturally) gave all of the good-looking cookies to Amy to deliver to her friend and these are the poor deformed ones that were left over, hah.


IMG_6592
IMG_6580


Best Ever Sugar Cookies
recipe slightly adapted from here

ingredients:
  • 3 cups all-purpose flour
  • 1 tsp baking powder
  • 1/2 tsp salt
  • 2 sticks (1 cup) unsalted butter (I use Irish butter which I think makes ALL the difference)
  • 1 cup Caster sugar (super-fine sugar, also called baker's sugar)
  • 1 large egg
  • 2 tbsp milk (I used some creamy almond milk)
  • sparkling sugar, for rolling (you could also use turbinado sugar if you didn't want a color)
  1. In a large bowl, combine the flour, baking powder, and salt. Set aside.
  2. In the bowl of an electric mixer fitted with the paddle attachment,, cream together the butter an sugar until light an fluffy, 3-5 minutes. Add in the egg and milk and beat for another few minutes until fully combined.
  3. Turn the dough out onto a clean workspace (a silicone baking mat works great), knead it a few times until it comes together, and then divide it into two equal pieces. Wrap each half in plastic wrap and store in the fridge overnight (or at least 2 hours, but I think longer is better).
  4. When ready to bake, preheat oven to 375 degrees.
  5. Remove the dough from the fridge and form each ball into a log 1 1/2-2 inches in diameter. They dough will be quite firm so you will have to work with it a bit.
  6. Roll the logs in the sugar until the outside is completely coated. Put the dough logs back in the fridge for about 10 minutes so they can firm up a bit.
  7. Slice 1/3 inch thick rounds off of the logs and place on a cookie sheet lined with a silicone baking mat about 1 inch apart.
  8. Bake for 8-9 minutes until the edges just start to turn golden. Cool on the cookie sheet for 2 minutes before transferring to a wire rack to cook further.
IMG_6581

Saturday, June 12, 2010

Ina Garten's Lemon Bars

Note: I am reposting this recipe from October 14, 2009 because I just recently made these again (and took better pictures) and they are PERFECT for summer. Plus, they are absolutely divine :P! (Also, can we just look at how lame and completely UN-loquacious my posts used to be! Hah.)


Ina Garten's Lemon Bars

I have been craving lemon bars for the past few days and finally picked up a huge bag of teeny tiny lemons and decided it was time. I have heard many good things about Ina's Lemon Bars so I opted to put them to the test.
These lemon bars had the perfect shortbread crust with a nice crisp texture and a sweet, but tart, creamy filling.


Ina Garten's Lemon Bars

Ina Garten's Lemon Bars
recipe from here

ingredients:

For the Crust:
  • 1/2 lb unsalted butter, at room temperature
  • 1/2 cup granulated sugar
  • 2 cups flour
  • 1/8 tsp kosher salt
For the Filling:
  • 6 large eggs, at room temperature
  • 3 cups granulated sugar
  • 2 tbsp lemon zest
  • 1 cup freshly squeezed lemon juice
  • 1 cup flour
  • confectioners' sugar, for dusting
  1. Preheat oven to 350 degrees.
  2. For the crust, cream the butter and sugar until light in the bowl of an electric mixer fitted with the paddle attachment.
  3. Combine the flour and salt and add to the butter and sugar mixture with the mixer on low. Mix until just mixed.
  4. Dump the dough onto a well-floured surface and gather into a ball.
  5. Flatten the dough with floured hands and press into a 9 x 13 x 2 inch baking sheet, building up a 1/2 inch edge on all sides.
  6. Bake the crust for 15 to 20 minutes, until very lightly browned (I baked mine for 17 and a half minutes). Let cool on a wire rack.
  7. For the filling, whisk together the eggs, sugar, lemon zest, lemon juice, and flour. 
  8. Pour over the crust and bake for 30 to 35 minutes, until the filling is set.
  9. Let cool to room temperature. Cut into whatever shape you like and dust with confectioners' sugar.

Ina Garten's Lemon Bars


Grrrr! Nothing annoys me more than this glitch in Blogger that makes your text UN-wrap and just cut off in the middle of words :(

Thursday, June 10, 2010

S'mores Ice Cream

IMG_6561


I know the title alone has already sold you, but let me at least pretend to further convince you :D.
This ice cream is certainly not your typical ice cream- unlike the countless ice creams I have made before, this one is not a custard, as in it contains no eggs. What it does have is marshmallows melted right into the actual ice cream itself ( I know, crazy right?). Annnd, there's no sugar; the marshmallows pack enough sugar in on their own not to warrant any extra.
It's a pretty unbelievable concoction. You'l be super weirded out by the consistency before it firms up in the freezer- DON'T WORRY, magic will happen, I promise ;)!
The end product is a wonderful, creamy, marshmallow-flavored base with graham cracker swirls and crunchy chocolate pieces- a frozen s'more! It's certainly a real treat for those hot summer days when the traditional warm s'more just won't cut it. (Can you tell I'm totally obsessed with summer lately? Gah, I'm so excited! If only this dreary Seattle-weather would clear up for more than a day!)


IMG_6565
IMG_6564
IMG_6566


S'mores Ice Cream
recipe from here

The original recipe stated the yield was 1/2 quart, but I doubled it and nearly overflowed my 2 quart ice cream machine (this is the doubled recipe here, so feel free to halve it if you're worried.). 

ingredients:
  • 1 package marshmallows (I used the big, Jet-Puffed variety)
  • 2 cups whole milk
  • 3 cups heavy cream
  • 2 milk chocolate bars, chopped (I used one Ghirardelli bar and one Hershey's with Almonds bar)
  • 5-6 graham crackers, broken into pieces
  1. In a large saucepan, heat together the marshmallows, milk, and cream over medium heat until the marshmallows are melted and combined with the milk/cream. The mixture will increase in size due to the expanding marshmallows. Remove from heat and allow to cool for only a minute so it doesn't get too sticky. 
  2. Transfer to your ice cream maker and churn for 30-40 minutes (yes the mixture will be piping hot when your pour it in). In the last couple of minutes, add in the chocolate pieces. Stir in the graham cracker pieces by hand.
  3. Freeze for 4-6 hours ( I found any less produced an odd, gelatinous consistency) and serve!
IMG_6560
IMG_6563

Wednesday, June 9, 2010

Brown Butter Toffee Blondies (with Homemade Toffee!)

IMG_6539


It's certainly no secret that I love brown butter, but I'm not sure that I have fully expressed my adoration for the oh-so-simple spin on something so common. There is nothing better than the nutty smell of browning butter on the stove; I love the way the aroma wafts through the house. The only thing better than the smell of brown butter is the taste :P!
These blondies may not look like much, but they are beyond amazing. I know I say that sort of thing a lot, but honestly, I took my first bite of the still slightly warm bar and was in sheer awe... "OH MY GOD!" I exclaimed. "What?!" Mikey questioned sounding somewhat concerned. "This is the best thing I have ever put in my mouth," I answered. And while I'm sure that isn't entirely true, it certainly is in the top 5. And Mikey felt the same way. After his first bite he couldn't speak for at least 10 full seconds and then declared, "These are jaw-dropping."
I'd like to think that my homemade toffee had something to do with how these babies turned out :). Making your own toffee is actually surprisingly simple and far more delectable than the bags of stuff you find on the baking aisle of your local supermarket. I suggest trying your had at making some yourself even if you don't make these incredible blondies. Just spread some melted chocolate over the cooled toffee (skip the part where you break it up) and then sprinkle some chopped nuts on top- pure delight!


IMG_6532
IMG_6540


Brown Butter Toffee Blondies
recipe slightly adapted from here

ingredients:
  • 2 1/2 sticks unsalted butter + more to grease pan
  • 2 1/4 cups all-purpose flour
  • 1 1/2 tsp baking powder
  • 1 1/2 tsp sea salt
  • 2 cups packed dark brown sugar
  • 1/2 cup granulated sugar
  • 3 large eggs
  • 2 1/2 tsp vanilla extract
  • 1 cup homemade toffee bits (recipe below)
  1. Preheat oven to 350 degrees. Butter a 9 x 13-inch baking dish and set aside.
  2. In a small saucepan, melt the butter over medium-high heat. Cook until it turns golden brown and smells nutty (the butter should foam up and then mostly subside).
  3. In a medium-sized bowl, combine the flour, baking powder, salt, and toffee. Set aside.
  4. In the bowl of an electric mixer fitted with the paddle attachment, mix together the sugars and brown butter until combined. Add in the eggs and vanilla and beat for around 3-5 minutes until light and fluffy. Slowly add in the flour mixture and beat on low speed until combined. Pour the mixture into the prepared pan and smooth the top.
  5. Bake for 30-35 minutes until a toothpick inserted into the center comes out clean. Let cool and then slice and serve!
Homemade Toffee
this will make more than you need for the above recipe but it is a great topper for ice cream, or if you're like me you'll just munch on it :D

IMG_6516
IMG_6531

ingredients:
  • 1 cup unsalted butter (2 sticks)
  • 1 cup granulated sugar
  • 1/4-1/2 tsp sea salt
  1. Line a large baking sheet with a silicone baking mat. Set aside.
  2. Combine all of the ingredients in a medium saucepan (I used a dutch oven) over medium-high heat. Cook until the mixture turns a deep golden and the mixture is at about 300 degrees, stirring constantly. If you don't have a candy thermometer just use color to guide you. Basically you want it a bit darker than this: IMG_2844
  3. Pour the mixture onto the lined baking sheet and allow the mixture to cool for about 10 minutes
  4. Using a large knife, break up the toffee into very small pieces. Store in tupperware.
Note: When I first took my toffee off of the heat, the butter seemed to separate from the mixture so I put it back on the heat and whisked it for just a minute of two and it became homogenous.

IMG_6518
Related Posts with Thumbnails