My blog has moved!

You should be automatically redirected in 6 seconds. If not, visit
http://www.spachethespatula.com/
and update your bookmarks.

Showing posts with label baked goods. Show all posts

Tuesday, June 21, 2011

Strawberry-Pistachio Rolls


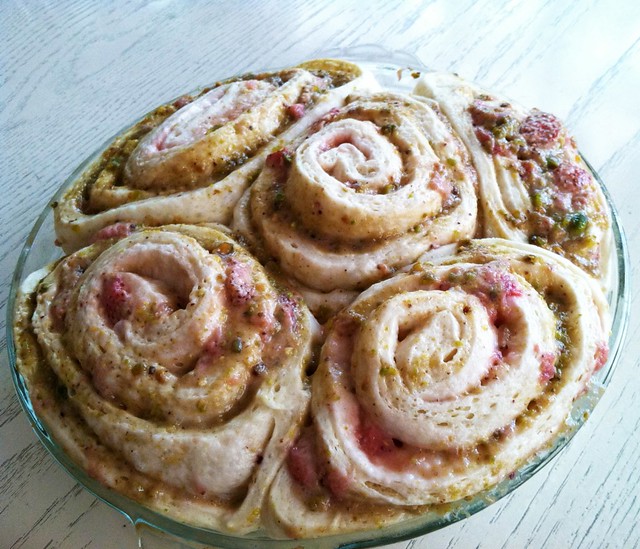
I'll start by saying sorry for the pictures as they were taken with my iPhone. But, the exciting part of that is that I FINALLY HAVE AN iPHONE! Yayyy! I made these rolls in Florida where I didn't have my amazing photographer there to help me out.

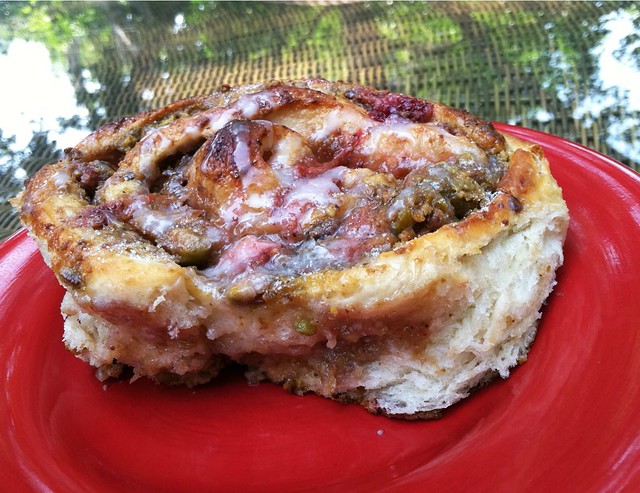
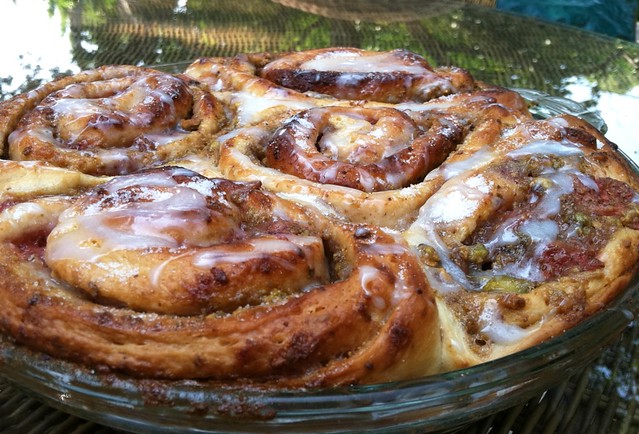
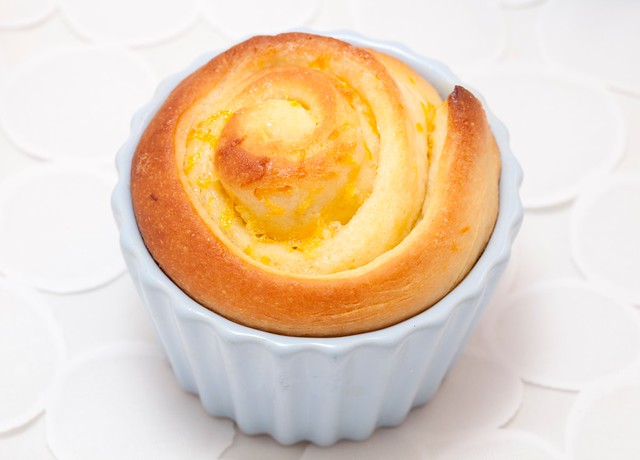
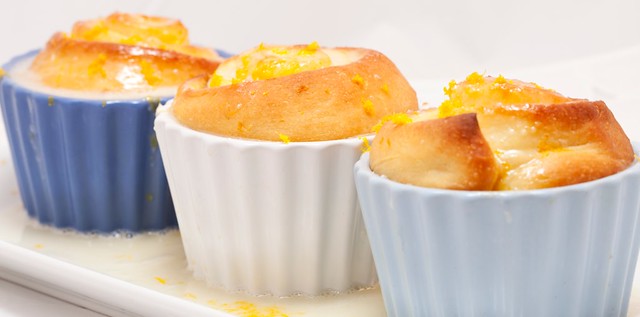
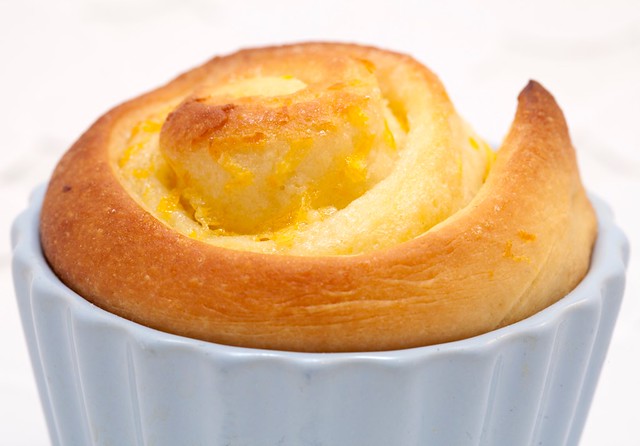
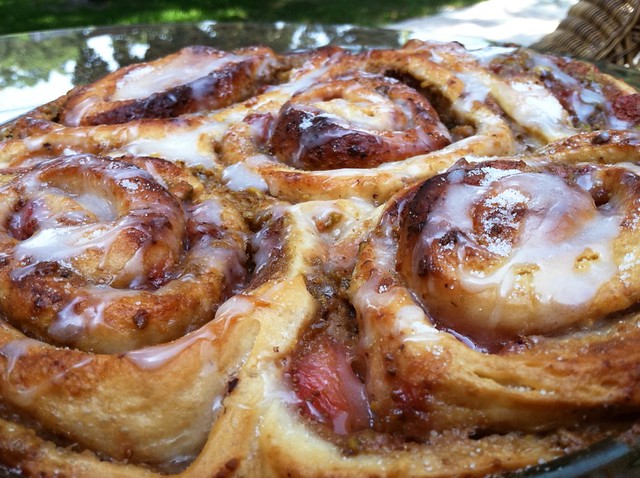
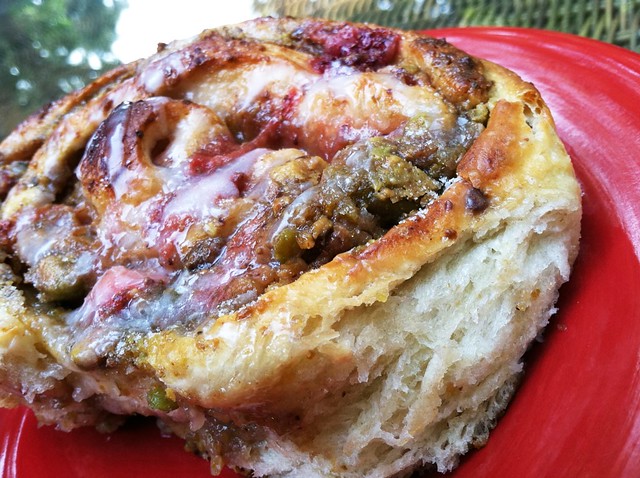
I love experimenting with different sweet rolls (like these Meyer Lemon Sweet Rolls), so when I saw these on Kaitlin's blog, Whisk Kid, I knew I had to give them a try. If you're wondering, they are just as good as they look. The sweet strawberry and pistachio fillings play off each other, creating an amazing harmony of salty/sweet-fresh/rich flavors that make it quite easy to down an entire roll (which are about the size of your entire hand) all by yourself (not to mention the fact that the red and green look beautiful together).

While these are still amazing cooled, I find them to be at their peak enjoyment state when they are nice and warm out of the oven. I mean a) who doesn't love warm bread in any situation? and b) the fillings are all gooey and oozing about in the most delicious way.

I think it would be a wonderful idea to add a whole vanilla bean in there somewhere, perhaps in the strawberry filling, just to really put these babies over the top. Someone try it and report back?

pre-bake obviously:

Strawberry-Pistachio Rolls
recipe slightly adapted from here

Dough:
ingredients:
  • 2 1/2 tsp active dry yeast
  • 1/2 cup lukewarm water
  • 66g (1/3 cup) granulated sugar
  • 1/2 milk, warmed
  • 78g (1/3 cup) butter, unsalted, melted and cooled to room temperature
  • 1 large egg, at room temperature, beaten
  • 1 tsp salt
  • more or less 500g (4 cups) flour
  • extra sugar for sprinkling
  1. In the bowl of an electric mixer fitted with the paddle attachment, combine the yeast, water, and sugar. Let sit for 5 to 10 minutes until the yeast is activated (the top should be foamy).
  2. Add in the milk, butter, egg, and salt, and mix to combine. Add in the flour, 1/2 cup at a time, until the dough pulls away from the bowl. Switch to the bread hook attachment and mix, on high, for 15 minutes.
  3. Dump the dough into a buttered bowl. Cover with plastic wrap and allow to rise in a warm area for about an hour, until doubled in size.
  4. Turn the dough out onto a lightly floured surface and roll into a 10 x 24 inch rectangle. Spread with the two fillings (recipes below), leaving a 1 inch border on each side. Tightly roll the rectangle up, and slice into 10+ rolls.
  5. Preheat oven to 350 degrees. Butter a pie dish (or individual ramekins, etc.) and place the rolls in, leaving a bit of space between each (DO NOT stuff your pan as the rolls will rise again and overflow the pan.... I'm speaking from experience here people).
  6. Allow to rise again for about an hour. Sprinkle the tops with sugar and bake in the oven for 25-30 minutes until golden-brown and baked through. (You can drizzle the tops with a simple glaze made from confectioners' sugar and milk if you desire, which you should, because it looks nice :).)
Strawberry Filling:
ingredients:
  • 1 pint strawberries, hulled and quartered
  • 50g (1/4 cup) granulated sugar
  • 1/2 tsp salt
  • 1-2 tbsp fresh lemon juice
  • 1 tbsp cornstarch
  1. Combine all ingredients in a small saucepan and cook on medium heat for about 15 minutes, stirring frequently, until the berries have slightly broken down and the mixture is thickened.
  2. Cool and set aside.
Pistachio Filling:
ingredients:
  • 128g (1 cup) pistachios, roasted and salted
  • 50g (1/4 cup) granulated sugar
  • 1/2-1 tsp pure vanilla extract
  • 28g (2 tbsp) butter, unsalted, at room temperature
  • 1 large egg, at room temperature
  1. Place all ingredients into the bowl of a food processor and process until the mixture is a thick paste.
  2. Set aside.

Sunday, June 19, 2011

Orange Poppy-Seed Cake with Berries and Crème Fraîche


I just got back from a wonderful visit to Florida to see my family and friends and had a ton of fun :). I got to spend time sunning myself at the beach AND I finally made it to Harry Potter World in Universal Islands of Adventure-- something I've been wanting to do forever. You see, I am a Harry Potter freak and so my friends and I went to the park on the opening day. After waiting in line for 8 hours, me passing out with heat exhaustion and having to go to the medic room, and a long argument to get our refunds, we saw NOTHING. It was one of the most disappointing experiences of my life. But, I finally got to go and it was really quite fun! However, I do not recommend the Butter Beer. It's ultra weird and has a strange foamy, creamy layer on the top that I was told is a "non-dairy butterscotch flavoring." Ew.

Tomorrow I start my last quarter of college, EVER and I can't freakin' wait to get it over with :P!

So, about this cake... It's pretty amazing. It's fresh and unique and a perfect alternative to a rich, chocolate dessert. The orange syrup that is poured on the cake straight out of the oven gives it an extremely moist texture that can be described as almost pudding-like. The orange-Cointreau macerated berries are a nice counterpoint, and the creamy crème fraîche is a rich, zingy contrast.


Orange Poppy-Seed Cake with Berries and Crème Fraîche
recipe slightly adapted from here

ingredients:

for the cake:
  • 1 1/2 cups cake flour
  • 3/4 tsp salt
  • 1 tsp baking soda
  • 1/2 tsp baking powder
  • 1/4 cup poppy seeds
  • 3/4 cup (1 1/2 sticks) unsalted butter, at room temperature
  • 1 1/4 cups granulated sugar, divided
  • 2 tsp orange zest
  • 4 large eggs, separated
  • 2/3 cups sour cream
  • 2 tsp pure vanilla extract
  • 1/4 tsp cream of tartar
for the berries/syrup:
  • 1 cup freshly squeezed orange juice
  • 1/4 cup + 2 tbsp Cointreau
  • 3 tbsp granulated sugar
  • 1/4 cups strips of orange zest
  • 3 cups mixed raspberries, blackberries, and strawberries (strawberries should be halved or quartered)
  • confectioners' sugar, for dusting
  • crème fraîche, to serve
for the syrup:
  1. In a small saucepan, combine the orange juice, Cointreau, 3 tbsp sugar, and strips of orange zest over medium-high heat. Cook, stirring frequently, for about 5-10 minutes until the sugar is dissolved. Remove pan from heat.
  2. Fish out the zest strips with a fork and discard. Pour 1/3 cup of the syrup into a bowl and reserve the rest for the cake.
  3. Add the berries to the bowl with the 1/3 cup syrup and place in the fridge, covered, to macerate for at least 2 hours and up to 24.
for the cake:
  1. Preheat the oven to 350 degrees. Butter and flour a 9 or 10-inch springform pan and set aside.
  2. In a medium bowl, combine the flour, salt, baking soda, baking powder and poppy seeds. Set aside.
  3. In a small bowl, whisk together the egg yolks, sour cream, and vanilla. Set aside.
  4. In an electric mixer fitted with the paddle attachment, beat the butter, 1 cup of the sugar, and orange zest for about 5 minutes until light and fluffy. Alternately add in the flour mixture and yolk mixture, beginning and ending with the flour mixture, beating well after each addition.
  5. In another bowl, with a hand mixer, beat the egg whites with a pinch of salt until they are foamy. Add in the cream of tartar and beat until soft peaks. Add in the remaining 1/4 cup sugar, a little at a time, and beat until stiff peaks.
  6. Stir 1/3 of the meringue into the cake batter and then gently fold in the remainder.
  7. Pour the batter into the prepared pan and smooth the top. Bake for 40-45 minutes, until a toothpick inserted into the center comes out clean.
  8. As soon as you remove the cake from the oven, poke the top all over and brush the top with 1/2 of the reserved syrup. Let stand for 10 minutes. Run a thin knife around the side of the pan and remove the cake. Invert it on a rack and poke the bottom all over. Brush the remaining syrup over it, re-invert the cake on another rack or plate, and let stand until entirely cool. (You can keep the cake like this wrapped in plastic wrap at room temperature for a day before serving.)
  9. Before serving, sift confectioners' sugar over the top and serve with the macerated berries and crème fraîche.

Tuesday, April 26, 2011

Chocolate Cupcakes with Vanilla Swiss Meringue Buttercream


For the longest time, I thought that I hated both cupcakes and cake. It was not until about 5 years ago that I discovered that what I really hate is boxed cake, packaged frosting, and the cupcakes sold at your local supermarket deli. In fact, it turns out, I LOVE real cake and cupcakes!

My absolute favorite cupcakes in the universe are the cupcakes sold at Trophy Cupcakes. They are seriously to-die-for! Seattle has more than its fair share of cupcakeries, and as a self-proclaimed cupcake connoisseur, I have tried nearly all of them and am here to tell you, Trophy's are the best of the best. That's why, my cake base in this recipe is based off of one of Trophy's chocolate cupcakes!

The cupcakes are unbelievably moist and chocolatey, but not overly rich. The frosting is creamy and buttery, yet still light thanks to the whipped egg whites. In fact, the buttercream is more than a little addictive and I think you'll find that the fact that the frosting recipe makes more than you need won't be at all an issue :).

I garnished my cupcakes with pink sparkling sugar and candied rose petals.


Chocolate Cupcakes
base recipe from here
makes 2 dozen cupcakes

ingredients:
  • 2 cups + 2 tbsp granulated sugar
  • 1 3/4 cup all-purpose flour
  • 3/4 cup + 1 tbsp cocoa powder (no Dutch-processed)
  • 1 1/2 tsp baking powder
  • 1 1/2 tsp baking soda
  • 1 tsp salt
  • 2 large eggs
  • 1 cup whole milk
  • 1/2 cup vegetable oil
  • 2 tsp pure vanilla extract
  • 1 cup boiling water
  1. Preheat oven to 350 degrees. Line cupcake tins and set aside.
  2. In a large bowl, whisk together the eggs, milk, oil, and vanilla extract; set aside.
  3. In the bowl of an electric mixer fitted with the paddle attachment, stir together the sugar, flour, cocoa powder, baking powder, baking soda, and salt.
  4. Add the wet mixture to the dry and mix on medium speed for 30 seconds. Scrape down the sides and add in the boiling water and stir to combine.
  5. Fill the cupcake liners 3/4 of the way up. Bake for 18-20 minutes until a toothpick inserted into the center comes out clean.
  6. Allow the cupcakes to cool 10 minutes in the tin before removing and allowing to cool completely.


Vanilla Swiss Meringue Buttercream
recipe slightly adapted from here

ingredients:
  • 1 1/3 cups caster sugar
  • 7 large egg whites
  • pinch of salt
  • 1 1/4 lbs (5 sticks) unsalted butter, softened
  • seeds scraped from 1 vanilla bean
  • 1 tsp pure vanilla extract
  1. In the (heatproof) bowl of an electric mixer, combine the sugar, salt, and egg whites. Set over a pot of simmering water (making a double boiler) and whisk constantly for about 5-10 minutes until the mixture reaches 160 degrees.
  2. Fit the mixer with the whisk attachment and beat (on medium-high) the heated mixture for 10 minutes until mixture is lukewarm and stiff, glossy peaks form.
  3. Switch to the paddle attachment and, with the mixer set to medium speed, mix in the vanilla bean and extract. Use immediately or transfer to an airtight container and refrigerate for up to 3 days.

Friday, April 8, 2011

Coconut Double-Chocolate Cookies (Vegan)


Cookies, specifically chocolate chip cookies, are my first, true baking love. They are the first treats I ever learned to bake myself, and they hold a special place near and dear to my heart. 

These particular cookies are by no means a traditional chocolate chip cookie (that recipe can be found HERE), but man are they addictively tasty! These cookies come together really quickly, and their chewy texture and rich flavor will leave you and your taste-testers questioning how on Earth these are vegan (seriously). 

The coconut oil adds a coconut flavor that is subtle enough not to overpower the cookie, but deepens the overall taste of it in an intriguing manner. Make sure you have a glass on milk on hand (be it cow, soy, almond, etc.), because these babies are ULTRA chocolatey, in the best possible way.


Coconut Double-Chocolate Cookies (Vegan)
recipe from here

ingredients:
  • 1/2 cup unrefined coconut oil, not in liquid form
  • 2/3 cup dark brown sugar
  • 8 ounces semi-sweet (vegan) chocolate, chips or chopped
  • 3 tbsp ground flax
  • 6 tbsp warm water
  • 2 tsp pure vanilla extract
  • 1 cup whole wheat pastry flour
  • 1/2 cup cocoa powder
  • 1/2 tsp baking soda
  • 1/2 tsp sea salt
  1. Preheat oven to 325 degrees. Line baking sheet with a silicone baking mat or parchment paper; set aside.
  2. In a small bowl, combine the flour, cocoa powder, baking soda, and salt; set aside.
  3. In the bowl of an electric mixer fitted with the paddle attachment, combine the sugar and coconut oil and beat well.
  4. Combine the water and flax and set aside to gel.
  5. Put the chocolate in a microwave-safe bowl and heat in the microwave in 30-second-intervals until melted; allow to cool for a minute.
  6. Add the gelled flax and melted chocolate to the coconut oil/sugar and beat until incorporated.
  7. Slowly add in the flour mixture and beat on low speed until combined. Stir in the chocolate.
  8. Scoop 1-2 tablespoon-sized mounts onto your prepared baking sheet. Bake for 10-12 minutes. Allow to cool on the baking sheet for a bit before transferring to a wire baking rack to cool further.

Friday, March 4, 2011

Vanilla Bean Macaroons (Vegan)

IMG_0285

Coconut is one of my very favorite foods, and I am entirely boggled as to how some people so detest it. Not only is it delicious, but it is rich in fiber and healthy fats!

I am a huge fan of macaroons, and when I saw these over at Oh She Glows, I was immediately drawn to them. While I knew I would like them since I absolutely LOVE all things coconut, I did not expect them to completely blow me away as they have done.

These macaroons are AMAZING! They are dense and chewy and absolutely addictive. The outside is perfectly crisp, and even after cooling, the inside is gooey and rich. The whole vanilla bean really pumps up the flavor and raises them above any macaroons you have tasted before. As Mikey bit into one, I heard an "Oh WOW!" Seconds later he was grabbing another :). 
Also, these babies are completely vegan and relatively healthy when eaten in moderation- something that is almost entirely impossible ;).


IMG_0305
IMG_0286


Vanilla Bean Macaroons
recipe slightly adapted from here
makes 20-24 macaroons

ingredients:
  • 2 2/3 cups shredded unsweetened coconut (to make the coconut butter OR 1 cup store-bought coconut butter)
  • 2 cups shredded unsweetened coconut (I used reduced fat here and regular in the coconut butter)
  • 3/4 cup pure maple syrup
  • 1 tsp vanilla extract
  • seeds scraped from 1 vanilla bean
  • 1 tsp sea salt
  1. Preheat oven to 300 degrees. Line baking sheets with a silicone mat or parchment paper; set aside.
  2. To make the coconut butter: Add the 2 2/3 cups shredded coconut to the bowl of a food processor and process for 8-12 minutes until creamy, scraping down the bowl as necessary.
  3. Combine all of the ingredients (including coconut butter) in the bowl of an electric mixer fitted with the paddle attachment and beat to combine.
  4. Scoop 1-2 tablespoon-sized mounds onto the baking sheet (they won't spread so you can place them fairly close to one another).
  5. Bake for about 25 minutes, or until the bottoms are golden. Let cool on baking sheet for a couple of minutes before transferring to a plate or rack to cool further.
IMG_0294

Friday, February 25, 2011

Thomas Keller's Lemon Sabayon Tarts with Rosemary and Honey-Mascarpone Whipped Cream

IMG_0253

So remember when I said a few weeks ago that I was going to share the dessert that I made for Mikey's parents' dinner party? Well here it finally is! The reason it took so long is that last time I had no time to photograph the tarts before I handed them over to Amy, Mikey's mom, for her party. So, on Monday, while I had no class due to President's Day, I went over to his parents' home and Amy and I made them again!

These tarts are tasty and unique, and a wonderful finish to any meal. The best part is that the tartness and freshness from the lemons make them a lot lighter than a chocolate or ice cream dessert. The filling is creamy and smooth, and the pine nuts and rosemary in the crust add a nice earthiness. The honey-mascarpone whipped cream cuts the sourness from the citrus and ties the entire dessert together, leaving you with a dessert that looks and tastes far more sophisticated than it really is ;).

This dessert is fairly easy to make, but, you need to be ready for a workout because you will have to whisk continuously for a good 10-15 minutes. Having to do this twice in one day left my arm feeling like I just lifted weights at the gym! However, the whisking is the only truly difficult part of the recipe, and even that doesn't take any special skill.

I think that it would be fun to experiment with different nuts and herbs in the crust and different citrus in the filling. For instance, a brazil nut and maybe mint crust with a blood orange filling, or keep the pine nut crust and add in grapefruit as the filling! Adding cocoa powder into the crust might even be an interesting alteration.

If you have any extra sabayon, it is positively delectable served over fresh berries!

IMG_0272
IMG_0260
IMG_0279

Thomas Keller's Lemon Sabayon Tart with Rosemary
recipe slightly adapted from here
the crust recipe will make enough for 3 large tarts or an array of smaller ones (also, I wouldn't recommend  trying to third the crust recipe as it would be difficult to measure 1/3 of an egg)
the filling is for 1/3 of the crust recipe (I find it's easiest to make the filling in smaller batches)

crust:
  • 10 ounces (2 cups) toasted pine nuts (you simply must toast them; it makes all the difference)
  • 3 sprigs fresh rosemary
  • 1/3 cup granulated sugar
  • 1 lb (3 cups) all-purpose flour
  • 1 tsp sea salt
  • 8 ounces (2 sticks) unsalted butter, at room temperature
  • 1 large egg
  • 1 tsp pure vanilla extract
  1. Place the pine nuts in a food processor and pulse a few times. Add in the sugar, rosemary leaves, salt, and flour and continue to pulse until the nuts are finely ground.
  2. Transfer the mixture to the bowl of an electric mixer fitted with the paddle attachment. Add in the butter, egg, and vanilla extract and mix to incorporate.
  3. Divide the dough into three equal parts. Wrap each piece in plastic wrap and refrigerate for at least 10 minutes before using. (You can freeze any extra dough for up to a month.)
sabayon & assembly:
  • 2 large eggs, cold
  • 2 large egg yolks, cold
  • 3/4 cup sugar
  • 1/2 cup fresh lemon juice
  • 1-2 tbsp fresh lemon zest
  • 6 tbsp unsalted butter, cold and cut into 6 pieces
  1. Preheat the oven to 350 degrees. Butter and flour (I only buttered and it worked great) a 9-inch fluted tart pan (or rectangular equivalent- or many smaller tart pans) and refrigerate it while the oven preheats.
  2. Remove the tart pan from the fridge. Using your fingers, press the chilled dough into the tart pan(s), and up the sides.
  3. Bake the crust for 10 to 15 minutes, then rotate it and bake for 10-15 minutes more until evenly golden-brown. Remove the crust from the oven and let it cool while you make the sabayon filling.
  4. Bring about 1 1/2 inches of water to a oil in a pot that is slightly smaller than the diameter of the bowl you will be making your sabayon in.
  5. In a large metal or glass bowl, whisk together the eggs, yolks, and sugar for about a minute until the mixture is smooth. In a measuring cup, combine the lemon juice and zest; set aside.
  6. Set the bowl over the pot, creating a double boiler, and whisk the mixture vigorously. After about 2 1/2 minutes, when the eggs are foamy and have thickened, add 1/3 of the lemon juice. Continue to whisk vigorously, and after another 2 1/2 minutes when the mixture has thickened again add another 1/3 of the lemon juice. Again whisk for another 2 1/2 minutes and then add the final 1/3 of lemon juice. Whisk for 2-3 minutes until the mixture has thickened and is light in color. You can judge if it's thick enough by placing a wooden spoon in the mixture, taking it out, and running your finger down the back of it. If the trail left by your finger stays, it is thick enough.
  7. Turn off the heat and leave the bowl over the water. Whisk in the butter, a piece at a time.
  8. Pour the warm sabayon into the tart crust and place the tart pan on a baking sheet.
  9. Preheat the broiler. While the sabayon is still warm, place the tart under the broiler. Leaving the door of the oven open, brown the top of the sabayon, rotating if necessary to get an even color. (This won't take very long, so DON'T walk away!)
  10. Let the tart sit for at least an hour before serving. (I served mine at room tempeature but you could, alternatively, serve it chilled.) Serve with Whipped Honey-Mascarpone Cream recipe below).
Honey-Mascarpone Whipped Cream

ingredients:
  • 1 cup heavy whipping cream
  • 6 tbsp mascarpone
  • 2-3 tbsp honey
  1. Combine all ingredients in a bowl and whip until stiff peaks.
IMG_0277

Sunday, February 20, 2011

Salted Chocolate Caramel Tarts

IMG_0225

These tarts are the final component to the Valentine's dinner that I made for Mikey and myself this year, and I think they were both of our favorite parts!

These tarts are even more amazing that they look. The luxuriously creamy chocolate ganache, the ooey-gooey caramel, and the crisp, buttery, golden crust all come together to create one of the best desserts I have ever had!

We ended up eating these little tarts as if they were cookies- just picking them up and biting them! It seemed to work best, and certainly aided in hastening the plate to mouth exchange. While these tarts are amazingly tasty, they are also amazingly rich, and I highly recommend that you have an ice-cold glass of milk on hand to wash it down.

Mikey brought some extras in to work and gave one to his parents and all were met with rave reviews!

IMG_0210
IMG_0220

Salted Chocolate Caramel Tarts
recipe slightly adapted from here

ingredients:

crust:
  • 10 tbsp (5 ounces) unsalted butter, at room temperature
  • 1/2 cup (3 1/2 ounces) granulated sugar
  • 2 large eggs, at room temperature
  • 1 tsp pure vanilla extract
  • 2 cups (8 1/2 ounces) all-purpose flour
  • 1 tsp sea salt
caramel:
  • 1 cup (7 ounces) granulated sugar
  • 5 tbsp water
  • 1/2 cup heavy cream
  • pinch of sea salt
chocolate ganache:
  • 12 ounces bittersweet chocolate, coarsely chopped
  • small pinch of sea salt + more for garnish
  • 2 cups heavy cream
for the crust:
  1. In the bowl of an electric mixer fitted with the paddle attachment, cream together the butter and sugar for about 5 minutes. Add in the eggs and vanilla and mix until incorporated. Add in the flour and salt on low speed and mic until just incorporated.
  2. Scrape the dough out onto a piece of plastic wrap and shape into a disk. Wrap and refrigerate for at least 1 hour or overnight.
  3. Flour work surface and roll out your dough to 1/4'' thick. Press the dough into the bottom and up the sides of a 9" tart pan (I used seven 4" tart pans). Place in the freezer for 10-15 minutes or in the fridge for an hour.
  4. When ready to bake, preheat the oven to 350 degrees.
  5. Line your crust-filled tart shell(s) with tin foil and fill with pie weights or dried beans. Bake for 30 minutes if you are using a large tart pan, or 20 minutes if you are using smaller. Turn the tarts halfway through.
  6. Remove the foil and weights from the tarts and bake for about 10 minutes more or until the tart shells are golden. Let cool on a wire rack before filling.
for the caramel:
  1. Place the cream in a small sauce pan and heat it over medium heat. Stir it occasionally while you cook the sugar and if it starts to boil up, then turn it off.
  2. In a medium saucepan heat the water and sugar over high heat, stirring until the sugar dissolves.
  3. Bring the mixture to a boil and cook without stirring until the mixture turns a dark amber. Swirl the pan to ensure even cooking. (This will take between 5 and 10 minutes.)
  4. Take the sugar mixture off of the stove and SLOWLY pour the cream into the sugar, a little at a time because it will boil up. Stir until combined and smooth. Stir in the salt.
  5. Pour the caramel into the bottom of the cooled tart crust(s), covering the bottom(s) evenly. Allow is to cool until it firms and is no longer shiny.
for the ganache:
  1. Place the chocolate and salt in a large heatproof bowl.
  2. Place the cream in a small saucepan and bring to a boil.
  3. Pour the hot cream over the chocolate and allow it to sit for a couple of minutes. Whisk slowly to gently combine (whisking to fast will incorporate air making the ganache less smooth).
  4. Ladle an even amount of ganache into each of the tarts over the caramel. While the ganache is still warm, sprinkle the tops of the tart(s) with some sea salt. (I used a combination of pink Himalayan salt and black lava salt that is colored with charcoal.)
  5. Allow the tart(s) to sit at room temperature for 3-12 hours to cool and harden
IMG_0204

Saturday, February 5, 2011

Meyer Lemon Sweet Rolls

IMG_0136 copy


I'll start off by stating the obvious- these are NOT low-calorie rolls. However, they ARE the kind of treat to make on a lazy weekend morning with a couple of friends or, perhaps your kids. Additionally, they are so amazingly scrumptious that you will take one bite and no longer trouble yourself with trifling matters such as: Will I need to spend an extra hour working out? Do I care if I gain weight just looking at these? No, none of this matters anymore when the warm, gooey, tart, and sweet morsel hits your mouth- everything is now right in the world.

These rolls, while time-intensive, are quite simple to make. Whenever I'm baking with yeast, I always am afraid that I am going to do something wrong and the bread won't rise or something of the sort, but I have yet to fail with yeast and am rapidly coming to the realization that maybe my stigma surrounding it is completely unfounded. Now that I know how easy these rolls are to make, and more importantly, how hard they are to get wrong, I can't wait to experiment with various different filling combos as well as the traditional cinnamon roll!

If you have the time, I highly suggest that you try out these rolls. You will not be disappointed by the crisp exterior, the ooey-gooey center, or the creamy, tart glaze. In fact, these rolls are well worth waking up early to make :)!

IMG_0157
IMG_0142
IMG_0151
IMG_0155

Meyer Lemon Sweet Rolls
recipe from slightly adapted from here
makes about 2 dozen rolls (depending on how you roll/cut them)

ingredients:

rolls:
  • 2 cups warm water
  • 2 tbsp dry yeast
  • 2/3 cup instant nonfat dry milk powder
  • 1/2 cup granulated sugar
  • 2 tsp kosher salt
  • 1/2 cup unsalted butter, softened
  • 1 large egg
  • about 5 1/2 cups all-purpose flour
filling:
  • 1 cup unsalted butter, melted
  • 1 cup granulated sugar
  • zest of 6 Meyer lemons
glaze:
  • 8 oz. block cream cheese
  • juice of 6 Meyer lemons
  • pinch of kosher salt
  • 6 cups powdered sugar
  1. In the bowl of an electric mixer, stir together the warm water and yeast and allow to proof for around 10 minutes. It will get kind of foamy on top when it's done.
  2. To the yeast/water mixture, add in the milk powder, sugar, and salt. With the paddle attachment, stir together on low speed. Add in the softened butter and egg and combine.
  3. Slowly add in the flour, 1 cup at a time until the dough is soft but not sticky (you may need a little more or less flour that I used). Increase the mixer speed to high and mix the dough for about 5 minutes until it pulls away from the sides of the bowl and begins to climb the paddle.
  4. Remove the dough from the bowl and knead a few times on a floured work surface. Set the dough into a large greased bowl and cover with plastic wrap. Set in a warm place to rise for an hour.
  5. Cut the risen dough into thirds. Using a rolling pin, roll 1/3 of the dough into a rectangle 1/4-1/2 inch thick. Spread the dough with 1/3 cup of the butter, 1/3 cup of granulated sugar, and the zest of 2 lemons. Carefully roll the dough up tightly and cut into 1 1/2 inch rolls. Repeat with the rest of the dough.
  6. Preheat the oven to 275 degrees. Place the rolls on a large baking sheet or individual baking cups. Set on top of the preheating oven to rise for about half an hour. Bake for 16-18 minutes until golden brown.
  7. While rolls are baking combine glaze ingredients in a large bowl and beat until combined. Pour or drizzle over warm rolls.
IMG_0135
IMG_0153
IMG_0130

These sweet rolls are featured in a linky party at Sweet Rolls that Rock! Click the button below to check out some more tasty and unique sweet rolls!
  Sweet Rolls that Rock 

Friday, February 4, 2011

Brown Butter Chocolate Walnut Cookies

IMG_0091

Is there anyone out there who doesn't enjoy a good chocolate chip cookie? If so, they should probably head to a doctor and get that checked out because I'm not sure that it's normal.

These cookies are truly something amazing. The brown butter gives them a distinctive nutty flavor that it further complemented by the crunchy walnuts. They are also incredibly chocolatey. I love the way the chocolate chips melt a bit in the warm dough to create scrumptious ribbons of chocolate throughout.

You certainly don't have to add the specialty chocolate squares on top of (or inside of!) the cookies, but it  really puts these delectable delights over the top. I used a milk chocolate bar that was mixed with bits of Christmas spice cookies that I found to really enhance all of the flavors, but I encourage you to play around with any chocolate bar that catches your eye! I think white chocolate would be heavenly, or you could even try a caramel-filled chocolate!

IMG_0090

I find these cookies (like all chocolate chip cookies :P) are best eaten warm, when the chocolate is all melty, with a big class of cold milk- total bliss!

IMG_0107
IMG_0105

I also went ahead and stuffed the specialty chocolate into the center of 1/4 of the cookies for an ooey-gooey treat. They turned out more round and sphere-like, almost like ice cream scoops of delectable cookie!

IMG_0126
IMG_0119
IMG_0128

Brown Butter Chocolate Walnut Cookies
makes roughly 3 dozen cookies

ingredients:
  • 1 cup (2 sticks) unsalted butter
  • 2 cups chopped walnuts
  • 1 cup dark brown sugar
  • 1/2 cup granulated sugar
  • 1 large egg + 1 large egg yolk
  • 1 tbsp pure vanilla extract
  • 2 cups all-purpose flour
  • 1/2 tsp baking soda
  • 1 tsp kosher salt
  • 2 cups chocolate chips (I used 1/2 dark chocolate and 1/2 milk chocolate)
  • optional: specialty candy bar separated into sections (I used a Milk Chocolate with Spiced Cookies Divine chocolate bar)
  1. Preheat oven to 350 degrees. Line a baking sheet with a silicone baking mat or parchment paper; set aside.
  2. In a small saucepan, brown the butter over medium heat. The melted butter should foam up and then subside. It will be a golden-brown color when done and smell nice and nutty. Remove from heat and set aside.
  3. In a medium bowl, combine the flour, baking soda, and salt. Set aside.
  4. In the same pan that you browned the butter, toast the walnuts over medium heat. You'll be able to smell them when they are done; set aside.
  5. In the bowl of an electric mixer fitted with the paddle attachment, combine the warm brown butter and sugars on medium-high speed. Slowly add in the egg, egg yolk, and vanilla and beat until combined. The mixture should look very silky and brown. Slowly add the flour mixture in and beat on low speed until just combined. Stir in the walnuts and chocolate chips. The warm mixture should melt the chocolate about half-way so that ribbons of chocolate form throughout the dough.
  6. Scoop 1-2 tablespoon sized balls onto prepared baking sheet. If using, press a square of the specialty chocolate onto the top of each dough ball. (Alternatively, you can press the square into the middle of the dough for a gooey surprise when you bite in!)
  7. Bake for 10-12 minutes until golden (they may appear doughy still but they will be perfect when they set up). Let cool on the baking sheet for 2 minutes before transferring to a rack to cool further.
IMG_0085
IMG_0110
Related Posts with Thumbnails