My blog has moved!

You should be automatically redirected in 6 seconds. If not, visit
http://www.spachethespatula.com/
and update your bookmarks.

Sunday, April 25, 2010

Teeny Tiny Dark Chocolate Cheesecakes with Cajeta and Raspberries

Teeny Tiny Dark Chocolate Cheesecakes with Cajeta and Raspberries

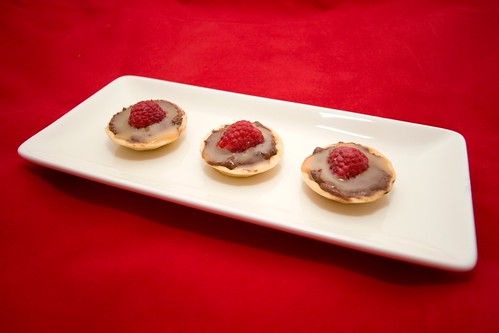
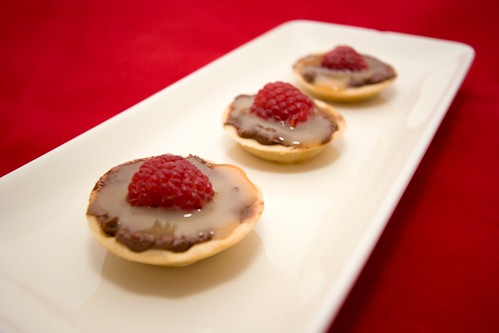
These are the adorable little cheesecakes that I made to go with my cute baby quiches for my boyfriend's curling team.
I used the exact same Sable & Rosenfeld Party Cups (by the way I bought them from Pasta & Co.) that I used for the quiches (they are quite versatile!). One of their suggestions for what to do with the little cups was mini chocolate cheesecakes. I thought that would be adorable but I wanted them to be a bit more special than that. I brainstormed a few ideas in my head- white chocolate drizzled on top? fruit? caramel? Then I thought, hey, how about cajeta instead of caramel? Cajeta is basically a goat's milk dulce de leche with a unique twang to it. It is ammmmaaazzing! I've made it multiple times since it's great drizzled over tart frozen yogurt, as well as a staple for these pretty Chocolate-Covered Peanut Cajeta Cups and my Chocolate Turtle Cookies.
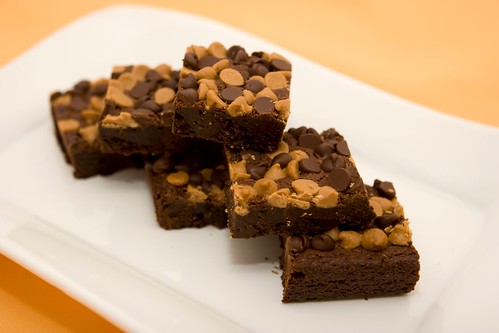
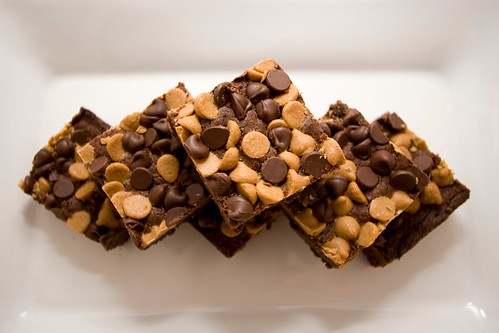
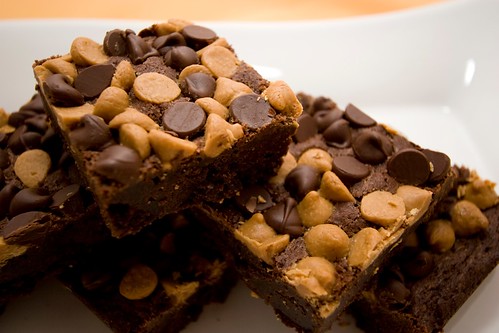
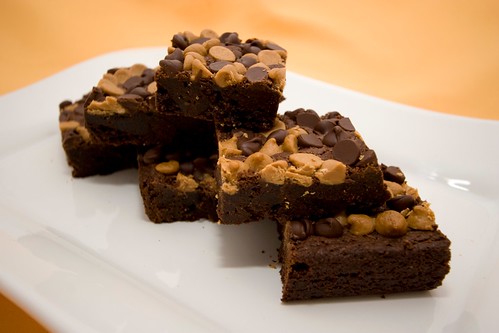
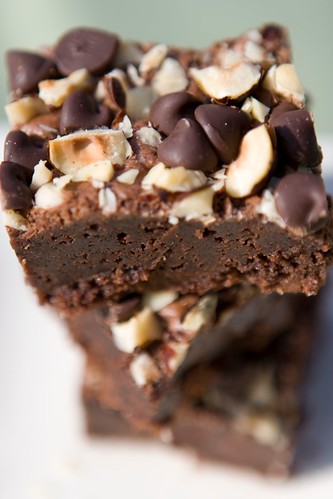
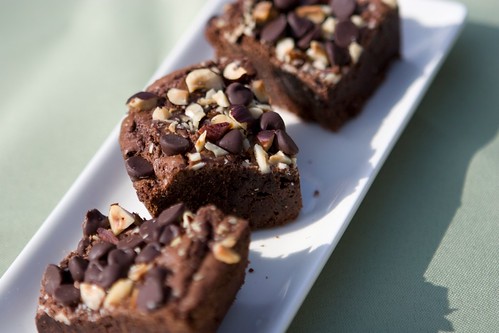
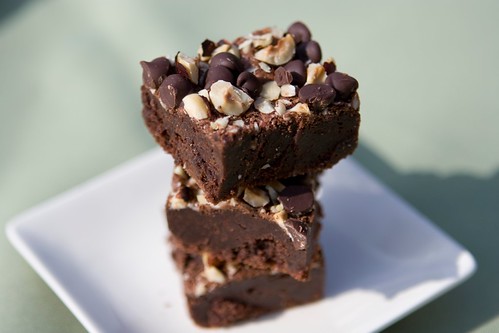
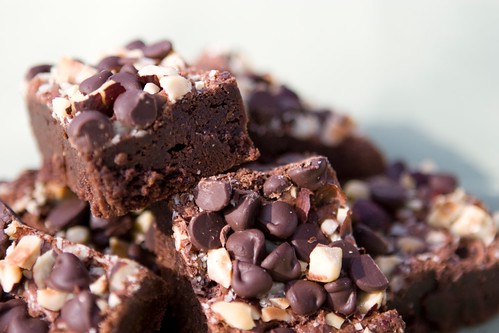
A raspberry garnish finished off the little cakelettes. They turned out really well! These bite-sized desserts were a great alternative to the traditional rice krispie treats and box-mix brownies that littered the buffet table, and were second to go only to my Triple Chocolate Peanut Butter Brownies :)!

Teeny Tiny Dark Chocolate Cheesecakes with Cajeta and Raspberries

Teeny Tiny Dark Chocolate Cheesecakes with Cajeta and Raspberries
filling recipe adapted from here

ingredients:
  • as many little cups as your heart desires (I used about 2 dozen and had a ton of extra filling- which isn't a bad thing!)
  • 5 ounces dark chocolate
  • 2 (4 ounce) packages of cream cheese, at room temperature (I used Neufchatel)
  • 1/2 cup + 3 tbsp granulated sugar
  • 2 tbsp unsweetened cocoa powder (I used Dutch-processed)
  • 2 large eggs
  • cajeta, at room temperature (seriously, make the whole batch- you won't be sad about having extra!)
  • raspberries, sliced in half
  1. Preheat the oven to 325 degrees. Set the little cups out on baking sheets and set aside.
  2. Melt the chocolate in the microwave in 30 second increments, stirring after each to see if the chocolate is melted. Set aside.
  3. In an electric mixer fitted with the paddle attachment, cream together the cream cheese, sugar, and cocoa powder until smooth. Beat in the eggs, one at a time, until incorporated. Add in the melted chocolate and mix to combine.
  4. Spoon about a teaspoon of the cheesecake mixture into each cup. Bake for 12-15 minutes or until set.
  5. Refrigerate the cheesecake for at least 1/2 an hour and then top each with 1/4-1/2 teaspoon of cajeta and 1/2 a raspberry. Pop them back in the fridge until you're ready to serve.
Teeny Tiny Dark Chocolate Cheesecakes with Cajeta and Raspberries


By the way, I have NO idea why my links are a different color than usual. Does anyone else have this problem with Blogger/ do you know how to fix it? Thanks!

Saturday, April 24, 2010

Triple Chocolate Peanut Butter Brownies

IMG_6053


Guys, someone needs to stop me. I am addicted to brownies (1 2). Is there a brownie helpline I can call? This is not good for my waistline, not good at all. Please send help!
However, it is absolutely glorious for my taste buds. These brownies can only be described as outrageous. Nothing should be allowed to taste this good; these babies are downright sinful! They include both dark chocolate and semisweet, but where is the third type of chocolate to complete the trifecta? In the peanut butter! Yes. I've had a mostly finished off jar of white chocolate peanut butter chillin' in my pantry for the past year. It's a bit too sweet for the typical PB&J, but it's absolutely perfect in these brownies! Peanut butter and chocolate are just one of those classic combos that I can't get enough of. Oh and by the way, this is the first time I have used peanut butter chips because I am obviously some kind of fool, but OH. MY. GOSH. They are like the creamy insides of Reese's Pieces!
These are fudgy brownies, NOT cakey. Cakey brownie lovers might as well leave now because you're so not welcome here *points to the door* (Juuust kidding! ...or am I?!), but fudgy brownie lovers, get in your kitchens and bake these on the double and then prepare to be in complete and utter awe.


I made these for my boyfriend's curling league, and let me just tell you- someone else happened to bring brownies too, and theirs just sat there all sad while mine were gobbled up in no time at all :D.


IMG_6060
IMG_6063
IMG_6061


Triple Chocolate Peanut Butter Brownies
recipe generously adapted from here
makes 16 brownies 
(or 32 if you cut the little squares in half creating triangles like I later did!)

ingredients:
  • 1 cup all-purpose flour
  • 3 tbsp Dutch-processed cocoa powder (you can use regular unsweetened if you have it on hand)
  • 1/2 tsp baking powder
  • 1/2 tsp sea salt
  • 1/2 cup (1 stick) unsalted butter)
  • 4 ounces dark chocolate
  • 1 cup granulated sugar
  • 1/3 cup White Chocolate Wonderful Peanut Butter (of course you could use regular peanut butter, but then they would only be double chocolate peanut butter brownies)
  • 2 large eggs
  • 1 tsp vanilla paste (or extract)
  • 1/4 cup peanut butter chips
  • 1/4 cup semisweet chocolate chips
  1. Preheat oven to 375 degrees. Grease an 8x8 inch square baking dish and line with parchment paper; grease the paper too. Set aside.
  2. In a medium-sized bowl, combine the flour, baking powder, cocoa powder, and salt. Set aside.
  3. In a small sauce pan, melt the butter over medium heat. Remove from heat and stir in the chocolate until melted.
  4. In the bowl of an electric mixer fitted with a paddle attachment, beat together the melted chocolate/butter and sugar for a couple of minutes. Add in the eggs, vanilla, and peanut butter. Beat until combined. Reduce the mixer speed to low and add in the flour mixer. Beat until just combined.
  5. Scrape the batter into the prepared baking dish and smooth the top. Sprinkle the peanut butter chips and chocolate chips over the top.
  6. Bake for about 20-30 minutes or until the edges are puffed and the center looks set. Do not overbake (like I may have done just a weence, shhh)!
  7. Cool completely before slicing. It's best to refrigerate them first and then slice (I, personally, think).
IMG_6062
IMG_6058

Friday, April 23, 2010

Itty Bitty Mushroom Quiches

IMG_6078


After the Winter Olympics, Mikey (my boyfriend) took up an interest in curling (lol), so we found a local curling club that was having an open house where you could go and pay $10 to try it out for the day. Well, needless to say it wasn't my favorite, but Mikey loved it! He signed up for both lessons, and a spring league.
This week, he signed up to bring the snacks for the league. I was so happy to hear that I would actually have people to cook for! I hate to say that a lot of what I make ends up going to waste because Mikey and I just can't handle eating it all ourselves.
I got to work in the kitchen baking up an enormous storm. I made (more) brownies (which will be up later this week), tiny cheesecakes (these will also be up later this week), and these adorable mini quiches!
A while back I had purchased these great Sable & Rosenfeld Party Cups but didn't have a use for them (yes I buy things just because I think they are cool/cute). But after the news that I would be making food for a ton of hungry curlers, I knew they would be great for appetizers.
The quiches turned out great- tons of flavor for such little bites! Plus, they were super easy to make and a real crowd pleaser- they were gone in about 10 minutes!


IMG_6085


Itty Bitty Mushroom Quiches
recipe adapted from here
makes 20-30 mini quiches

ingredients:
  • 20-30 party cups
  • 2 large eggs
  • 1/2 cup heavy cream
  • 5-10 crimini mushrooms, diced (you want 1/4 cup of sauteed diced mushrooms)
  • 1 tbsp butter
  • 1 heaping tbsp freshly grated parmigiano reggiano
  • 1-2 tsp diced chives
  • sea salt and freshly ground pepper
  1. Preheat the oven to 350 degrees. Set out the party cups on a baking sheet and set aside.
  2. Heat a smal saute pan over medium-high heat and add the butter. When the butter is melted, add in the mushrooms and cook for 5-7 minutes until nice and brown. Turn off the heat and set aside.
  3. In a medium bowl, beat together the eggs, cream, cheese, salt, and pepper. Add in the mushrooms and chives and combine.
  4. Spoon about a teaspoon of the egg mixture into each party cup. Bake for 15-20 minutes until the tops begin to turn ever-so-slightly golden.

Thursday, April 22, 2010

White Chocolate Mascarpone Pistachio Brownies with Cardamom-White Chocolate Sauce


IMG_5998 copy


Okay, I am clearly having a brownie thing lately. It happens, you know? Anyways, I got the idea in my head a few days ago for a white chocolate brownie, and since then, I could not stop thinking about it! The thought intrigued me; I've never had, let alone seen a white chocolate brownie before, but I imagined that they would be elegant and unique.
I remembered how gorgeous my Mascarpone Brownies with a Honey-Chocolate Sauce turned out and I thought it would be interesting to adapt the recipe for a white chocolate brownie. Naturally, I had to change up the flavor profile, so I added in some pistachios. I also replaced honey in the sauce with cardamom which pairs magically with the pistachios. 
These white chocolate wonders turned out far better than I could have hoped for. Though, I'm not sure if I'm comfortable calling them brownies. They seem to be in a category all their own. They are soft, yet fudgy, and so unusual that they are sure to wow your friends and family. Plus, they are far easier to make then they appear (and sound, boy is that title a mouthful)!

IMG_6041
IMG_6017
IMG_6033


White Chocolate Mascarpone Pistachio Brownies
recipe generously adapted from here

ingredients:
  • 3/4 cup all purpose flour
  • 3/4 tsp baking powder
  • 1/2 tsp sea salt
  • 1/2 cup + 6 tbsp unsalted butter
  • 6 ounces white chocolate, chopped (or you can use chips; I used disks from Whole Foods)
  • 8 ounces mascarpone (my container had actually 8.8 ounces so I just threw it all in)
  • 1 cup granulated sugar
  • 4 large eggs
  • 2 tsp vanilla extract
  • 3/4 cup chopped, roasted pistachios (plus more for garnish)
  1. Preheat the oven to 350 degrees. Grease an 8x8-inch baking dish and set aside.
  2. Combine the flour, baking powder, and salt in a small bowl and set aside.
  3. Melt the white chocolate and 1/2 cup of butter together in microwave, checking and stirring every 30 seconds.
  4. In the bowl of an electric mixer fitted with the paddle attachment, beat the mascarpone, 6 tbsp butter, and sugar until combined. Add in the eggs one at a time, mixing thoroughly after each addition. Add in the vanilla and mix to combine. Pour in the melted chocolate mixture and beat until combined.
  5. Slowly add the dry ingredients to the wet ingredients and mix on low speed until just combined.
  6. Stir in the pistachios by hand.
  7. Pour the batter into the prepared baking dish. Bake for about 45 minutes or until the brownies are set and top is golden-brown.
  8. Remove from oven and allow them to cool to room temperature. Then, pop them in the fridge so they get nice and chilled. Trust me, they are FAR better cold and much easier to cut. Serve with warm Cardamom-White Chocolate Sauce and a garnish of chopped pistachios (the cold brownies with the warm sauce is totally where it's at.)

Cardamom-White Chocolate Sauce
  • 1/2 cup heavy cream
  • 8 cardamom pods, crushed
  • 5 ounces white chocolate
  1. Place the cardamom pods with seeds in a small sauce pan over medium-high heat. Stir until pods brown, about 5 minutes. Add the cream and bring the mixture to a light boil, then reduce heat to low and simmer for about 10 minutes.
  2. Turn the heat off and cover. Let steep at room temperature for about 30 minutes and then strain out the cardamom pods and seeds.
  3. Return the now cardamom infused cream to the stove and bring to a light boil. Turn off the heat and stir in the chocolate until fully melted and combined.
  4. Server warm over the brownies!
IMG_6011
IMG_6002
IMG_6012

Wednesday, April 21, 2010

Anzac Biscuits

IMG_5965


I saw this recipe a couple of weeks ago and knew that I'd have to try it. I'm a huge coconut lover (I never can understand why so many people hate it) so these shortbread-like cookies sounded right up my alley.
Apparently, these are super popular in New Zealand and now I can definitely see why. These things are freakin' addictive! They are seriously so good. They are super crisp (my dad would LOVE these, he loves crunchy cookies; next time I go home I'll have to make them) and sweet. The sugar sort of caramelizes and produces something so incredible that it is hard to describe. Now, they may not be the prettiest cookies, in fact they are rather ugly, but I promise you that for as drab as they look, they are even more delicious.
Don't believe me? I ate four right out of the oven and Mikey ate eight, yes, eight. They are that good. (Also, they are fairly small cookies :P, about the size of a quarter-ish.)


IMG_5970
IMG_5957
IMG_5962


Anzac Biscuits
recipe adapted from here

ingredients:
  • 1 cup all-purpose flour
  • 1 cup granulated sugar
  • 1 cup rolled oats
  • 1 cup ground unsweetened coconut (just whir it around in a food processor until it becomes a coarse meal- be sure to measure it after you grind it up)
  • 1 stick (8 tablespoons) unsalted butter
  • 1 tbsp honey
  • 1/2 tsp sea salt
  • 2 tbsp boiling water
  • 1 tsp baking soda
  1. Preheat oven to 350 degrees. Line your baking sheets with silicone baking mats or parchment paper and set aside.
  2. In a medium-sized bowl, combine the flour, sugar, and oats. Set aside.
  3. In a small saucepan, melt the butter and honey over medium-low heat. Add in the water and baking soda. The mixture will fizz a bit when the baking soda is added.
  4. Pour the melted butter mixture over the dry ingredients and stir to combine.
  5. Form into teaspoon-sized balls (you'll have to really press the mixture together) and place on the lined baking sheets about an inch or so apart.
  6. Bake for 8-12 minutes or until golden. Let cool on the baking sheet for 10 minutes and then transfer to a wire rack to cool further.
IMG_5979
IMG_5964

Sunday, April 18, 2010

Ina's Spring Green Risotto


IMG_5921

The arrival of spring has brought so many striking greens (especially the asparagus) to the produce section at the store! I wanted a recipe that I could use a bunch of them in and remembered that Ina had a risotto recipe- perfect!
Risotto is one of my very favorite dishes, and it had been quite a while since I last made any (see here and here); I decided that this Spring Green Risotto was the best way to let the greens I wanted to use shine at the peak of their season.
This risotto was pure heaven. In fact, it may just be the best risotto I have ever made! The mascarpone made it so creamy and rich, but with the abundance of asparagus, leeks, peas, and fennel, the dish was still fresh and vibrant. I loved the slight licorice flavor that the fennel brought in paired with the sweet peas, and the lemon added a wonderful brightness to the dish.
Also, I just want to stress that you absolutely must use a good parmesan cheese (parmigiano reggiano) in the risotto; it makes a night and day difference. 
I served my risotto as a main course, but I imagine that some Lemon Roasted Chicken would be sublime with it.

IMG_5942

Ina's Spring Green Risotto
recipe from here
serves 4 as a main dish or 6 as a side

ingredients:
  • 1 1/2 tbsp extra virgin olive oil
  • 1 1/2 tbsp butter
  • 2 leeks, chopped, white and light green parts only
  • 1 fennel bulb, chopped
  • 1 1/2 cups Arborio rice
  • 2/3 cups Sauvignon Blanc (or other dry white wine)
  • 4-6 cups chicken stock, simmering
  • 1 bunch thin asparagus, cut at a diagonal
  • 10 ounces fresh or frozen peas
  • freshly grated lemon zest, from 2 lemons
  • sea salt and freshly ground pepper
  • freshly squeezed lemon juice, from 1/2 a juicy lemon
  • 1/3 cup mascarpone cheese
  • 1/2 cup freshly grated parmigiano reggiano
  • 3 tbsp fresh chives, minced
  1. Heat the olive oil and butter in a medium saucepan or dutch oven over medium heat. Add the leeks and fennel and saute until tender, about 5 to 7 minutes.
  2. Add in the rice and stir for a minute to coat. Ad in the white wine and simmer over low heat, stirring constantly until most of the wine is absorbed.
  3. Add the chicken stock 2 ladles at a time, stirring constantly. Wait for the stock to be absorbed before adding more. This will take probably 25-35 minutes.
  4. While cooking the risotto, blanch the asparagus in boiling salted water for 4-5 minutes. Drain and immediately run under cold water.
  5. When the risotto has been cooking for about 15 minutes, add in the asparagus, peas, lemon zest, salt, and pepper. Continue cooking and adding stock until rice is tender but still has a bite to it.
  6. In a small bowl, combine the mascarpone and lemon juice.
  7. When the risotto is done, remove from heat and stir in the mascarpone mixture, parmigiano reggiano, and chives.
  8. Serve immediately and garnish with additional chives and parmigiano reggiano if desired.
IMG_5927
IMG_5936


    Tuesday, April 13, 2010

    Cinnamon Hazelnut Brownies


    IMG_5894


    I have been having the most incurable chocolate cravings lately! I don't even know why because normally, I'm not so much of a dessert person (odd considering how much I love to bake, but usually I only try one or two of whatever I make, and then offload the rest onto others). But, these past couple of weeks the cravings have been unrelenting and nothing, not even dark chocolate M&M's or Chocolate Peanut Butter Cake, could cure them!
    Alas, my search continued. But then, then I found these. These glorious, wonderful, amazing squares of rich, fudgy goodness and the incessant lust for chocolate was finally quashed!
    I have Sugar Plum to thank for this; her spectacular Cinnamon Hazelnut Brownie recipe combines two of my very favorite chocolatey things: brownies and Nutella. Need I say more? No, probably not, but I will.
    These brownies are chewy and dense with a slight spice from the cinnamon and a whole lotta crunch from the hazelnuts. They're pretty close to the best brownies around, in my humble opinion (and I have made some pretty magnificent brownies like these Mascarpone Brownies with a Chocolate Honey Sauce or these Cheesecake Brownies). I implore you, run to your kitchen and bake these immediately!


    IMG_5883
    IMG_5884
    IMG_5896


    Cinnamon Hazelnut Brownies
    recipe slightly adapted from here
    makes 16 amazing brownies

    ingredients:
    • 1 cup all-purpose flour
    • 3 tbsp unsweetened cocoa powder (I used Dutch-processed)
    • 1 1/4 tsp cinnamon
    • 1/2 tsp baking powder
    • 1/2 tsp sea salt
    • 1/2 cup (1 stick) unsalted butter
    • 4 ounces semisweet chocolate chips, plus more for sprinkling on top
    • 1 cup granulated sugar
    • 1/3 cup Nutella (I actually used a different brand, Loacker, because that was what was at my grocery store, but the taste is the same)
    • 2 large eggs, at room temperature
    • 1 tsp vanilla paste (or extract)
    • 1/4 cup finely chopped hazelnuts
    1. Preheat oven to 375 degrees. Grease an 8x8 inch square baking dish and line with parchment paper; grease paper. Set aside.
    2. In a medium-sized bowl, combine the flour, cocoa powder, cinnamon, baking powder, and salt. Set aside.
    3. In a small sauce pan, melt the butter over medium heat. Remove from heat and stir in the chocolate until melted.
    4. In the bowl of an electric mixer fitted with a paddle attachment, beat together the melted chocolate and sugar for a few minutes. Add in the Nutella, eggs, and vanilla and beat for a couple more minutes until fully combined. Reduce the mixer speed to low and add in the flour mixture. Beat until just combined.
    5. Scrape the batter into the prepared baking dish. Sprinkle the hazelnuts and chocolate chips over the top (I used a heavy hand when "sprinkling").
    6. Bake for about 30 minutes, or until the edges are puffed and the center is set (mine baked 33 minutes). Don't overbake or they won't have that wonderful fudgy texture; it's honestly better to underbake them by a bit than overbake them!
    7. Cool completely before slicing. It's easiest to refrigerate them before slicing and removing from the baking dish- plus they taste awesome nice and cold!
    IMG_5885
    IMG_5908

    Monday, April 12, 2010

    Spanish Tostadas with Chorizo and Watermelon- Tapas Night Part 3 of 3

    IMG_5846


    This is Part Three of my Tapas Date Night Menu, and I think it just might be the most interesting. You're probably thinking, "Watermelon and chorizo?" Yes my friends, watermelon and chorizo indeed.
    This appetizer is like a roller-coaster for your taste buds- spicy chorizo, sweet and fresh watermelon, crunchy bread- this is a dish you simply MUST try!
    I've never been the biggest fan of sausage (weird I know), but when I saw that this recipe contained sausage with watermelon, I knew this was a recipe that I couldn't pass up.
    These tostadas were amazing (and Mikey's favorite dish of the evening). They are a bit messy though, so I suggest you have a fork handy.


    IMG_5843


    Spanish Tostadas with Chorizo and Watermelon
    recipe slightly adapted from here


    ingredients:
    • 2 hot chorizo sausages, sliced
    • 3 medium-sized heirloom tomatoes, chopped
    • 2-3 cups chopped watermelon
    • crusty, rustic bread, sliced
    • 1 large garlic clove
    • extra virgin olive oil
    • baby arugula
    • about 2 tbsp sherry vinegar
    1. Heat a medium-sized sauté pan over high heat. Add in the chorizo (no added oil) and cook for a few minutes. Add in the tomatoes and cook for just a minute.
    2. Add the chorizo/tomato mixture to a large bowl with the watermelon. Toss well together.
    3. Toast the bread slices and while they are still warm, rub each with the garlic clove. Drizzle each slice with a bit of the olive oil.
    4. Top each piece of toast with a few leaves of arugula. Spoon on the chorizo/watermelon mixture, and then top again with more arugula leaves.
    5. Add the sherry vinegar to the hot pan that you cooked the chorizo in and stir it around to deglaze the pan. Pour the vinegar over the tostadas. Serve!
    IMG_5839
    Related Posts with Thumbnails