My blog has moved!

You should be automatically redirected in 6 seconds. If not, visit
http://www.spachethespatula.com/
and update your bookmarks.

Wednesday, January 27, 2010

Maple Dijon Roasted Brussel Sprouts


In my quest to be healthy despite my love of all food, I have decided to start including calorie counts of my recipes.


IMG_1260


I saw this recipe over at Closet Cooking a couple of weeks ago and could not wait to try it out. I adore savory/sweet combinations and I new this one would be right up my alley.
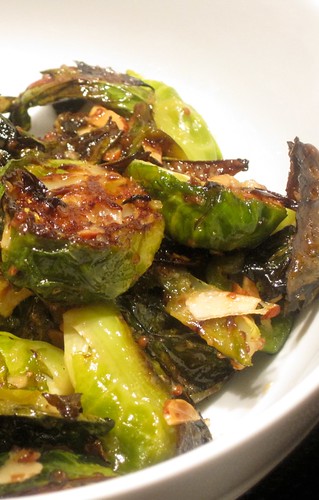
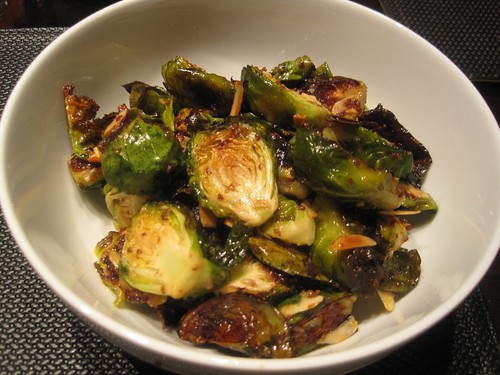
The brussels sprouts were out-of-this world good! The tang of the apple cider vinegar with the sweetness of the maple syrup was utterly divine.
I like my roasted veggies ultra crispy so I let them go in the oven for quite a while. The little leaves that fell off of the spouts got nice and crunchy and reminded me a lot of kale chips- Yum!


IMG_1255


Maple Dijon Roasted Brussels Sprouts
recipe from here

As you can see I used a pound of brussels sprouts (as apposed to Kevin's two) with the same amount of dressing; I really enjoyed the concentrated flavor and though it was accidental on my part, I will now make them like this every time!

ingredients:
  • 1lb brussels sprouts, washed, trimmed, and halved
  • 1 tbsp extra virgin olive oil
  • salt and pepper
  • 1 tbsp extra virgin olive oil
  • 1 tbsp apple cider vinegar
  • 1 tbsp pure maple syrup
  • 1 tbsp whole grain mustard
  • 1 tsp dijon mustard
  • 1 small clove garlic, minced
  • 1/4 cup sliced almonds, toasted
  1. Preheat oven to 400 degrees.
  2. Toss the brussels sprouts in 1 tablespoon olive oil and spread out on a baking sheet.
  3. Whisk together the remaining ingredients minus the almonds. Set aside.
  4. Bake the sprouts for around 30 minutes, being sure to stir them around half way through.
  5. Toss the roasted sprouts and toasted almonds in the vinaigrette and serve!
4 side servings at about 170 calories each, or two big servings at 340 calories each :)

IMG_1262
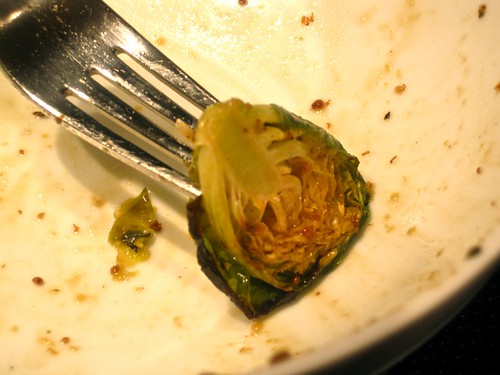
Good to the last sprout!

Sunday, January 24, 2010

Grilled Pear, Humboldt Fog, and Mint Panini

IMG_1223


This year, Mikey got a panini press for Christmas and, to be honest, I think I was more excited about his gift than he was, ha ha. A few weeks ago, we tried it out for the first time and it was a overwhelmingly successful venture! I made Mikey a panini with grilled chicken, sharp cheddar, bacon, homemade chipotle mayonnaise, and spinach, served up with some creamy tomato soup. And for myself, a panini with dry coppa, arugula, and fontina cheese. I also had to sneak a tiny bowl of the tomato soup because man, this boxed stuff is incredible! It was Pacific Natural Foods Creamy Tomato and I seriously thought it was out-of-this-world good. It has this amazing subtle sweetness to it. I immediately went out and bought 3 more boxes of the stuff along with a box of nearly every variety they make. I might be a bit obsessive...
Anyways, the paninis were scrum-diddly-umptious and I basically couldn't wait to use the press again.
I found this wonderful blog called Panini Happy while looking for flavor combinations and came across a Grilled Peaches and Humboldt Fog Panini that sounded really tasty. Since peaches aren't in season at the moment, I decided to switch it up and use pears! The sandwich turned out SO good! The creaminess and pronounced taste of the Humboldt Fog paired with the sweet, grilled pears was simply delightful- another success for the panini maker!
I served my panini up with a handful of baby spinach dressed in a simple vinaigrette, and some creamy pumpkin soup. The recipe for the soup can be found here!


IMG_1231


Grilled Pear, Humboldt Fog, and Mint Panini
recipe adapted from here
serves 1

ingredients:
  • 1 large pear (I used Bosc), sliced into 1/2 inch slices
  • 1 ounce Humboldt Fog goat cheese
  • fresh mint
  • 2 slices of bread (thicker works better, I just used what I had on hand which was Pain du George- a whole wheat bread)
  • a small amount of butter
  1. Preheat the panini grill to 375 degrees.
  2. Place the pear slices on the grill and grill for around 2 minutes, until they are caramelized. Remove from the grill and set aside.
  3. Butter one side of each of the bread slices with a bit of butter.
  4. Layer the pear slices onto a slice of the bread (not the butter side) and top with some mint leaves and then the cheese. Top with the remaining slice of bread and press for around 3 to 4 minutes (make sure the butter sides of the bread are facing the panini press), or until the cheese is melted. Serve!
IMG_1216

Friday, January 22, 2010

Honey Whole Wheat Pound Cake

IMG_1246


I saw this scrumptious-looking cake over at Joy the Baker quite a while ago, yet somehow the recipe slipped through the cracks and I never got around to making it.
After battling acute bronchitis and an acute sinus infection for the past week and not being able to really cook or bake, I was certainly ready to jump back into things. I spent my ill days looking through all of the recipes I had bookmarked and saw this one and knew it would be the first thing I made once I could actually be up and about again.
This pound cake was absolutely delightful. It was rich and moist from the buttermilk with naturally sweet undertones from the honey, as well as a nutty flair thanks to the whole wheat. Basically what I'm telling you is that this pound cake is the total package. As in, make it as soon as you can; I'm sorry I waited so long :).


IMG_1235


Honey Whole Wheat Pound Cake
recipe ever-so-slightly adapted from here
makes 1 loaf and 6 muffins

ingredients:
  • 2 1/4 cups unbleached white whole wheat flour
  • 2 tsp baking powder
  • 3/4 tsp salt
  • 3/4 cup unsalted butter (12 tbsp)
  • 1 cup granulated sugar
  • 1/2 cup honey (I used a natural, raw fireweed honey)
  • 2 tsp vanilla paste
  • 3 large eggs
  • 1 cup buttermilk (the NON low-fat variety is where it's at)
  1. Preheat oven to 350 degrees. Butter and flour pans and set aside.
  2. In a small bowl, mix together the  flour, baking powder, and salt and set aside.
  3. In the bowl of an electric mixer fitted with a paddle attachment, cream together the butter and sugar on medium speed for about 3 minutes. Add in the honey and mix for another 2 minutes. Add in the eggs one at a time and beat for 1 minute after each addition. Add in the vanilla and beat to combine.
  4. Add the flour mixture and buttermilk, alternately, to the mixer, beginning and ending with the flour mixture.
  5. Pour the batter into the prepared pans and smooth the tops. Bake the cake for about and hour and muffins for 20-25 minutes until a toothpick inserted into the center of each comes out clean. Allow the cake and muffins to cool for 10-20 minutes in the pans before transferring to a wire cooling rack to cool further.
IMG_1237

Sunday, January 17, 2010

Chicken Parmigiana

IMG_1207


Sorry for the lack of posts, but Mikey has been quite sick with a sinus infection all week and I finally caught it too yesterday. I thought I might be able to elude the bug this time since Mikey has started showing signs of improvement but alas, I woke up yesterday morning with a sore throat :(.
Well anyways, I'm very excited to share this recipe with you! I just love Ree's simple approach to cooking over at The Pioneer Woman, and I have had this Chicken Parmigiana recipe saved for months.
It turned out fabulous! It's a wonderful, hearty meal that is sure to bring you comfort when you're down (whether that be because you're ill, or maybe because it has been raining for two straight weeks!). I (roughly) halved her recipe since it was just Mikey and I eating.


IMG_1200


Chicken Parmigiana
recipe from here
serves 2-3

ingredients:
  • 2-3 boneless, skinless chicken breasts, trimmed and pounded flat
  • 1/4 cup all-purpose flour
  • salt and pepper, to taste
  • 1/4 cup extra virgin olive oil
  • 1 tbsp butter
  • 1/2 medium onion, chopped
  • 2 garlic cloves, minced
  • 1/2 cup red wine
  • 28 ounce can of crushed tomatoes
  • 1 tbsp granulated sugar
  • 2 tbsp fresh parsley, chopped (plus more to garnish)
  • 1/2 cup parmigiano reggiano, freshly grated
  • 1/2 lb thin linguine
  1. Mix the flour, salt, and pepper together on a large plate. Dredge the flattened chicken breasts in the mixture and set aside.
  2. Start boiling water for pasta. Cook pasta until al dente.
  3. Heat the olive oil and butter together in a large skillet over medium heat. When hot, fry the chicken breasts on both sides until golden-brown (roughly 2-3 minutes per side). Remove from skillet and keep warm on a plate with tin foil over the top.
  4. Add the onion and garlic to the skillet and gently stir for about 2 minutes (do not clean skillet first!). Pour in the wine and stir, being sure to scrape up all of the browned bits on the bottom of the pan. Allow to cook for about 2 minutes.
  5. Pour in the crushed tomatoes and stir to combine. Add in the sugar and more salt and pepper to taste. Allow to cook for about 30 minutes. Then, add in the parsley and stir.
  6. Lay the cooked chicken breasts on top of the sauce and completely cover each in grated cheese. Reduce heat to low and cover and cook until the cheese is fully melted.
  7. To plate, place cooked noodles on a plate and cover with sauce. Carefully place a chicken breast on top and garnish with more parsley. Serve right away!

Sunday, January 10, 2010

Meyer Lemon Cakes

IMG_1171


I just bought a beautiful bag of Meyer lemons and simply couldn't wait to use them. I searched around for recipes for a while and found a ton, but in the end I decided to stick with trusty Ina and her Lemon Cakes recipe.
I switched it up a bit and added some frozen blueberries to one of the cakes because I just adore the combination of lemon and blueberries.
The cakes turned out amazing! Both Mikey and myself found them to be the perfect balance of sour and sugary flavors, with him liking the plain lemon cake better, and me preferring the lemon blueberry version (he's not a berry guy). Just like Ina's Lemon Bars, these cakes pack a ton of tart lemon-y flavor (though the use of the Meyer lemons cuts down of the tartness quite a bit). I am a true lemon lover so nothing is ever too tart for me personally, but if you only slightly like lemon I would suggest dialing back the lemon usage a bit.
These cakes make an excellent dessert served up with a bit of blueberry sorbet or vanilla ice cream, but they also make a tasty breakfast on their own!


IMG_1183


Meyer Lemon Cakes
recipe adapted from here

ingredients:
cakes:
  • 1/2 lb unsalted butter, at rom temperature
  • 2 cups granulated sugar
  • 4 large eggs, at room temperature
  • 1/3 cup grated Meyer lemon zest,  from about 6-8 lemons 
  • 3 cups all-purpose flour
  • 1/2 tsp baking powder
  • 1/2 tsp baking soda
  • 1 tsp sea salt
  • 1/4 cup freshly squeezed Meyer lemon juice
  • 3/4 cup buttermilk
  • 1 tsp vanilla paste
  • 1 1/2 cups fresh or frozen blueberries (optional, this is the amount for one of the cakes)
lemon syrup:
  • 1/2 cup freshly squeezed Meyer lemon juice
  • 1/2 cup granulated sugar
glaze:
  • 2 cups confectioners' sugar
  • 3 1/2 tbsp freshly squeezed Meyer lemon juice
  1. Preheat oven to 350 degrees. Grease and flour 2 loaf pans.
  2. Cream the butter and granulated sugar in the bowl of an electric mixer fitted with a paddle attachment for about 5 minutes on medium speed. Add in the eggs one at a time and mix until combined. Add in the lemon zest and fully incorporate.
  3. In a medium-sized bowl, mix together the flour, salt, baking powder, and baking soda. Set aside.
  4. In a small bowl, combine the lemon juice, buttermilk, and vanilla paste.
  5. To the butter/sugar mixture, alternately add in the flour and buttermilk mixtures, beginning and ending with the flour mixture.
  6. Pour half of the batter into the first loaf pan and set aside.
  7. Fold the blueberries into the remaining batter and pour into the other loaf pan.
  8. Smooth the tops of the batter and bake for 45 minutes to an hour until a toothpick inserted into the center comes out clean.
  9. Meanwhile, in a small saucepan, cook the ingredients for the lemon syrup over low heat until the sugar dissolves.
  10. When the cakes are finished baking, allow them to cool for ten minutes. Remove them from their trays and then spoon the lemon syrup evenly over them. Allow the cakes to cool completely.
  11. For the glaze, combine the confectioners' sugar and the lemon juice in a bowl and whisk until smooth. Pour the glaze over the tops and allow it to drip down the sides. Serve!
IMG_1164
IMG_1182

Saturday, January 9, 2010

Curried Pumpkin Lentil Soup

IMG_1137


I can see already that this is going to be a busy quarter for me in terms of school and I probably won't get as many posts up as I would like to, but I sure will try!
It's been pretty dreary and cold here in Seattle with all this rain lately, and all I could seem to think about was a big, warm bowl of soup to brighten my spirits. Well, tonight for dinner I finally got around to making that soup!
My adoration for pumpkin grows ever-stronger after tasting this hearty bowl of goodness. I absolutely love the sweetness of the pomegranate molasses with the curried pumpkin, and the lentils ensure that you are getting a filling meal :). The addition of the apple really brings the soup together in a sweet and spicy medley of Indian flavors.


IMG_1148


Curried Pumpkin Lentil Soup
recipe slightly adapted from here

ingredients:
  • 1 tbsp olive oil or butter
  • 1 medium onion, diced
  • 2 garlic cloves, minced
  • 3 cups chicken broth
  • 1/2 cup red lentils
  • 1 cup pureed pumpkin
  • 1 tbsp curry powder
  • 1 tsp cinnamon
  • 1 tsp garam masala
  • 1/8 tsp cayenne pepper
  • salt and pepper, to taste
  • 1 medium apple, diced
  • 2 tbsp pomegranate molasses (I made my own using Kevin's recipe here)
  1. Heat the butter or oil in a large dutch oven over medium-high heat. Add in the onions, season with salt and pepper, and cook until translucent and slightly browned, about 5 minutes. Add in the garlic and continue to cook until fragrant, just about another minute.
  2. Add in the broth, lentils, and apple and bring to a boil. Cover and reduce to medium heat and continue to cook for about 7-10 minutes, or until the lentils are cooked through.
  3. Stir in the pumpkin puree and spices and stir to combine. Reduce heat to low and cook for another 5 minutes. Remove from heat.
  4. Ladle into bowls and drizzle with pomegranate molasses before serving.
IMG_1142

Tuesday, January 5, 2010

Edamame Hummus

Edamame Hummus


My junior year at the University of Washington is officially underway as of yesterday, and I am both excited and nervous for the quarter. In an effort to bring my lunches/snacks instead of purchasing them on campus, I have been making some easy-to-pack foods/meals.
I love hummus, and I think it makes a wonderful appetizer, snack, or meal. As much as I adore the traditional chickpea-based hummus, I fell in love with another type that I tried about a year ago- edamame hummus. It is a delightful (and colorful!) alternative to regular, old hummus. It's really satisfying and has that "healthy-taste" (Does that make sense to anyone but myself? I guess "fresh" works as well...) to it. I implore you to make it immediately, and make it by the pound! Pack it for work, or school, or you children's lunches. You can even serve this as a super easy appetizer at a dinner party. It's applications are endless!


Edamame Hummus


Edamame Hummus

ingredients:
  • 10 ounces edamame, boiled and shells removed (frozen are great too!)
  • zest and juice of 1 lemon
  • 3 cloves of garlic
  • 1/2 tsp cumin
  • 1/4 cup tahini
  • 1/4 cup extra virgin olive oil
  • salt and pepper, to taste
  • red pepper, flakes, to taste (optional)
  1. Combine everything except the olive oil in the bowl of a food processor and blend until combined.
  2. Slowly drizzle in the olive oil until desired consistency is reached.
  3. Garnish with more olive oil, toasted sesame seeds, red pepper flakes, or parsley (really anything you like). Serve with veggies and pita bread :).
Edamame Hummus

Friday, January 1, 2010

Plum and Blueberry Galette

HAPPY NEW YEAR!

summer 09 140


Finally, the rush of the holidays is nearly over and I can get back to posting!
Now, I have to admit, this recipe is quite old- from July 2009, but it is so amazing that I just have to share it with you. Normally I wouldn't use things like boxes of piecrust mix, but I made this recipe while home in Florida over the summer and didn't have much time to mess around making the pastry crust by hand (though over the past year I have become such a natural food snob that I would undoubtedly make the crust myself simply because I despise no knowing exactly what I'm putting in my food). Don't let the boxed piecrust deter you, however; make no mistake, this galette is fantastic! It makes a refreshing dessert, or even a delectable breakfast alternative.
I had used all fresh fruits when I made it, but I'm sure you could use some frozen blueberries in a pinch. The lightness you get from the fruit is paired so nicely with the rich pastry crust and sugar-y drizzle.
The great thing about this recipe is that it is also highly adaptable. You can substitute any fruits you like, such as perhaps: raspberry and nectarine, blackberry and peach, or strawberry and mango.


summer 09 141

Plum and Blueberry Galette

ingredients:
filling:

  • 1 1/4 lbs plums (I used a variety of red, black, and yellow plums), pitted and cut into 1/2-in. wedges
  • 1/2 cup blueberries
  • 1/2 cup granulated sugar
  • 4 tsp cornstarch
crust:
  • 1 box (11 ounces) piecrust mix
  • 3 tbsp granulated sugar
  • pinch of ground ginger
  • 1/3 cup water 
  • 1 large egg, lightly beaten
icing drizze:
  • 1 tbsp water
  • 1/2 cup confectioners' sugar
  1. Preheat oven to 375 degrees. Line a large baking sheet with foil (though I experienced some sticking with the foil so I would suggest a silicone baking mat).
  2. In a medium-sized bowl, toss together the filling ingredients (now, try not to eat all of t before it's time to actually bake it). Set aside.
  3. In a large bowl, combine all of the crust ingredients except the egg. Stir until mixture begins to come together, then roll it out into a 13-inch circle on a lightly floured surface. Carefully roll it up on the rolling pin and transfer it to the baking sheet.
  4. Spoon the filling in the center of the dough, leaving a 3-inch border all around. Fold the edges of the dough partially over the fruit mixture and brush with beaten egg.
  5. Bake for 35 minutes until crust is golden-brown and the filling is bubbly (you may experience some leakage but that's fine). Carefully transfer the galette to a serving tray using two spatulas to aid in balancing it.
  6. In a smal bowl combine the icing ingredients and mix until pliable (add more water if necessary). Drizzle over galette and serve!
summer 09 139

Pay it Forward Goodies

rachael2


About a month ago, I left a comment over on Closet Cooking regarding an event called Pay It Forward. Three people are randomly chosen from the comments to participate, and Kevin sends them a box of food-related goodies. The idea is that, then, each of those three people will host the event themselves and choose three more people each that they will send out boxes to! I was a winner (yay!), and I just got my box a few days ago and thought I would post my incredibly awesome Canadian foodie gifts:


First, some Maple Cream Cookies (For the record, these are so terribly scrumptious. I use the word terrible because I can't keep my paws off of them!):
rachael7


Pure Maple Syrup (the good stuff):
rachael4


Maple Sugar (I can't wait to bake with this; think maple sugar cookies, or a maple caramel!):
rachael5


Some AMAZING-looking Balsamic Fig and Date Mustard that I'm sure you could put on your shoe and it would be wonderful:
rachael6


A couple bags of Maple Tea (Oh how I adore tea of all sorts):
rachael8


And lastly, a few Japanese Kit-Kat Bars (really cool!):
Pay it Forward- Japanese KitKats


Thanks so much Kevin!


I will, of course, be participating in this even as well, choosing three more random individuals to send out boxes too, but the rules state that I have a whole year to do this. As I have very few readers (read maybe 5 including family?) at the moment, I don't think that now would be the best time for me to do any sort of give-away, but do look forward to it in the semi-near future!


Now, at the same time (like within one or two days) I also entered a give-away for a Starbucks mug over at Blissful Bellas, and somehow won that as well (talk about lucky)! Starbucks was all out of their holiday mugs for my prize, but I got this gorgeous mug instead:
rachael10
I love it! Thanks girls! I can't wait to have some of my new Canadian tea in this mug :)
Related Posts with Thumbnails