Looking for a last minute Halloween treat? Try these super simple (super cute) cookies that I made last year! They take almost no effort at all and they are a huge hit with kids! Best of all, you probably have nearly all of the ingredients on hand!
[Post originally from 10/27/09]
My little sister needed some Halloween themed goodies to bring to her high school dance this evening and these were quick and super easy.
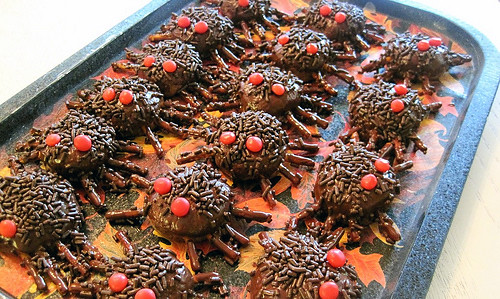
They are a bit rich for my taste buds, but perfect for a bunch of kids trying to satisfy their holiday sweet-tooth at a school function! Plus, look how adorable they are!
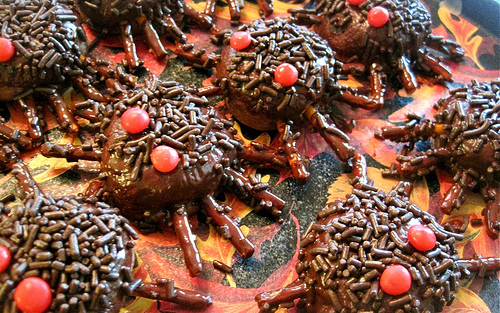
Spooky Spider Cookies
- 2 cups all-purpose flour
- 1/2 tsp baking powder
- 1/2 tsp salt
- 1/8 tsp baking soda
- 2 tbsp unsweetened cocoa powder
- 10 tbsp unsalted butter, at room temperature
- 1/2 cup light brown sugar
- 1/4 cup granulated sugar
- 1 egg, at room temperature
- 1 tsp vanilla extract
- 1 bag thin pretzel sticks
- 11.5 ounce bag of dark chocolate chips (I used Ghirardelli 60% bittersweet)
- 2 tbsp vegetable oil
- 6+ ounces chocolate sprinkles
- small red candies (I used cinnamon hard candies)
- Preheat oven to 350 degrees.
- In a medium-sized bowl combine the flour, salt, baking soda, baking powder, and cocoa powder. Set aside.
- In a large bowl cream together the butter and sugars. Add the egg and vanilla and beat until combined.
- Gradually add in the flour mixture and beat until just combined. The dough should look slightly dry.
- Form tablespoon sized balls with the dough and place on a cookie sheet. The dough will not really spread while baking so there is no need to place them too far from one another.
- Break the pretzel sticks in half and and stick 8 halves into each ball (4 on each side).
- Bake for 12 minutes. Remove from cookie sheet and cool on a wire rack.
- Combine the chocolate chips and oil together in a bowl and melt in the microwave in 30 second intervals.
- With a pastry or basting brush, paint the cookies completely, including the pretzels. Cover with sprinkles and push two red candies into each cookie for eyes.