My blog has moved!

You should be automatically redirected in 6 seconds. If not, visit
http://www.spachethespatula.com/
and update your bookmarks.

Wednesday, December 8, 2010

Pomegranate and Mango Guacamole

IMG_7196

So, this is one of the appetizers that I made for Thanksgiving. Yes, I'm still sharing Thanksgiving recipes. I told you I made a TON of food- and I still have 5 more posts of things I made to get up! However, this particular recipe isn't exactly typical Thanksgiving fare and you could serve it whenever.

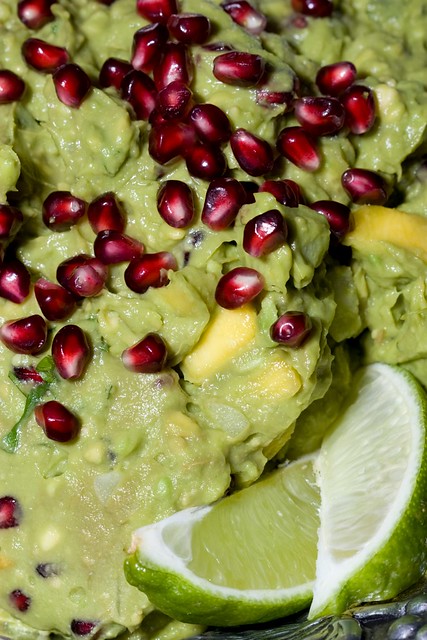
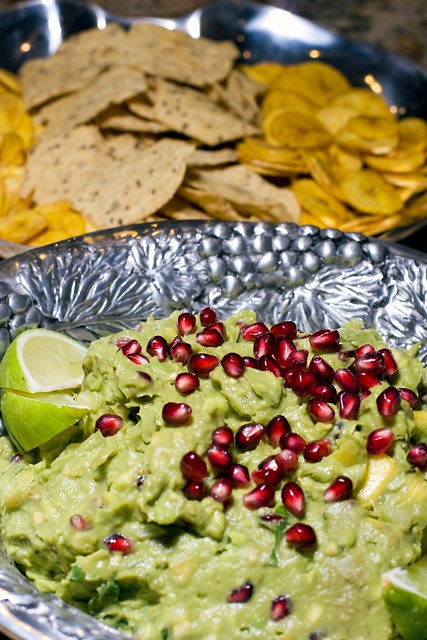
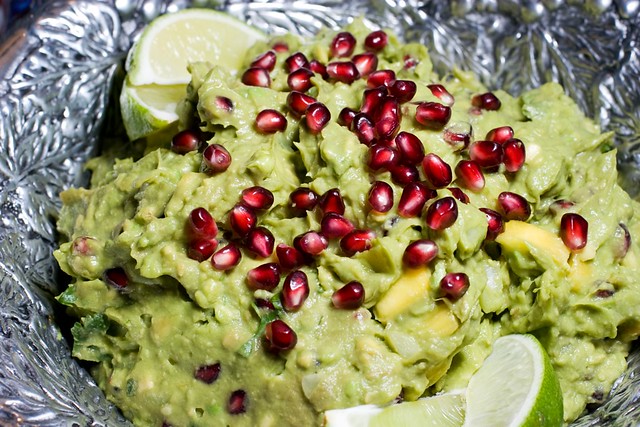
It might seem odd to consider adding pomegranate or mango to guacamole- and even stranger to add both- but I assure you, it is beyond delicious! The mango and pomegranate add a sweetness that is offset by the spicy chiles and acidic lime juice. Another thing that I love about this guac is the multitude of textures. The familiar creaminess of the avocados is cut with the little balloon-like pomegranate arils and juicy mango chunks; and, when piled on a crunchy plantain chip, you are left with pure texture-heaven!

I got quite a few compliments on this appetizer and I will definitely be making it again! It's also quite easy to throw together. Honestly, the most difficult part is getting the arils out of the pomegranate- which admittedly can be rather time-consuming. I've found the best way to go about it is to cut the pomegranate in halfway through and then pull it apart. Do the same to separate it into quarters. Next, grab a large bowl of water and hold the quarters under the water and pull out the arils.

IMG_7192
IMG_7179

Pomegranate and Mango Guacamole
recipe slightly adapted from here

ingredients:
  • 4 ripe avocados
  • 1/2 large white onion, diced
  • 2 fresh serrano chiles, finely chopped, seeds removed from one but left in the other
  • 1/4 cup freshly squeezed lime juice
  • Arils (seeds) from 1 pomegranate
  • 1 large mango, peeled and diced
  • sea salt
  • 1/2 cup cilantro, chopped
  1. Halve, pit and peel the avocados. Coarsely mash them in a large bowl.
  2. Stir in the onion, chiles, and lime juice. Season with salt to taste.
  3. Fold in the pomegranate seeds, leaving a small amount left over to garnish. Add in the mango and cilantro.
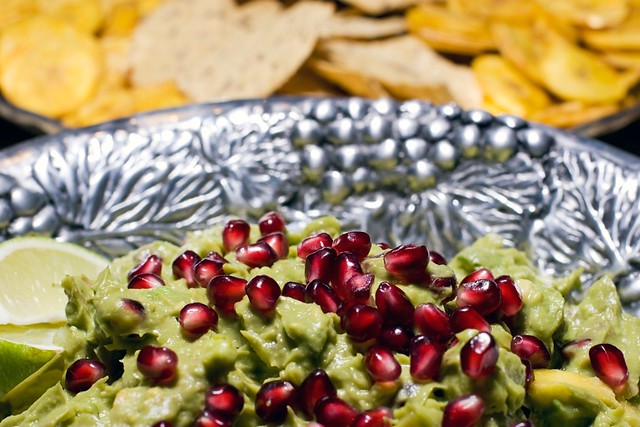
  4. Garnish the top with lime wedges and the leftover pomegranate arils. Serve with plantain chips. I also served mine with multigrain tortilla chips.
*This can be made 4 hours ahead of time. Just press plastic wrap onto the surface of the guacamole and refrigerate. Bring to room temperature before serving.

IMG_7183
IMG_7199

Thursday, December 2, 2010

Pumpkin Cheesecake with Maple Caramel Sauce and Creme Fraiche Whipped Cream

IMG_7294

As I've said before, I absolutely despise Pumpkin Pie. This is terribly odd as I LOVE everything else pumpkin. Anyways, because of this hatred, every year for Thanksgiving I make a dessert that includes pumpkin, but is not a pumpkin pie. Last year I made a Pumpkin Banana Cream Pie that was positively scrumptious, but this year's pumpkin pie substitute was, dare I say, TWICE as good!

This cheesecake filling was luxuriously creamy with hints of spice throughout. I've left the whipped cream topping unsweetned as I think you will agree that the cheesecake and caramel are plenty sweet enough and the slight tang that the creme fraiche adds is a delightful compliment.

My two absolute favorite parts of this cheesecake were the crust, which was totally awesome with the mixture of the nutty pecans and gingersnap cookies, and the maple caramel sauce which I have to refrain from drinking straight out of the squeeze-bottle, and which I can say from experience is AWESOME when heated up and drizzled over ice cream (by the way, homemade vanilla ice cream post is coming in the near future!).

I would have loved to get some pictures of slices of this cheesecake but unfortunately Mikey and I were not given much time to take pictures as everyone was ready to dig in!

IMG_7285
IMG_7291


Pumpkin Cheesecake
recipe adapted from here

ingredients:

crust:
  • 1 1/2 cups ground gingersnap cookies
  • 1 1/2 cups (6 ounces) pecans, toasted
  • 1/4 cup firmly packed brown sugar
  • 1/4 cup (1/2 stick) unsalted butter, melted
filling:
  • 4 8-ounce packages cream cheese, room temperature
  • 1 2/3 cups sugar
  • 1 1/2 cups canned pure pumpkin puree
  • 1/4 cup whipping cream
  • 1-1 1/2 tsp ground cinnamon
  • 1 tsp ground allspice
  • 1/2 tsp freshly grated nutmeg
  • 4 large eggs
for crust:
  1. Preheat oven to 350 degrees.
  2. In a food processor, fine grind the ground cookies, toasted pecans, and brown sugar. Add in the melted butter and whir to combine.
  3. Press the crust onto the bottom and sides of a 9-inch-diameter springform pan with 2-3 inch sides.
  4. Bake for 8 minutes.
for filling:
  1. In the bowl of an electric mixer fitted with the paddle attachment, beat together the cream cheese and sugar until light and creamy. Remove 3/4 cup of the mixture and do with it what you will. (The original recipe uses this as a topping but instead I used the creme fraiche whipped cream.)
  2. Add in the pumpkin, whipping cream, cinnamon, allspice, and nutmeg. Beat until well combined. Add in the eggs 1 at a time, beating until just incorporated after each addition.
  3. Wrap the bottom and sides of the springform pan with 2 layers of aluminum foil. Place the springform pan in a large roasting pan and fill with cheesecake filling. Place the roasting pan in the oven and fill the roasting pan with enough hot water to come about halfway up the sides of the springform pan (it's much easier to fill it with water when it's already in the oven).
  4. Bake for 1 hour and 15 minutes to 1 hour and 45 minutes, until the top is set but the cheesecake still jiggles when lightly shaken. Refrigerate overnight.
  5. To serve, spread the Creme Fraiche Whipped Cream (recipe below) over the top of the cheesecake and top with drizzles of the Maple Caramel Sauce (recipe below). Serve with extra caramel on the side.
Creme Fraiche Whipped Cream

ingredients:
  • 1/2 cup creme fraiche
  • 1 cup heavy whipping cream
  1. Chill the bowl and whisk attachment of an electric mixer for at least 15 minutes before making whipped cream.
  2. In the cold bowl of an electric mixer fitted with the whisk attachment, beat together the creme fraiche and whipping cream until stiff peaks form.
Maple Caramel Sauce
recipe from here

ingredients:
  • 2 cups heavy whipping cream
  • 3/4 cup granulated sugar
  • 1/2 cup pure maple syrup
  • 1/4 tsp maple flavoring
  1. Combine the cream, sugar, and syrup in a large, heavy saucepan over medium heat. Stir until the sugar dissolves.
  2. Increase the heat to high and bring to a boil. Reduce the heat to medium-low and simmer until the sauce is caramel-colored and reduced to 1 3/4 cups, stirring occasionally, about 35 minutes. (Don't be alarmed in the mixture bubbles up. Stir it and it will subside. If it gets too high you can turn down the heat until it subsides.)
  3. Stir in the maple flavoring. Cool slightly, cover, and chill.
IMG_7304

Tuesday, November 30, 2010

Bubble-Top Brioche Rolls

IMG_7268


Out of all of the things that I made for Thanksgiving dinner, it was these that I was the most proud of! Having never ever made bread before (or anything including yeast aside from this Gooey Butter Cake), I was positively thrilled with the final result!


I've always been desperately afraid of making bread because I thought it seemed far too complicated and I was sure that I would screw it up, but after making these, I am convinced that it is far easier than I ever imagined!


These rolls were, in my opinion (and Mikey's), perfect. They were pillowy-soft, slightly sweet, and gorgeously golden-brown. After my success with these rolls, I can't wait to try my hand at all sorts of bread recipes. On my immediate list is: cinnamon rolls, pizza dough, and Christmas Stollen.


Though this dough requires quite a bit of babysitting (as you have to pretty much be around to watch it for 4 hours after making it), it is worth all the effort!


IMG_7265
IMG_7266


Bubble-Top Brioche Rolls
recipe from here
makes 24 rolls

ingredients:
  • 1/2 cup warm water (110-115 degrees)
  • 1/2 cup warm whole milk (110-115 degrees)
  • 2 tbsp active dry yeast
  • 5 1/2 cups all-purpose flour
  • 1 tbsp salt
  • 6 large eggs, room temperature
  • 1/4 cup + 2tbsp granulated sugar
  • 3 sticks (1 1/2 cups) unsalted butter, at room temperature
  • 2 large eggs beaten with 2 tsp water, for glaze
  1. Combine the water and milk in the bowl of an electric mixer fitted with the paddle attachment. Sprinkle the yeast over and stir to fully moisten. Let stand for about 8 minutes, stirring occasionally.
  2. Add in the flour and salt to the yeast mixture. Blend at medium-low speed for 1-2 minutes, until shaggy lumps form (though the term "shaggy lumps" confused me at first, I knew exactly what it meant when it happened and hopefully you will too).
  3. Add in the eggs one at a time, beating until blended after each addition. Increase the mixer speed to medium and beat until the dough is smooth, about 3 minutes.
  4. Reduce the speed to low and add in the butter one tablespoon at a time, blending after each tablespoon (this process may take a while).
  5. Increase the mixer speed to medium-high and beat until the dough pulls away from the sides of the bowl and climbs the paddle, 8 to 9 minutes.
  6. Butter a large bowl. Scrape the dough into the bowl and cover the bowl tightly with plastic wrap. Let the dough rise in a warm place until it has doubled in size (I put mine by the fireplace!).
  7. Gently deflate the dough by lifting around the edges and letting the dough fall back into the bowl.
  8. Cover the bowl tightly with plastic wrap and place in the refrigerator, deflating the dough the same way every 30 minutes until t he dough has stopped rising, an hour and a half to two hours. Chill overnight.
  9. When ready to bake, butter 24 standard muffin cups. Divide the dough into 24 equal pieces and cut each piece into thirds. Roll each small piece into a ball. Place 3 balls in each muffin cup. Cover the muffin tins with waxed paper and place in a warm area to rise for 50-60 minutes until almost doubled.
  10. Preheat oven to 400 degrees. Brush the top of each roll with the egg glaze, being careful not to let the glaze drip down between the dough and pan.
  11. Bake the rolls until golden, about 20-25 minutes. Cool rolls for 10 minutes before serving.
IMG_7267
IMG_7264

Sunday, November 28, 2010

Roasted Brussel Sprouts with Pomegranates and Vanilla-Pecan Butter

IMG_7258

For this year's Thanksgiving I took on almost more than I could handle in terms of cooking (which you will clearly see in the next several posts as I share with you everything that I made), but it all certainly payed off because the food was great and everyone had a wonderful time!

I always think of brussel sprouts as a quintessential side dish for Thanksgiving. I'm not really sure why considering they were never around my Thanksgiving table growing up, but I just think they ought to be there. They are truly a great fall vegetable despite the bad rap they are disposed to.

This side dish is quite unique and extremely tasty. It's also very easy to make if you aren't trying to make 5 separate dishes at the same time like I was on Thanksgiving. Somehow I managed to forget about my poor sprouts in between the potato water catastrophe and vigilantly watching my rolls in the oven, and thought that I had burned them to a crisp, dooming them to the depths of the trash can. But, after being assured that they were quite tasty and not at all charred to death, it was smooth sailing!

The pomegranates add a wonderful sweetness, but also a delightful crunch. The vanilla-pecan butter smells absolutely out-of-this-world, and I found that a little goes a long way. I found these brussel sprouts to be a great addition to the feast we devoured on Thursday, and I can't wait to make them again when I can devote my full attention to them.

By the way, yes, I am aware that the "correct" spelling is Brussels sprouts, but, you know, no one ever says BrusselS sprouts. Thus, I am inclined to drop the "s" and, as a consequence, the capitalization.

IMG_7253
IMG_7251
IMG_7255

Roasted Brussel Sprouts with Pomegranates and Vanilla-Pecan Butter
recipe adapted from here

  • 3 tbsp unsalted butter, slightly softened
  • 1/2 vanilla bean, seeds scraped
  • 2 tbsp toasted pecans, chopped
  • 2 lbs brussel sprouts, trimmed and halved
  • 3 tbsp canola oil
  • sea salt and freshly ground pepper
  • 2 tbsp pomegranate molasses (it's simple to make your own by boiling down pomegranate juice, sugar, and a touch of lemon juice)
  • seeds from 1 pomegranate
  • zest from 1 orange
  1. Combine the butter and vanilla bean in a bowl. Fold in the pecans. Refrigerate for at least 30 minutes before serving.
  2. Preheat oven to 375 degrees. Line a baking sheet with aluminum foil, set aside.
  3. In a medium bowl, toss together the brussel sprouts and canola oil; season with salt and pepper. Pour the brussel sprouts onto the prepared baking sheet. Roast in the oven for 15-20 minutes, until browned.
  4. Remove the brussel sprouts from the oven and toss with the pomegranate molasses. Return to the oven for 5-10 minutes longer.
  5. Transfer the sprouts to a large bowl and add in the pomegranate seeds. Top with as much of the vanilla-pecan butter as you desire.
IMG_7254
IMG_7260

Tuesday, November 23, 2010

Thanksgiving Recipe Ideas


Looking for some last minute Thanksgiving recipes? Look no further! Here's an array of salads, potatoes, veggies, and desserts. The turkey and gravy are up to you, but everything else can be found here :D!

I'll be posting quite a few recipes that I'm going to make for this year's Thanksgiving over the next few days/weeks, but try these on your holiday table this Thursday!

Salad:

Peppery Green Salad with Manchego Cheese and Sauteed Pears
Peppery Green Salad with Manchego Cheese and Sauteed Pears: This wintery salad is unbelievably good. I made it for Christmas Eve last year and it was a huge hit :)

Italian Salad
Italian Salad: This salad is both tasty, and veggie-filled- so you can counteract al that gravy and pie!

Wild Rice and Lentil Salad with Oranges, Dried Fruit, and Chevre
Wild Rice and Lentil Salad with Oranges, Dried Fruit, and Chevre: This lettuce-less salad is perfect for fall!

Potatoes:

Roasted Garlic Mashed Potatoes
Roasted Garlic Mashed Potatoes: I made these for Thanksgiving last year. Roasting the garlic makes all the difference

Smashed Potatoes with Pancetta and Leeks
Smashed Potatoes with Pancetta and Leeks: These mashed potatoes are certainly not the traditional type you would see on a Thanksgiving table, but they are sure to both intrigue, and please your guests!

Roasted New Potatoes with Fresh Herb Pesto
Roasted New Potatoes with Fresh Herb Pesto: Not in the mood to mash up a giant vat of potatoes? Try these simple roasted potatoes- just as good and half the work!

Veggies:

Maple Dijon Roasted Brussel Sprouts
Maple Dijon Roasted Brussel Sprouts: I never tried brussel sprouts until I was an adult because everyone always seems to label them as the quintessential "gross vegetable." I don't know who gave brussel sprouts the bad rap but I would like a word with them because they are now one of my favorite veggies (and seem to be an essential for Thanksgiving)!

Roasted Asparagus
Roasted Asparagus: This takes almost no time, and produces amazing results- you'll never eat steamed asparagus again!

Condiments:

Maple Brown Sugar Cranberry Sauce
Maple Brown Sugar Cranberry Sauce: It wouldn't be Thanksgiving without cranberry sauce!

Dessert:

Pumpkin Banana Cream Pie
Pumpkin Banana Cream Pie: This pie is an exciting alternative to the traditional pumpkin pie. I made it last year and got rave reviews!

Pumpkin Shortbread with Egg Nog Ice Cream

Vanilla Bean Mascarpone Cheesecake with Passion Fruit Caramel
Vanilla Bean Mascarpone Cheesecake with Passion Fruit Caramel: This cheesecake might not be "fall-themed" or fit the mold of what is commonly served after a Thanksgiving feast, but it is one of the best desserts I have ever eaten and your guests will easily overlook the lack of sweet potato or pumpkin pie on the table.

Friday, November 19, 2010

Hazelnut-Lavender-Coconut Granola

IMG_7160


(I'm not sure why the font is so small all of a sudden... it is not a different size than any of my other posts :/. Blogger just likes to give me trouble, I suppose.)


Okay guys, this will be the last lavender recipe for a while, promise (though, if you love lavender as much as me that may not be such a good thing?)!

Let me just start off by stating the facts: this is the one of the best tasting and smelling granolas (with a serious emphasis on "smelling"- man my house smelled GREAT) in the whole wide world and if you think otherwise I'd have to say that you are positively crazy. With that said, you certainly have to like lavender and coconut to like this granola :).

Honestly though, it even beats my old favorite, Pine Nut and Black Pepper Granola, by a landslide. I suppose I could be extremely biased considering two of my very favorite flavors are lavender and coconut, but even Mikey-- who is not a granola-person mind you-- found it to be addictively scrumptious (side note: Firefox tells me "addictively" is not a word, but I could have sworn it was and will continue to go on pretending that it is).

Coconut and lavender seem like a less than desirable match, but they work unexpectedly well together! (I imagine that a lavender-coconut quick bread would be quite amazing.) The Meyer lemon's flavor is extremely subtle in this granola, but noticeable enough to freshen things up a bit. I love the delicious nuttiness the hazelnuts add, and the crunchy buckwheat kernels bring in lots of texture. Basically, I adore every component of this granola.

If you don't try either of the other two lavender recipes I've posted recently, I implore you to try this one! Because as a granola-lover, this one is just perfect for me, and I hope that you will find it to be more than acceptable for you as well!

By the way: Recently I posted an "About Me" page (which can be found at the very top of each page) and I was curious to know if there were any other questions you would like answered on the page. Please post any suggestions in the comments, thanks!


IMG_7147
IMG_7161
IMG_7151

Hazelnut-Lavender-Coconut Granola
recipe adapted from here

ingredients:
  • 4 cups rolled oats
  • 1/4 cup buckwheat
  • 1/2 cup unsweetened, shredded coconut
  • 1/2 cup hazelnuts, chopped
  • Zest of 2 Meyer lemons
  • 1/2 tsp sea salt
  • 1/4 cup coconut butter (you could use coconut oil instead, it just won't be as coconut-y)
  • 3/4 cup honey
  • 1 1/2 tbsp culinary lavender
  1. Preheat oven to 300 degrees. Line a large baking sheet with parchment or wax paper. Set aside.
  2. In a large bowl, mix together the oats, buckwheat, coconut, hazelnuts, lemon zest, and salt. Set aside.
  3. In a small sauce pan, melt together the honey, coconut butter, and lavender over low heat for about 4-5 minutes.
  4. Pour the hot mixture over the oats, etc. and stir to fully coat. Pour the mixture out onto the prepared baking sheet and spread it out into an even, thin layer.
  5. Bake for 20-30 minutes, or until the granola has reached your desired level of golden-brown (I like mine a little more on the extra-toasty side), stirring every 10 minutes. Allow to cool completely on baking sheet before storing.
IMG_7164
IMG_7145
IMG_7153

Friday, November 12, 2010

Lavender-Cardamom-Dark Chocolate Tart

IMG_7119

Yep, another lavender recipe! And I have another one on the way! I guess you could say I'm somewhat infatuated with the perfume-y flower at the moment, but I think there is something about it that is just perfect for the holidays! It's taste and aroma remind me of rosemary and pine trees, yet a bit more unique with its extra floral note.

I imagine this tart would be positively delicious paired with some vanilla bean ice cream, but it is quite tasty all on its own. The chocolate-y lavender filling is super creamy and decadent, and the salt on top brings the flavors over the top.

What I love most about this tart is the way it fills your home with the rich scent of cardamom as the crust bakes, and the soothing aroma of lavender as the cream steeps.

Since the filling is so rich, it only takes a small slice to satisfy. I found that the extra ganache that I had leftover was absolutely scrumptious with my Salted Honey Lavender Shortbread; just dip half of a square in and enjoy!

IMG_7126
IMG_7096
IMG_7114
IMG_7131

Lavender-Cardamom-Dark Chocolate Tart
recipe from here
The recipe states that it makes 1 9" tart or an equivalent rectangular tart, but I suppose my tart pan wasn't quite big enough as I found the crust to be a bit thick and I had quit a bit of ganache left over.

ingredients:

for pastry:
  • 260g all-purpose flour
  • 1 tsp ground cardamom (I used whole cardamom that I ground with a mortar and pestle)
  • 1 tbsp freshly grated Meyer lemon zest
  • 1/2 tsp sea salt
  • 1/4 cup granulated sugar
  • 7 tbsp unsalted butter, cut into pieces and chilled
  • 1 large egg yolk
  • 1 tbsp freshly squeezed Meyer lemon juice
  • 2 tbsp water, chilled
for ganache filling:
  • 10 oz. heavy whipping cream
  • 1/4 cup culinary lavender + more to top
  • 12 oz. dark chocolate, chopped
  • 3 tbsp honey
  • 2 tbsp unsalted butter
  • coarse sea salt
pastry:
  1. Using a food processor, pulse together the flour, cardamom, lemon zest, salt, and sugar until combined. Add in the butter and pulse until the mixture has the texture of small peas.
  2. Add in the egg yolk and then slowly add in the water/lemon juice just until the dough begins to form when pressed between two fingers.
  3. Form the pastry into a ball and refrigerate for at least one hour or stick it n the freezer for 15 minutes.
  4. When ready to bake, preheat the oven to 425 degrees.
  5. Press the pastry dough firmly into the tart pan. Prick the dough all over with a fork. Place a sheet of parchment paper over the dough and fill with pie weights or dry beans. Return to the freezer for just a few minutes so the dough can harden up a bit again.
  6. Bake for about 15 minutes until the edges begin to turn golden. Remove the beans and parchment paper and bake for 10-15 minutes more, or until the crust has turned golden brown all over. Remove from oven and let cool.
filling:
  1. In a medium saucepan, heat the cream and lavender buds to a simmer. Cover and remove from heat. Allow to steep for 10-20 minutes.
  2. Place the chopped chocolate and honey in a large bowl and place a fine mesh strainer on top. Set aside.
  3. Add the butter to the cream and lavender and return to a simmer. Remove from heat and pour the hot cream mixture through the sieve over the chocolate/honey. Be sure to press out all of the liquid from the lavender buds.
  4. Whisk the cream and chocolate together until smooth. Immediately pour into the prepared crust.
  5. In a mortar and pestle, rub together an equal amount of sea salt and lavender and sprinkle over the chocolate.
  6. Allow the tart to set at room temperature fora couple of hours until completely cool. Serve at room temperature.
IMG_7122

IMG_7125
IMG_7101

Friday, November 5, 2010

Salted Honey Lavender Shortbread

IMG_7087


It's no secret that I love shortbread....


... but I also adore salty sweets and recently received a bunch of culinary lavender for my birthday (considering my birthday was at the end of September I guess it's not so recent but I just got around to using it haha), so when I came across these shortbread squares it's safe to say I was absolutely smitten.

These cookies are buttery, salty, perfectly crumbly but not overly messy, and infused with a wonderful lavender flavor without being too floral-y of perfume-y. They make a beautiful dessert with a dollop of freshly whipped cream, or a great afternoon snack with a cup of piping hot tea :).

As an avid shortbread fan, these cookies are some of the best I have ever had (and let me tell you I've had quite a few varieties)! Not to mention the fact that these cookies are extremely simple to make thanks to the fact that you just press all of the dough into a pan and then cut them after they are baked. It also makes for easy clean-up considering you only really dirty your mixing bowl and baking tin!

IMG_7092
IMG_7078
IMG_7079
IMG_7085

Salted Honey Lavender Shortbread
recipe from here
makes 16 cookie bars

ingredients:
  • 7 1/4 ounces (2 1/2 cups) all-purpose flour
  • 2 tbsp corn starch
  • 2 1/4 ounces (1/3 cup) granulated sugar
  • 1 tsp culinary lavender
  • 6 1/2 ounces (3/4 cup or 1 1/2 sticks) unsalted butter, cut into small pieces
  • 1 tsp sea salt + more to top the cookies (I used Cyprus Flake Sea Salt which is pyramid-shaped, but any flaky salt would work i.e. fleur de sel)
  • 3 tbsp honey
  1. Preheat oven to 350 degrees. Grease an 8"x8"baking tin with butter or non-stick spray. Line with parchment paper and grease the parchment paper as well (make sure there is enough overhang of the parchment paper so that you can easily lift the cookies out of the tin). Set aside.
  2. (This step is optional but I find it distributes the lavender better.) In a food processor whir together the sugar and lavender for about a minute until the lavender buds are chopped and distributed throughout the sugar and the sugar has a purple hue (careful, it gets quite powdery).
  3. In the bowl of an electric mixer fitted with the paddle attachment, combine all of the ingredients and mix in low speed until combined (it's fine if the dough is crumbly).
  4. Press the dough into the prepared tin. With a fork, poke the surface of the dough all over.
  5. Bake for 30-40 minutes, or until golden brown and the cookies feel firm when lightly pressed mine baked for 30 minutes).
  6. After you remove to cookies from the oven, sprinkle the tops with sea salt. Allow to fully cool in the pan before removing and slicing into 16 equal squares.
IMG_7075
IMG_7080
Related Posts with Thumbnails