My blog has moved!

You should be automatically redirected in 6 seconds. If not, visit
http://www.spachethespatula.com/
and update your bookmarks.

Friday, July 30, 2010

Wild Rice and Lentil Salad with Oranges, Dried Fruit, and Chevre


Wild Rice and Lentil Salad with Oranges, Dried Fruit, and Chevre
So, this is the salad recipe that I was referring to in my previous post :).


When I was asked to make a salad for the dinner party the other evening at Mikey's parents' home, I just couldn't bring myself to bring an average lettuce-and-veggie-packed salad. I like to do things a little differently than one would expect, and I like to see the surprise in peoples' faces when they see what I have made. I love lentils and found this recipe while browsing for ideas and inspiration and it sounded perfect!


It is really refreshing and absolutely perfect for eating outside in the summer air. The orange adds a juicy sweetness that complements the chewy, earthy rice/lentils and creamy goat cheese wonderfully. I also particularly liked that the currants and raisins were pretty much the same size as the lentils so they surprised your taste buds with a fruity punch. I really enjoyed all of the different textures and all of the guests mentioned how delicious and unique it was!


This recipe makes quite a bit, but I don't think that would cause much disappointment as it holds up great as leftovers (that is if any is even left to take home).


Wild Rice and Lentil Salad with Oranges, Dried Currants, and Golden Raisins
Wild Rice and Lentil Salad with Oranges, Dried Fruit, and Chevre


Wild Rice and Lentil Salad with Oranges, Dried Fruit, and Chevre
recipe adapted from here

ingredients:
  • 2 cups wild and brown rice blend
  • 1 cup French green lentils
  • 1/2 shallot, finely chopped
  • 1/4 cup balsamic vinegar
  • 2 tbsp fresh lemon juice
  • 3-4 oranges (depending on how many you want; I like a lot)
  • 1/4 cup dried currants
  • 1/4 cup golden raisins
  • 1/2 cup extra virgin olive oil
  • 3/4 cup fresh flat-leaf parsley, chopped
  • creamy Chevre
  1. Cook the rice and lentils according to the package directions (I used a rice cooker for the rice). Set aside.
  2. In a small bowl, combine the shallot, vinegar, and lemon juice. Zest one orange and add it to the mix, set aside.
  3. Cut away the pith and peel from the oranges and cut the sections free from the membrane.
  4. Toss together the rice, lentils, shallot mixture, orange sections, dried currants, raisins, oil, and parsley (I also squeezed the remaining juice left in the orange membranes into the mix). Add salt and pepper to taste. Chill in the fridge until ready to serve (can be made a day in advance) or serve warm. Top with Chevre to taste.
Wild Rice and Lentil Salad with Oranges, Dried Currants, and Golden Raisins
Wild Rice and Lentil Salad with Oranges, Dried Fruit, and Chevre


p.s.- How do you guys like having the top image be a bit bigger? Better? Worse? Can't tell?

Wednesday, July 28, 2010

Vanilla Bean Mascarpone Cheesecake with Passion Fruit Caramel

IMG_6640


Let me start off by saying that this is possibly the best thing I have ever made.


A couple nights ago, we were invited to a grill-out at Mikey's parents' home, and Amy (his mom) asked if I could possibly bring a salad and dessert. You'll see the salad later, but this is the dessert I decided on- Vanilla Bean Mascarpone Cheesecake with Passion Fruit Caramel.
Now, I had never actually made cheesecake before, so it probably wasn't the best idea to try for the first time when I need to bring dessert to a dinner party with no back-up plan, but that's just how I roll :D. For never having made this, I can honestly say that it turned out next to perfect. It was that good.
The cheesecake filling itself was creamy, yet light due to the mascarpone, and the salty cashew crust complimented it so gorgeously. The pinch of ginger in the crust shined through and added an intriguing aftertaste that had everybody asking, "What is that?" 


The real star of the show, in my opinion, was the caramel. Oh. My. Gosh. It was silky and sweet but not too sweet, and basically you could drizzle it on your shoe and I think it'd taste good. The original recipe had a separate recipe for a passionfruit caramel, but I didn't appreciate that it used passion fruit juice cocktail and corn syrup so I made my own from an adaptation of a random recipe for blood orange caramel (which I think would also be awesome and need to try ASAP).


This cheesecake was pretty much the ultimate ending to a great cook-out, and certainly had everyone talking. Mikey, who doesn't even like cheesecake mind you, went back for a second slice which should tell you something right there :). I highly recommend this recipe for your next gathering; trust me, you won't be disappointed.


IMG_6630
IMG_6636
IMG_6635


Vanilla Bean Mascarpone Cheesecake
recipe adapted from here

ingredients:

crust:
  • 3/4 cup salted roasted cashews
  • 1/4 cup brown sugar, packed
  • 3/4 cup all-purpose flour
  • 1/4 tsp salt
  • 1/8 tsp ground cinnamon
  • 1/8 tsp ground ginger
  • 6 tbsp unsalted butter, chilled and cut into 1/2-inch cubes
  • 1 large egg yolk
filling:
  • 2 8-ounce packages cream cheese, at room temperature (I used one package of regular and one of Neufchatel which just has 1/3 less fat)
  • 3/4 cup granulated sugar
  • pinch of salt
  • 1 vanilla bean split lengthwise
  • 2 8-ounce containers mascarpone cheese
  • 1/2-1/3 cup creme fraiche
  • 4 large eggs
other:
  • passion fruit caramel (recipe below)
  • tropical fruits, to decorate (I used 2-3 sliced kiwi)
  1. Preheat oven to 325 degrees. Wrap the outside of a 9-inch diameter springform pan with 2 3/4-ince sides with 2 layers of tin foil. Set aside.
  2. In a food processor, combine the cashews and brown sugar and finely grind. Add in the flour, salt, and spice and blend for about 5 seconds. Add in the butter, slowly, and blend until mixture is a coarse meal. Add in the egg yolk and pulse until moist clumps form.
  3. Press the dough into the bottom and 1/2-inch up the sides of the pan. Pierce the crust all over with a fork and bake for around 30 minutes, or until golden brown. Cool crust but maintain the oven temperature.
  4. In the bowl of an electric mixer fitted with the paddle attachment, combine the cream cheese, granulated sugar, and salt. Scrape in the seeds of the vanilla bean and beat until smooth and fluffy. Add in the mascarpone and creme fraiche and beat at low speed just until blended, scarping down the sides of the bowl. Add in the eggs, one at a time, beating to incorporate after each addition.
  5. Place the springform pan in a large roasting pan and fill with cheesecake filling. Place the roasting pan in the oven and fill the roasting pan with enough hot water to come about halfway up the sides of the springform pan (it's much easier to fill it with water when it's already in the oven). Cover the top of the springform pan with foil.
  6. Bake for about 30 minutes, and then check of the cheesecake, lifting the foil. Re-cover and bake for another 30 minutes and then check on it again. Continue to do this until cake is loosely set but jiggles all over when the pan is gently shaken. Mine cooked for about 2 hours total.
  7. When done, remove the springform pan from the water and set on a rack to cool for an hour. Refrigerate, uncovered until cold, at least 6 hours. (I made mine a day ahead and just kept it in the fridge.)
  8. To serve, cut around the sides of the pan with a knife and then remove sides of pan. Decorate with passion fruit caramel and sliced tropical fruit. Cut into wedges and serve with more caramel.
Passion Fruit Caramel
recipe adapted from here

ingredients:
  • 2 cups passion fruit juice (I used this one)
  • 1 cup heavy cream
  • 4 tbsp unsalted butter
  • 1 cup granulated sugar
  1. Bring the passionfruit juice to a simmer over medium-high heat in a small saucepan. Cook for about 20 minutes, until reduced to about a 1/4 cup. Strain the reduced juice through a fine sieve into a bowl. Add the cream, stir, and set aside.
  2. In a medium saucepan, melt the butter over medium heat. Add in the sugar and continue to cook, stirring almost constantly, until the sugar is lightly caramelized (about 5 minutes). Add in the juice/cream mixture and cook for about 5 minutes more, stirring frequently. Strain mixture through a fine sieve. Refrigerate until ready to use.
IMG_6639
IMG_6629

Monday, July 19, 2010

Almond-Crusted Copper River Salmon with Leek and Lemon Cream and Roasted New Potatoes with Fresh Herb Pesto

IMG_6606


One of the very first things I did when I got back to the beautiful Pacific Northwest was head to Pike's Place Market and pick up some amazing Copper River Salmon fillets. Seattle has some amazing seafood, and I had been told that Copper River salmon is the best of the best. The season for this wild salmon isn't very long at only about 3-4 weeks, but as soon as it becomes available you will see signs all over Seattle proclaiming: "Copper River Salmon is here!!!"


You're probably thinking, so what? What's so great about this fish? Well, there is a lot to praise about this amazing breed of salmon; the top of the list of course being the flavor. Copper River salmon is extra fatty so it has a smooth, rich, almost nutty taste that is praised as one of the best in the world. Aside from the taste, though, these fatty fish are loaded with Omega-3's that keep your heart and cardiovascular system healthy, as well as your immune system. You will also get more Vitamin D than a glass of milk when you eat just a 3.5 oz. fillet (source)! Last but not least, these fish are a completely sustainable dining option! Really, could it get much better?


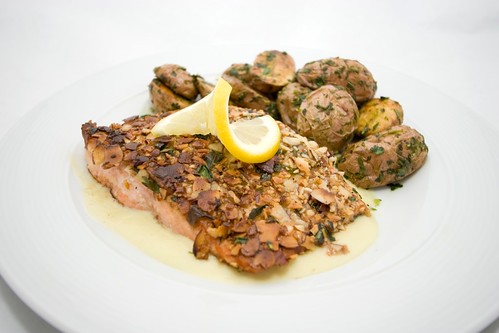
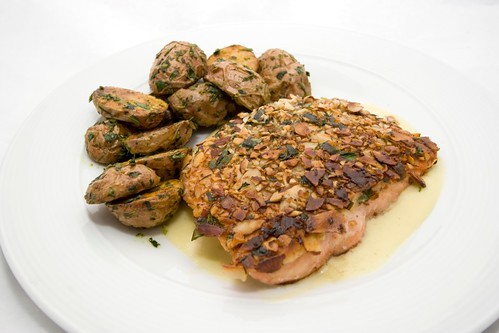
So, what did I do with my beautiful, vibrant red Copper River Sockeye Salmon fillets? I crusted them in almonds and served them up with a very mild lemon-y leek sauce. It was sheer perfection! The almonds complemented the fish's inherently nutty flavor impeccably, and the creamy sauce added another level of flavor without overpowering the natural taste of the salmon.
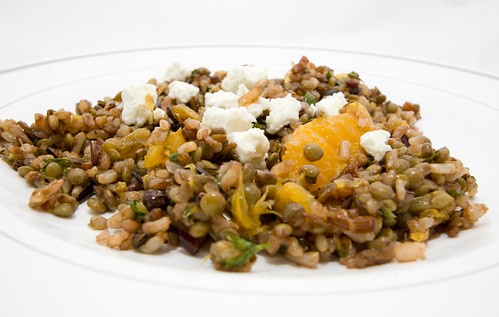
The herb-y potatoes on the side were out-of-this-world good as well. The raw herbs brought so much flavor to the party that I will be making them again and again. I think they would be incredible paired with lamb if you just added a little fresh mint to the pesto.


This meal was shockingly good, and Mikey proclaimed it the best salmon he had ever eaten! If you ever make your way out to Seattle, make sure it's during the end of May or during June so you can experience the sheer awesomne-ness that is Copper River Salmon.


I wish I had taken some pictures of these babies cut into because the color is so vibrant!

IMG_6620

Almond-Crusted Copper River Salmon with Leek and Lemon Cream
recipe from here
serves 3

ingredients:
  • 2 tbsp butter
  • 1 medium leek, thinly sliced (white and pale green parts only)
  • 1 1/2 tbsp fresh lemon juice (juice of about half a juicy lemon)
  • 1/2 cup whipping cream
  • 1/2 sliced almonds, roughly chopped
  • 2 tbsp fresh parsley, chopped
  • 1/2 tbsp grated lemon peel (from about 1/2 a lemon)
  • pinch of sea salt and freshly ground pepper
  • 1/4 cup all-purpose flour
  • 3 6-ounce skinless salmon fillets (I used Copper River Sockeye)
  • 1 egg, beaten
  • 1 tbsp olive oil
for the sauce:
  1. Melt 1 tablespoon of butter in a heavy saucepan over medium-high heat. Add in the leeks and saute for a couple of minutes. Reduce the heat to low, cover, and cook until the leeks are very tender, stirring occasionally, about 20 minutes.
  2. Increase the heat to medium and stir in the lemon juice for about a minute until the liquid evaporates. Stir in the cream and simmer for about 2 minutes, until slightly reduced.
  3. Cool slightly and then transfer mixture to a blender. Blend until smooth. Strain the sauce back into the saucepan, pressing on solids to extract all the liquid possible. This part took me a while because I am completely obsessive about getting every last drop, lol. Season the sauce, to taste, with salt and pepper. (The sauce can be made 1 day ahead, just cover and refrigerate it.)
for the salmon:
  1. Mix the almonds, parsley, lemon peel, salt, and pepper on a plate. Place the flour on a separate plate. 
  2. Sprinkle the salmon with salt and pepper and then dredge each fillet in the flour, shaking off the excess.
  3. Brush one side of each fillet with the beaten egg, and then press the brushed side of the salmon into the almond mixture. Set the salmon fillets aside, nut-side up.
  4. Melt the other tablespoon of butter with the olive oil in a large skillet over medium heat. Add the salmon to the skillet nut-side down and cook for about 5 minutes until the crust is nicely browned. Turn the salmon over and cook until the salmon is cooked through, about 5 more minutes.
  5. Reheat the sauce. To plate, spoon sauce onto the plate and then top with a salmon fillet. Garnish with a lemon twist if desired.
Roasted New Potatoes with Fresh Herb Pesto
recipe from here
serves 3

ingredients:
  • 1/2 cup fresh parsley
  • scant 1/4 cup fresh chives
  • 1 1/2 tbsp fresh rosemary
  • 2 tbsp extra virgin olive oil
  • 1 garlic clove, crushed
  • 1/2 tbsp fresh lemon juice
  • 1/4 tsp grated lemon peel
  • 1/4 tsp sea salt
  • 1 1/4 lbs red-skinned new potatoes, halved lengthwise
  1. In a food prcessor, combine the parsley, chives, rosemary, 1 tablespoon olive oil, garlic, lemon juice, lemon peel, and salt. Blend until the mixture resembles a coarse puree. (The pesto can be made 1 day ahead, just cover and refrigerate.)
  2. Preheat the oven to 400 degrees.
  3. Toss the potatoes with the remaining tablespoon of olive oil. Sprinkle generously with sea salt and freshly ground pepper.
  4. Arrange the potatoes, cut side down, on a baking sheet. Roast until the potatoes are golden brown and tender, about 40 minutes.
  5. Transfer the cooked potatoes to a large bowl and toss with pesto. Serve.
IMG_6625

Tuesday, July 13, 2010

Braised Short Ribs over Creamy Goat Cheese Polenta

IMG_3015


This is the last of the recipes that I have to share with you from my time spent with my family in Florida, and though the pictures are the worst, I think it may just be the tastiest. It's a super comforting dish that really just sticks to your bones.


Though the recipe itself is fairly straightforward and easy, finding the short ribs was an absolute nightmare. Apparently no one in Sarasota, Florida eats short ribs or something... it was extremely bizarre. I had to go to 3 different grocery stores and a butcher's shop to find them! I was flabbergasted when my family's tried and true neighborhood butcher responded to my bone-in short rib request with "Aren't those kind of rare?" WHAT? Are you, the extremely qualified butcher, asking me if this cut of meat is sparse in the meat-world??? Well, I certainly didn't think so considering they seem to be a staple on every restaurant's menu, but clearly I was sorely mistaken. I was told by the butcher in the next store that "All the snow birds went home so we don't really have them anymore." Excuse me? Do only northerners consume short ribs? All in all, I found the experience both frustrating and peculiar. I finally ended up locating some short ribs with the help of a phone call from one butcher to another, and I ended up buying out there entire stock (which was not very much... like 16 short ribs).


Anyways, despite the issues finding the main ingredient, this recipe was fantastic and completely worth all of the effort. The meat literally falls off of the bone and there is no need for a knife. The polenta is so good (and easy!) that I will be making it time and time again. I loved the slight tang that the goat cheese imparts. The best thing ever though is the fact that the creamy polenta soaks up all of the juicy cooking sauce from the meat- major yum!


IMG_3020
IMG_3014


Braised Short Ribs over Creamy Goat Cheese Polenta
recipe from here
serves 4

ingredients:

short ribs:
  • 8 bone-in beef short ribs
  • sea salt & freshly ground pepper
  • 1/4 cup all-purpose flour
  • 6 slices pancetta, diced
  • 2 tbsp olive oil
  • 1 medium onion, diced
  • 2 shallots, minced
  • 3 carrots, diced
  • 2 cups dry red wine (I used a Cabernet Sauvignon)
  • 2 cups beef stock
  • 2 sprigs fresh thyme
  • 2 sprigs fresh rosemary
polenta:
  • 1 cup yellow cornmeal (I used Bob's Redmill)
  • pinch of sea salt
  • 2 tbsp butter
  • 4 ounces goat cheese (not the crumbled kind!)
for the short ribs:
  1. Preheat oven to 350 degrees.
  2. Salt and pepper the ribs, and then dredge them in flour, shaking off any excess. Set aside.
  3. In a large dutch oven, cook the pancetta over medium-high heat until all fat is rendered and the pancetta is really crisp. Remove the pancetta pieces from the pot and set aside (don't discard!), leaving the rendered fat in the pot.
  4. Raise the heat to high and add the olive oil to the pot with the pancetta grease. Brown the ribs on all sides (you'l know they are browned when they are easily able to be lifted from the bottom of the pot). Set ribs aside.
  5. Lower the heat to medium and add in the onions, shallots, and carrots. Cook for 2-3 minutes and then pour in the wine, being sure to scrape up the browned bits on the bottom of the pan. Bring to a boil and cook for about 2 minutes.
  6. Add the beef stock, a pinch of freshly ground pepper , and the stock to the pot. Add in the ribs (they should be mostly submerged), and the sprigs of thyme and rosemary (yes, leave them whole). Put on the lid.
  7. Cook in the oven for 2 hours, then reduce the temperature to 325 and cook for an additional 30-45 minutes. Remove pot from the oven and allow to sit for about 20 minutes with the lis still on before serving. Right before you serve, skim the fat off of the top of the liquid. Serve over Creamy Goat Cheese Polenta (recipe below) with cooking juices spooned over top.
for the polenta:
  1. Bring 4 1/2 cups of water to a boil.
  2. Add in the cornmeal in a thin stream, whisking constantly to avoid any clumps.
  3. Reduce the heat to medium-low and cook for 15 minutes, adding salt and tablespoons of water as necessary.
  4. When the polenta is done, stir in the butter and goat cheese. Serve with Braised Short Ribs (or anything else because it's so darn good!).

Monday, July 12, 2010

Coffee-Chocolate Layer Cake with Mocha-Mascarpone Frosting

IMG_3045


While I was home in Florida, my little brother, Thomas, had his thirteenth birthday. He's officially a teenager! That absolutely blows my mind; I seriously feel like it was just yesterday that I was thirteen, but that was nine years ago!
Anyways, I wanted to bake him a cake for this special day, and even though upon bringing up the idea to him I was met with "but I hate cake...", I refused to let it go, ha ha. You see, it is not very often that I have a *good* reason to bake something. Mostly, I just bake and bake and then I have no one to eat the results and they rot on the counter. So, when a *good* reason, like a birthday, comes around, you're getting a dang cake!


This cake was absolutely scrumptious, but the real star was the mocha-mascarpone frosting. Oh. My. Gosh. that stuff was freakin' delicious! I must have eaten 1/4 cup of it on its own while frosting the cake. And, though it looks nothing like the rich, dark color pictured in the original Bon Appetit recipe (as many other reviewers complained as well), the flavor was not at all lacking.
To be completely honest, the cake was nothing to jump for joy over. I mean, it was good- don't get me wrong- but not "what-is-this-glorious-creation-in-my-mouth-that-sends-my-taste-buds-into-a-production-of-Swan-Lake-on-my-tongue"-good. The frosting, on the other hand is; so my proposition for you is, either make this cake (as it is still quite delicious and moist), or make your own favorite chocolate cake recipe, but top it with this amazing frosting. Heck, you could just make the frosting and eat it straight from the bowl if you're not worried about appearing to be a complete lardy-lard to the rest of humanity- which I'm not... :D


p.s.- I totally *would* apologize for the appearance of my cake, but I think it looks pretty great considering both layers completely crumbled and I somehow managed to still stack 'em and frost 'em. They aren't kidding about that parchment paper you guys!
Also, once again I am going to have to ask you to look beyond the photo quality to the great recipe hidden by the harsh (or no) lighting and bizarre composition choices, hah.


IMG_3047
IMG_3048
IMG_3057


Coffee-Chocolate Layer Cake with Mocha-Mascarpone Frosting
recipe slightly adapted from here

ingredients:

cake:
  • 2 cups cake flour
  • 3/4 cup natural unsweetened cocoa powder (I used Hershey's Dark)
  • 1 1/2 tsp baking soda
  • 3/4 tsp salt
  • 1 1/2 sticks (3/4 cup) unsalted butter, at room temperature
  • 2 cups brown sugar, packed
  • 3 large eggs
  • 1 1/2 tsp pure vanilla extract
  • 1 cup buttermilk
  • 1 tbsp + 1 tsp instant espresso powder dissolved in 3/4 cup hot water
frosting:
  • 1/3 cup natural unsweetened cocoa powder
  • 1 tbsp instant espresso powder
  • 1 1/2 cups heavy whipping cream, divided
  • 1 1/3 cups granulated sugar
  • 2 8-ounce containers mascarpone cheese, chilled
  • chocolate curls for decoration (I just took a vegetable peeler to a white chocolate bar and a dark chocolate bar)
for cake:
  1. Preheat oven to 325 degrees. Butter and flour two 9-ince cake pans. Line the bottoms with parchment paper. Set aside.
  2. In a medium-sized bowl, combine the flour, cocoa powder, baking soda, and salt. Set aside.
  3. In the bowl of an electric mixer fitted with the paddle attachment, beat together the butter and brown sugar for about 4-5 minutes until creamy. Add in the eggs one at a time, beating well after each addition. Mix in the vanilla. Alternately add in the flour mixture and buttermilk, beginning and ending with the flour. Slowly add in the hot water/espresso and beat until just smooth.
  4. Divide the batter between the two prepared pans and smooth the tops. Bake cakes for 30-40 minutes, or until a toothpick inserted into the center comes out clean. Cool cakes in pans for 15 minutes before removing them from the pans to cool completely. *You can bake the cakes a day ahead; just store in plastic wrap at room temperature.
for frosting:
  1. In a large bowl, combine the cocoa powder and espresso powder. Set aside.
  2. Bring 1 cup of the cream to a boil in a small saucepan. Slowly pour the hot cream over the cocoa mixture and whisk to combine. Add in the remaining cream and the sugar and stir until sugar dissolves. Cover and chill for at least 2 hours.
  3. In the bowl of an electric mixer fitted with the whisk attachment, combine the chilled cocoa mixture and the mascarpone cheese. Beat on low speed until combined and smooth. Increase the mixer speed to medium-high and beat for about 2 minutes or until medium-firm peaks form when the whisk is lifted (don't overbeat or it will curdle).
  4. Place the first cake layer onto your cake platter or serving tray. Top it with about 1 3/4 cups of the frosting. Spread the frosting to the edges. Top with the second cake layer. Spread a thin layer of frosting over the entire cake (the crumb-coating), and refrigerate for about 10 minutes. Spread the remaining frosting over the cake and top with chocolate curls.
IMG_3054

Sunday, July 11, 2010

Grilled Peaches with Prosciutto and Goat Cheese

IMG_2999


I apologize for the lack of posts recently, but I went to Florida for a few weeks to visit my family and friends :). Even though I didn't blog while I was away, I still was busy in the kitchen! I have a few great recipes (including this one) to share with you from my time spent at home. The one drawback to them though is that I didn't have my wonderful boyfriend with me with his super nice camera and thus, all of the food I made there was shot with my silly Canon point-and-shoot. I urge you to look past the mediocre pictures and still try the recipes as I feel they are some of the best I have ever made!


Grilling fruit is an amazing way to bring out its natural sweetness, and also a fun and new (to me at least!) way of utilizing your grill. Peaches are a juicy and delicious summer fruit and while they are quite tasty in crisps, pies, and other desserts, I absolutely love the idea of fruit in more savory applications.
These luscious bites are a perfect combination of sweet, salty, and tangy, and the basil picked from my mom's herb garden really throws them over-the-top. Add in the fact that these could not be easier to make (honestly, what will follow is not much of a "recipe" as much as it is a suggestion), you have a fresh and vibrant appetizer hat is great for grill-outs and summer gatherings!


IMG_3010
IMG_2998
IMG_2997


Grilled Peaches with Prosciutto and Goat Cheese
the amounts of the ingredients are totally up to you

ingredients:
  • ripe, but still fairly firm, peaches, pitted and quartered
  • prosciutto di parma, thinly sliced (you basically want 1/2-1/3 a slice for each peach quarter)
  • fresh basil
  • goat cheese (spreadable, NOT crumbles)
  • extra virgin olive oil
  • sea salt and freshly ground pepper
  • baguette, sliced
  1. Drizzle the baguette slices with a bit of extra virgin olive oil and sprinkle on some salt and pepper. Place them under the broiler until toasted (or you can grill them if you have enough room on your grill unlike me :P).
  2. Toss the peach quarters in some olive oil and pepper. Grill the peaches on each side for a few minutes until dark grill marks appear and the fruit easily lift from the grill.
  3. To serve, arrange the peaches around the goat cheese on a platter (the brand I used was Chavrie; it came in a nifty cube-like container and was easy to remove). Drape each peach with 1/2 slice of prosciutto and top with a basil leaf. Serve with the toasted baguette. To actually eat it, you should spread some goat cheese on a piece of toast and top it with the peach/prosciutto/basil. It's a big bite, but SO amazing!
IMG_3000
IMG_3007
IMG_2995
Related Posts with Thumbnails